Tips & Tricks
Common problems and practical advice for working with TPlus Class.
13.1 Replace TPlus's New EXE
The EXE is the file you double-click to open TPlus Class. It is the program itself. When an update is released, such as a bug fix or a new feature, you receive a new EXE to put in place of the old one. Your timetables and data are kept in separate files, so replacing the EXE does not touch them.
The EXE sits inside the Timetable Plus Class folder, the folder where the software is installed.
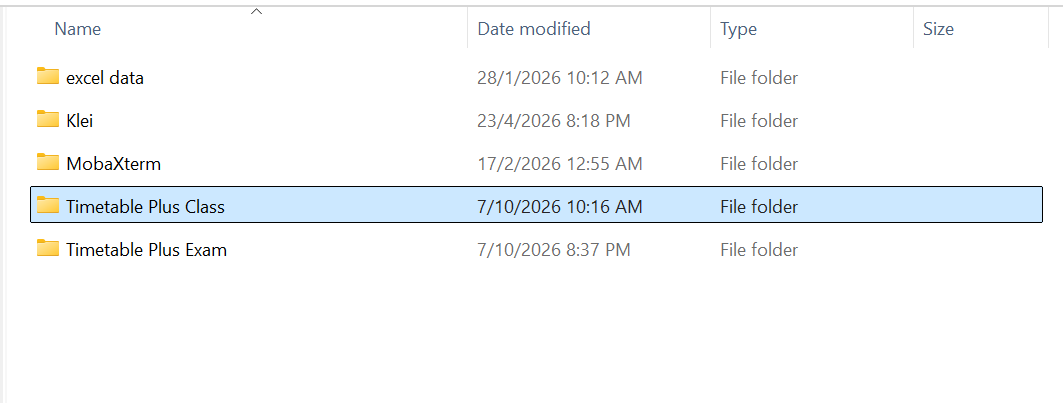
Open the folder to find the EXE to be replaced, shown below. It is the same file you open in 2.2 Launching the Application.
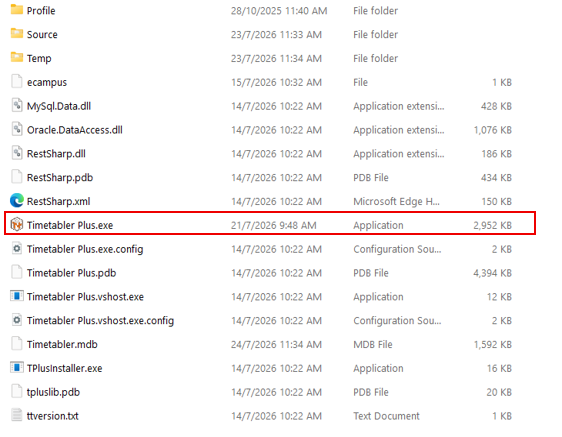
When you are told to replace it:
- Close TPlus Class if it is open.
- Find the EXE and click it once to select it.
- Delete the current EXE.
- Paste the new EXE you received into the same folder.
- Double-click the new EXE to open TPlus Class as usual.
13.2 Data Import Issue
Most import problems come from the data itself rather than from the system. The cases below are the ones that come up most often, with what causes them and how to clear them.
13.2.1 Room Not Showing in the Room List
After importing rooms or adding a new room in Room Management, you may find that a room does not appear in the room list used for scheduling. The room is still stored in the database but is hidden from the list.
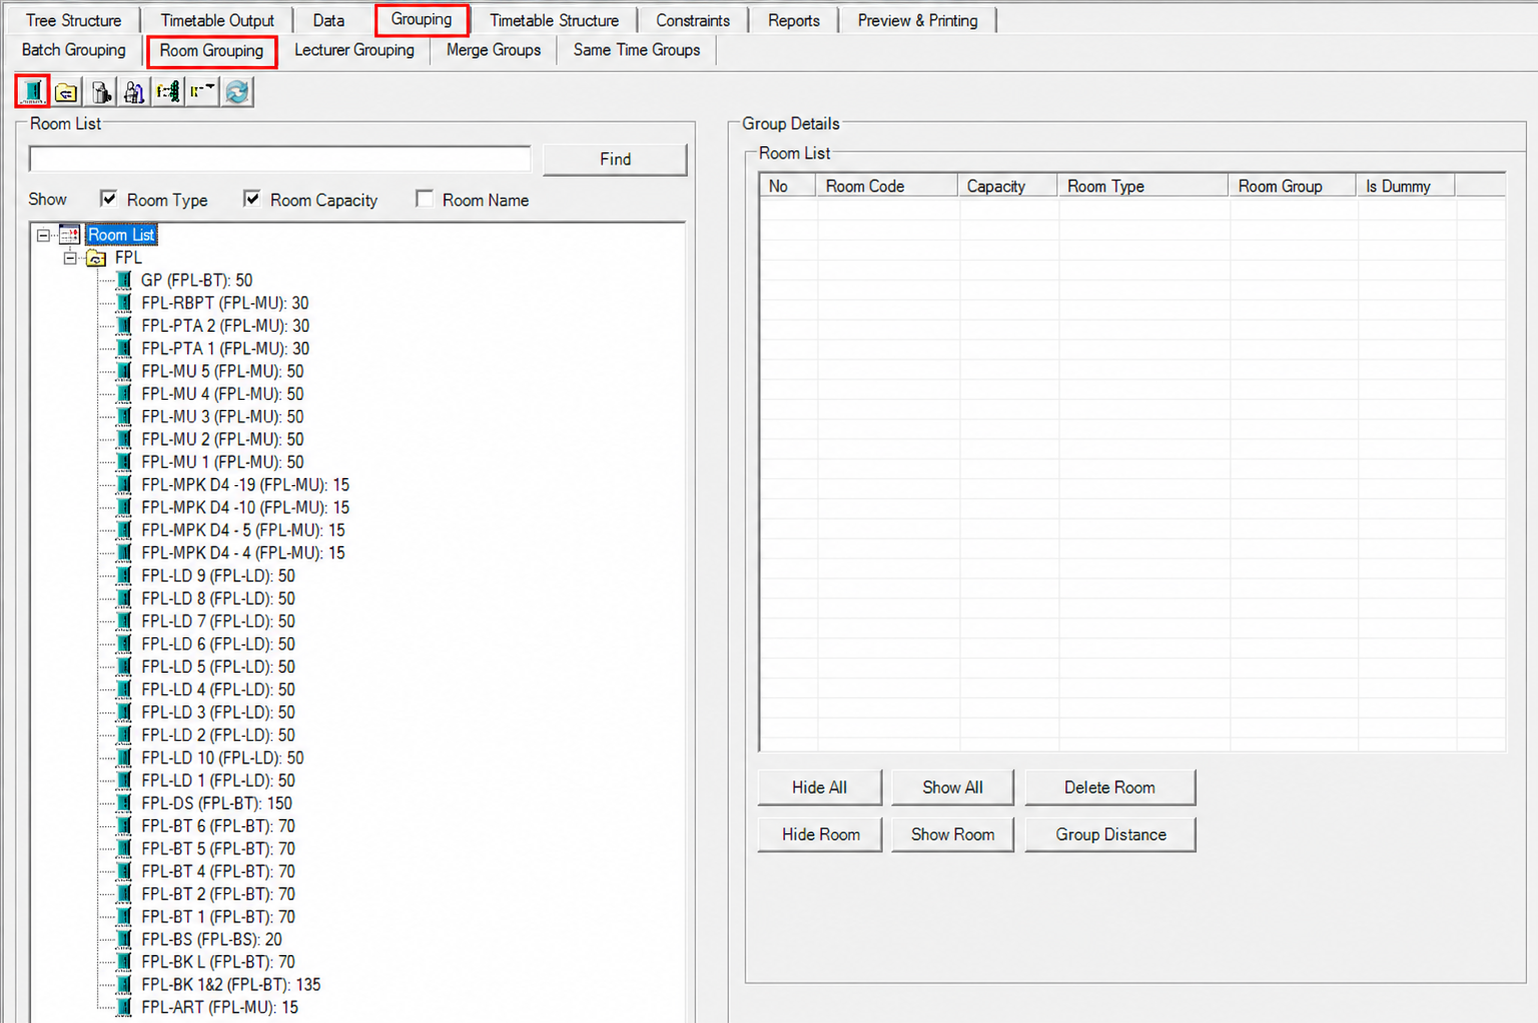
If the room is missing from the tree altogether, it has not been brought into this list yet. Click the first button on the toolbar, marked in the figure below, to open Room Management.
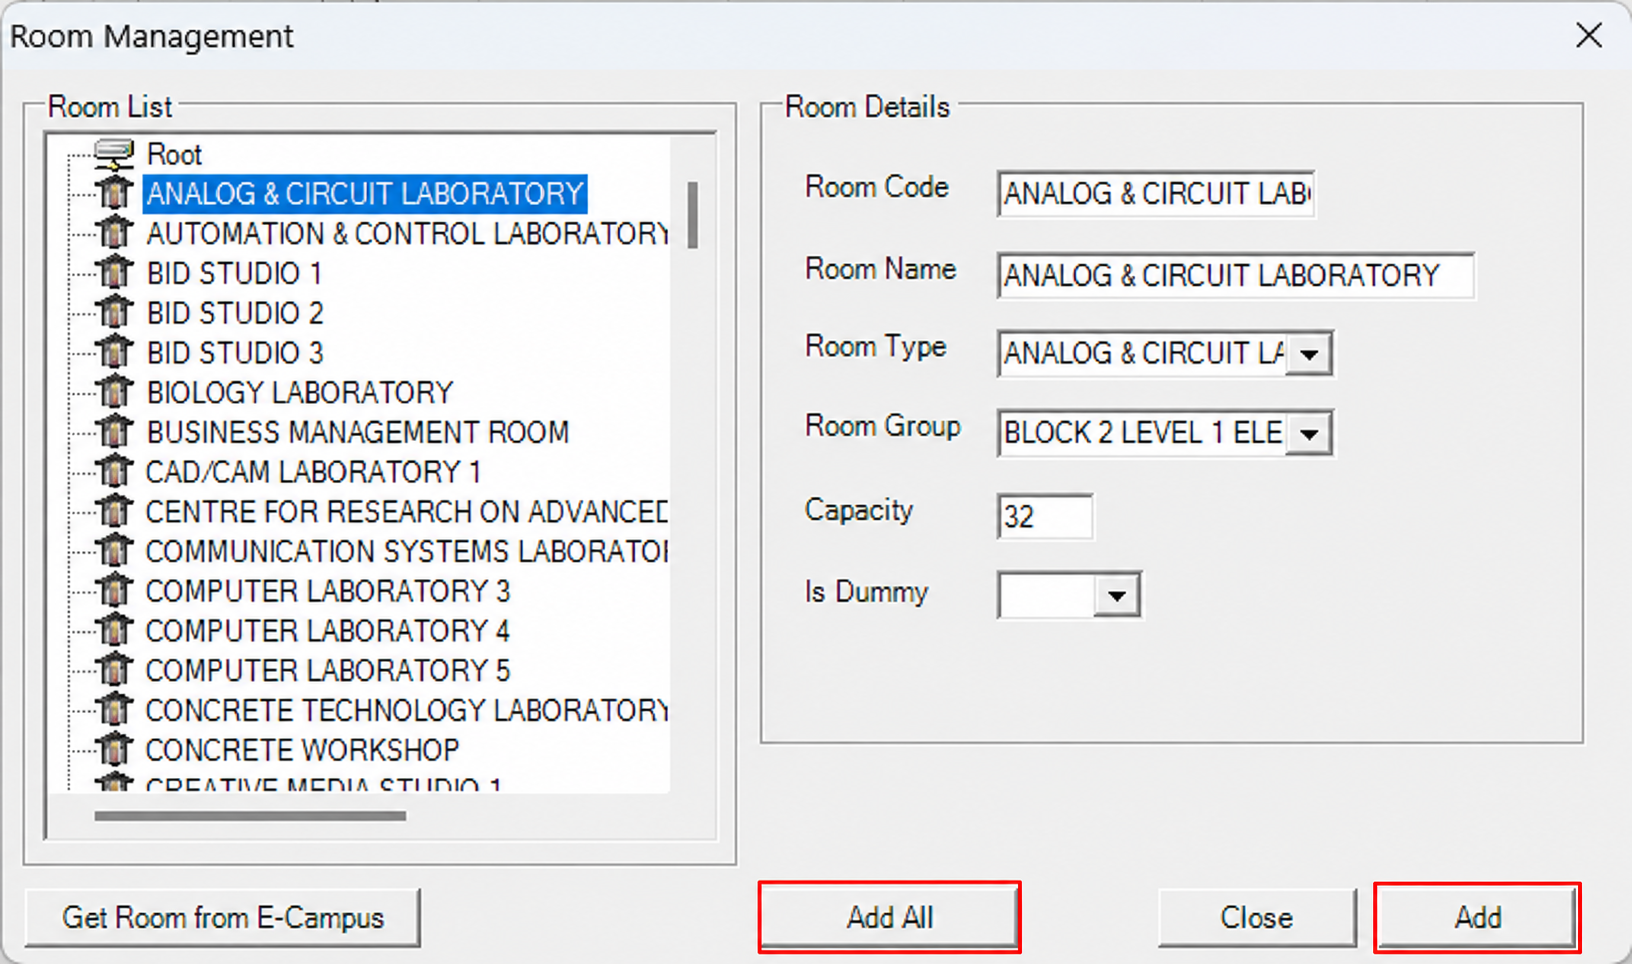
The Room Management window lists every room held in the database.
Select the room that was missing and click Add to put it into the room list, or click Add All to bring every room across at once. Get Room from E-Campus pulls the rooms from TPlus E-Campus if they are not in the database yet. Click Close when you are done, and the room now appears in the Room List and can be scheduled.
13.2.2 Specific CSV Format
The import only accepts a CSV file in the layout the system expects. Each type of record - rooms, courses, lecturers, batches, enrollment - has its own set of columns, so a file prepared for one cannot be used for another.
Prepare the file in a spreadsheet and save it as CSV (comma delimited). A workbook saved as .xlsx and simply renamed to .csv is still an Excel file and will not import. Keep one header row at the top and one record per row, with no blank rows, merged cells or extra sheets.
13.2.3 Wrong Columns
The importer reads the columns by position and name, so the file must carry the expected columns in the expected order. Adding, removing, renaming or reordering a column shifts every value after it, and the data lands in the wrong field - room names arriving as room types, for example - or the import stops with an error.
Compare the file against the required column list before importing, and if a column does not apply, leave it in place and empty rather than deleting it.
13.2.4 Illegal Characters
Two characters cause trouble inside a value: the comma (,) and the apostrophe ('). A comma is read as the end of the column, so everything after it is pushed into the next field, and an apostrophe can cut the value short or reject the record.
Remove them from the data before importing. Write ROOM A, BLOCK 2 as ROOM A - BLOCK 2, and INT'L BUSINESS as INTL BUSINESS.
13.2.5 Inconsistent Data Format
The system matches records on their exact text, so the same room written three ways becomes three different rooms: Lab 1, LAB 1 and lab1 are not treated as the same entry.
Keep one format across the whole file. Use UPPER CASE throughout, keep spacing and abbreviations consistent, and remove any stray spaces at the start or end of a value.
13.2.6 Incomplete or Inaccurate Data
A record that imports is not necessarily a record that works. If a required field is left out, the entry is created but cannot be used properly later on.
A room is the clearest example: if the file supplies the Room Name and the Room Group (building) but leaves the Room Type empty, the room imports and then never gets picked up during generation, because courses are matched to rooms by room type. Check that every record carries its full set of fields, and that the values point at entries that actually exist - a room group or department that has not been created yet will not link up.
13.3 General Tips
The chapters of this manual follow the order the work is actually done in, and each stage depends on the one before it. The advice below draws the most useful habits out of those chapters into one place.
13.3.1 Before You Generate
- Get the database right first. Rooms, courses and lecturers are the foundation of everything else, so prepare and verify them in Chapter 5 before moving on. A record that is missing a field imports quietly and then causes trouble much later, during generation.
- Keep the naming convention. Lecturer names must be unique, and the default format is (Department)-(First Name) - a lecturer named Muhammad Ali from the IT department becomes IT-ALI. Consistent naming makes every later list easier to read and prevents duplicate records.
- Set the global constraints before the individual ones. Global Default Values apply to everything at once, so start there and only add lecturer or room constraints for the cases that genuinely differ. Every extra constraint narrows what the generator can do.
- Run the pre-generate checks. The lists in Chapter 9 - Courses, Lecturers, Batches, Merges and Same-Time - are there to catch bad data while it is still cheap to fix. Clearing them first saves a failed generation later.
13.3.2 Working Without Losing Your Result
- Save often. Ctrl+S saves the current timetable file. Use Save As before trying a different approach so the working version stays untouched.
- Mark a checkpoint before a big change. Edit → Checkpoint → Mark Checkpoint (Ctrl+P) records the current state, and View Checkpoint Window brings it back. See 3.1.2 Edit Menu.
- Undo Generate is one level deep. It returns the timetable to the previous generated result, so it is a safety net for the last run, not a full history. Checkpoints are what protect the work before that.
- Lock what is already good. Once part of the timetable is right, lock those courses in 10.2.2 Lock / Unlock before generating again. Locked classes are left where they are, so a second run improves the rest without undoing the work you were happy with.
- Lock the time structure once it is settled. 6.1.7 Lock Time Structure stops the slots and days being changed by accident after classes have been placed against them.
13.3.3 Saving Repeat Work
- Use the excluded slot templates. Rather than blocking the same hours by hand every semester, build them once in 6.4 Excluded Slots Template and reuse them.
- Group instead of repeating. Room groups, batch groups and merge groups let one setting cover many records. Classes in the same merge group also run at the same time and are counted once, so lecturer workloads stay accurate.
- Organise projects in folders. Keeping each semester or campus in its own folder makes the timetable files easy to find later - see 3.7.1 Organising Projects Using Folders.
- Keep the database and the file in step. The database and the timetable file hold separate copies of the data. After changing one, use 5.2.8 Synchronization of Database so the two agree.
13.3.4 After Generating
- A full timetable is not a correct one. Work through the reports in Chapter 11 in order. They check the result from a different angle each time: lecturer workload, student clashes, subgroup sizes against room capacity, batch clashes and broken constraints.
- Fix, then re-check. Anything a report flags is corrected in 10.2 Manually Assign and then checked again - a correction in one place can create a clash somewhere else.
- Read the statistics before publishing. Room Statistics shows how heavily each room is used and Course Statistics shows how evenly the week is loaded. Both are quick ways to spot a result that is technically valid but unbalanced.
- Export to the right semester. When pushing the timetable to TPlus E-Campus, the semester chosen in the export window is the one the schedule is stored under - choose any other and the timetable will not appear. See 12.7 Export to E-Campus.