Import Database & Database Management
This chapter guides you through setting up the room, course, lecturer, and batch data in TPlus Class before proceeding to the next stage of timetable configuration.
5.1 Database Overview
This chapter explains how to configure the foundational data required in TPlus Class. You will import essential information such as Room Management, Course Management and Lecturer Management through the Database menu. These records must be prepared and verified before proceeding with data processing and timetable generation in the subsequent chapters. You can proceed with the following steps:
- Course Management: Store and manage the course information used throughout the timetable
- Room Management: Store and manage the rooms available for scheduling
- Lecture Management: Store and manage the lecturers and the courses they teach
- Add Database Manually: Add, edit or delete batches, rooms, lecturers, courses and departments by hand
- Import Database From E-Campus: Pull the records across from TPlus E-Campus instead of entering them
- Student Enrollment: Import the enrollment records and generate the courses from them
- Review and Edit Imported Data: Check the imported records and correct anything that is wrong
- Synchronization of Database: Keep the database and the timetable file in step with each other
5.2 Database
To get started, set up the Room Management, Course Management, and Lecturer Management data from the Database menu. These records are essential for the system and must be in place before you can import and process timetable data.
5.2.1 Course Management
The Course Management module is used to store and manage course information, allowing courses to be maintained and reused throughout the timetable scheduling process.
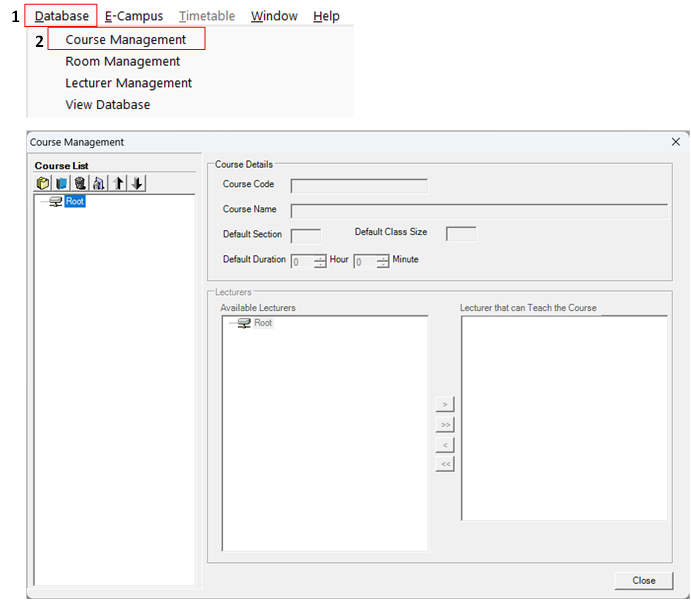
Step 1: Open the Database menu from the top menu bar. Then from the drop-down menu, select Course Management to open the Course Management module.
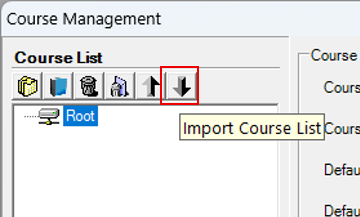
Step 2: Click the Import Course List icon.
Step 3: A file browser will open. Find your course file (.csv or excel.csv), select it, and click Open.


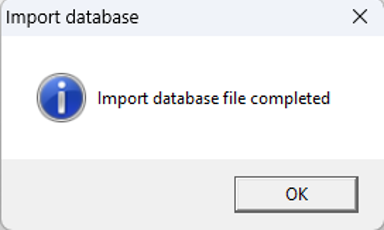
Step 4: After the data has been imported successfully, a confirmation message will be pop-up. Click OK to continue.
Step 5: Review the Course List to ensure that all courses have been imported successfully. Verify that the course details are accurate and complete before proceeding to the next step.
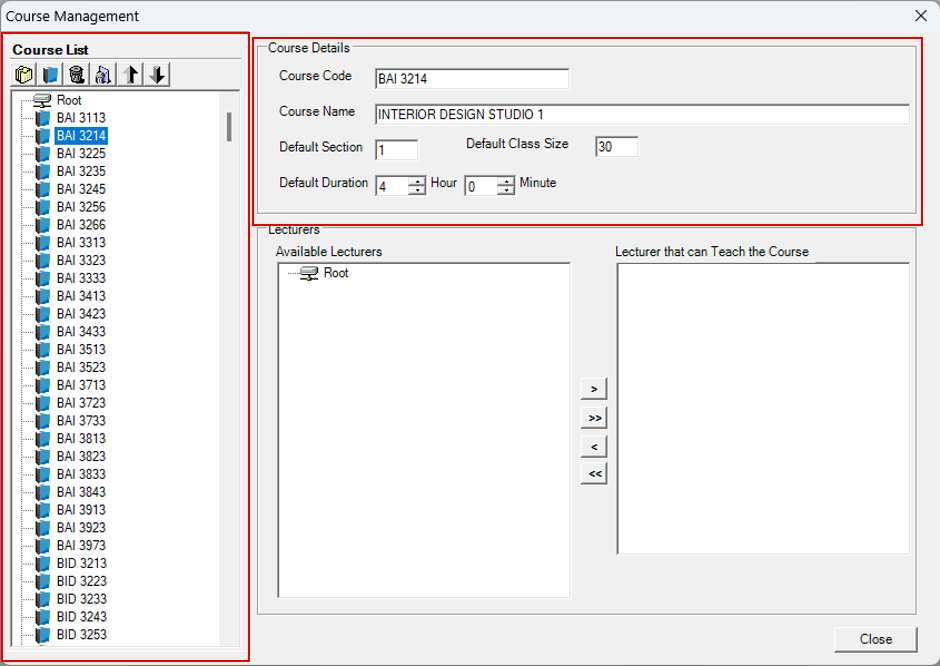
Once all course data has been verified, the Course Management setup is complete. You may now proceed to the next configuration step.
5.2.2 Room Management
Rooms are the venues where exams will be held. Each room must have the correct seating capacity; the system uses this to decide how many students fit in each room when generating the timetable.
Step 1: Open the Database menu from the top menu bar. Then from the drop-down menu, select Room Management to open the Room Management module.
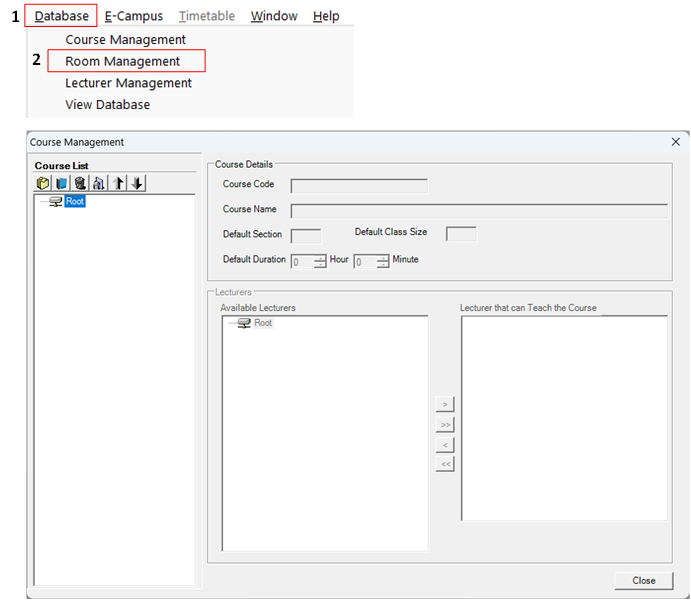
Step 2: Click the Import Room List icon.
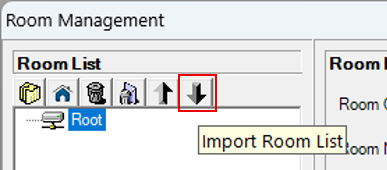
Step 3: A file browser will open. Find your room file (.csv or excel.csv), select it, and click Open.


Step 4: A confirmation message will appear once the import is done. Click OK to continue.
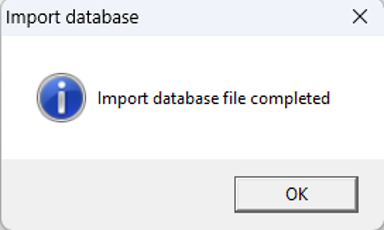
Step 5: Review the imported data to confirm that all details has been imported correctly before proceeding to the next step.
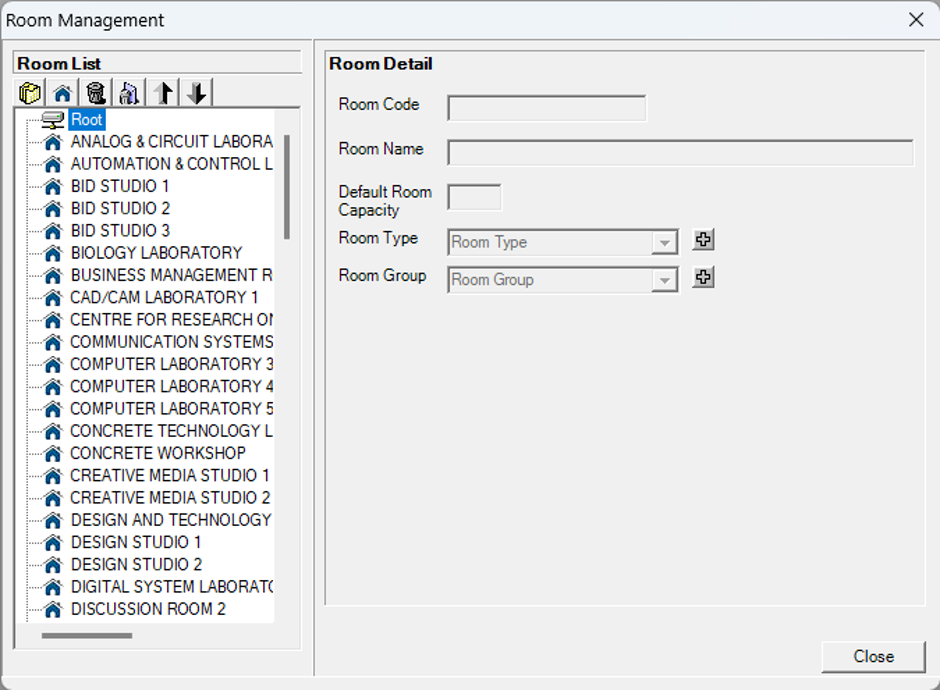
Once all room data has been verified, the Room Management setup is complete and the system is ready for the next configuration step.
5.2.3 Lecture Management
The Lecturer Management module is used to manage and maintain lecturer information required for timetable scheduling.
Step 1: Open the Database menu from the top menu bar. Then from the drop-down menu, select Lecturer Management to open the Lecturer Management module.
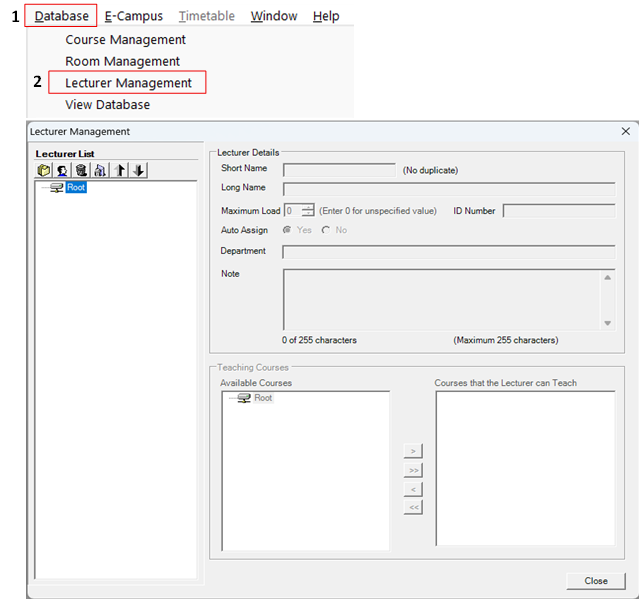
Step 2: Click the Import Room List icon.
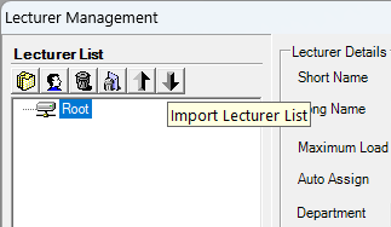
Step 3: A file browser will open. Find your lecturer file (.csv or excel.csv), select it, and click Open.


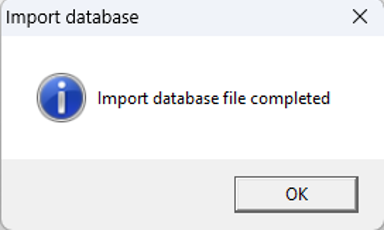
Step 4: A confirmation message will appear once the import is done. Click OK to continue.
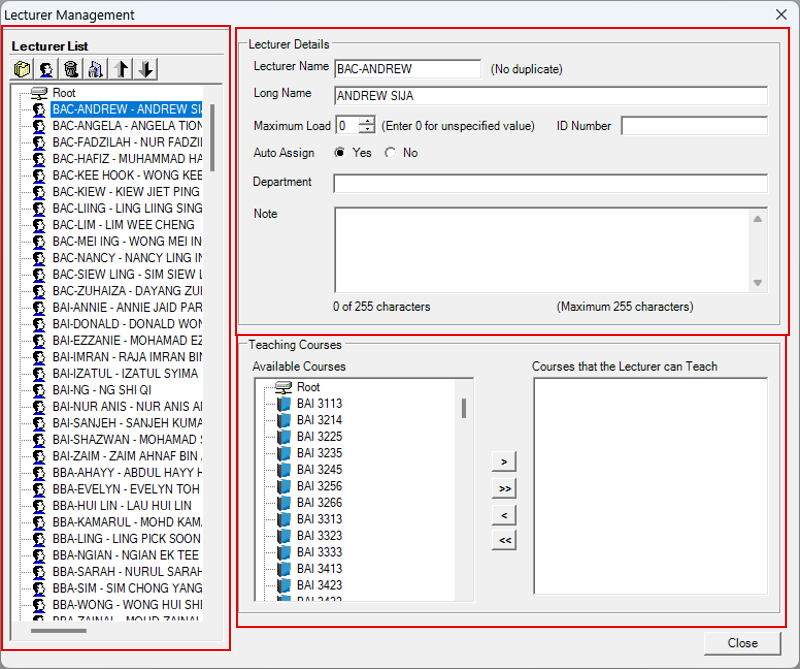
Step 5: The Lecturer Management module is divided into three sections: Lecturer List, Lecturer Details, and Teaching Courses. Each section is used to manage different aspects of lecturer information and course assignments.
-
Lecturer List
The Lecturer List displays all lecturers available in the system. Review the list to ensure that all lecturers have been imported successfully before proceeding.
-
Lecturer Details
The Lecturer Details section displays the selected lecturer's information, including the Lecturer Name, Long Name, ID Number, and Department. The Lecturer Name is a unique identifier and must not be duplicated. By default, the naming format follows (Department)-(First Name). For example, a lecturer named Muhammad Ali from the IT department will have the Lecturer Name IT-ALI.
-
Teaching Courses
The Teaching Courses section is used to assign the courses or batches that the selected lecturer is responsible for teaching. Select the required courses from the available list and assign them to the lecturer as needed.
With all lecturer data successfully imported and verified, the Lecturer Management setup is complete. The system is now ready for the next stage of timetable configuration.
5.2.4 Add Database Manually
Use this section to manually maintain the system database. You can add, edit, or delete records such as Batches, Rooms, Lecturers, Courses, and Departments to ensure the database remains accurate and up to date.
5.2.4.1 Batch
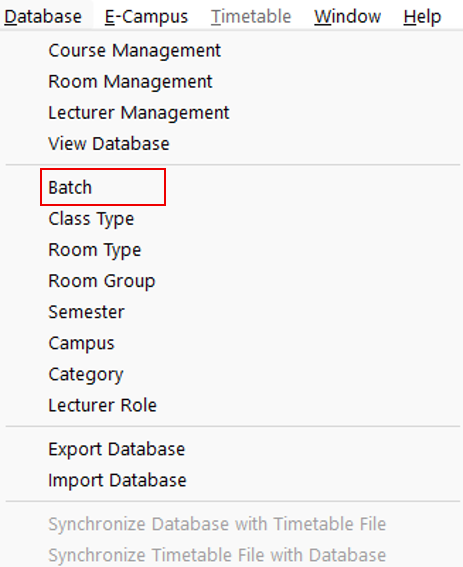
Open the Database menu from the top menu bar. From the drop-down menu, select Batch to open the Batch Management module.
The Batch Management window will appear. This window is divided into two sections:
- Batch List:
Displays all batches that have been created and stored in the system. You can select a batch from the list to view or modify its information.
- Batch Details:
Displays the details of the selected batch, including the Full Batch Name, Batch ID, and Default Batch Size. You can use this section to add new batches or update existing batch information.
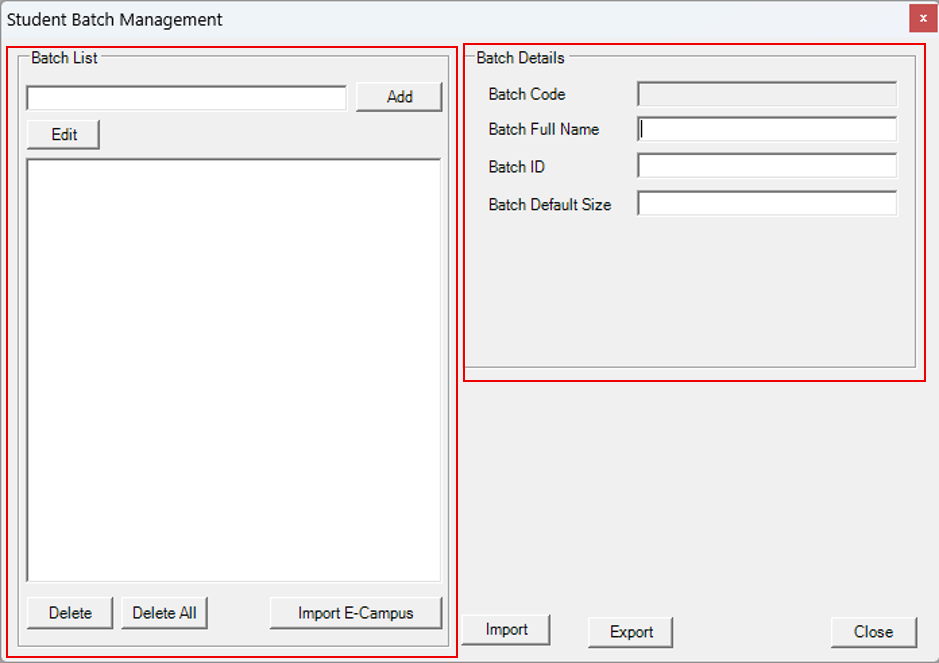
Figure 5.2.4.1.2:Batch Management Module - Batch List:
-
Enter the Batch Code (1) in the text field, then click Add (2) to create a new batch. Batch Full Name, Batch ID, and Batch Default Size details can be updated at any time by selecting the corresponding batch from the Batch List. All changes are saved automatically, so you can simply click Close (3) to exit the window once you have finished.
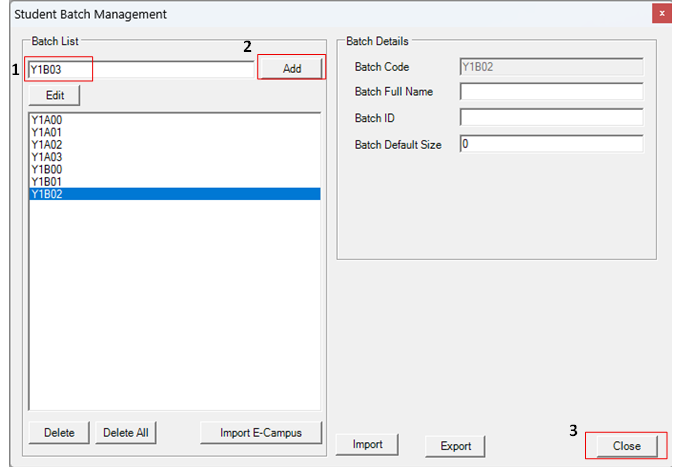
Figure 5.2.4.1.3:Adding Batch Management
5.2.4.2 Room Type
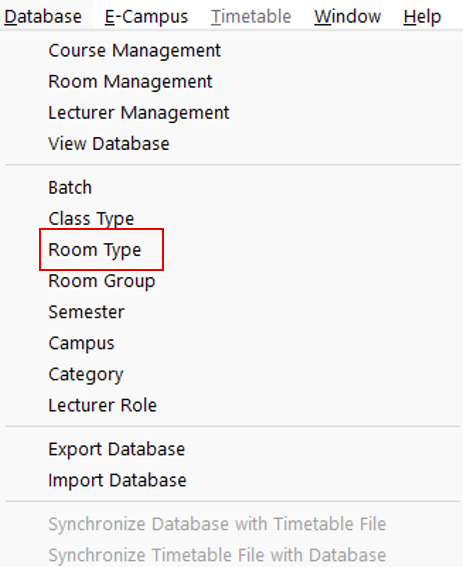
Open the Database menu from the top menu bar. From the drop-down menu, select Room Type to open the Room Type module.
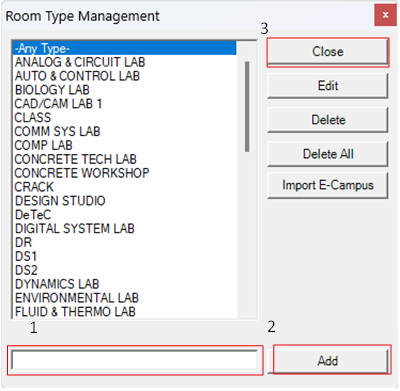
As shown below, you can either add a new Room Type manually or import room directly from E-Campus. This window supports automatic saving, so any changes are saved immediately. Once you have finished adding or updating room information, simply click Close to exit the window.
5.2.4.3 Room Group
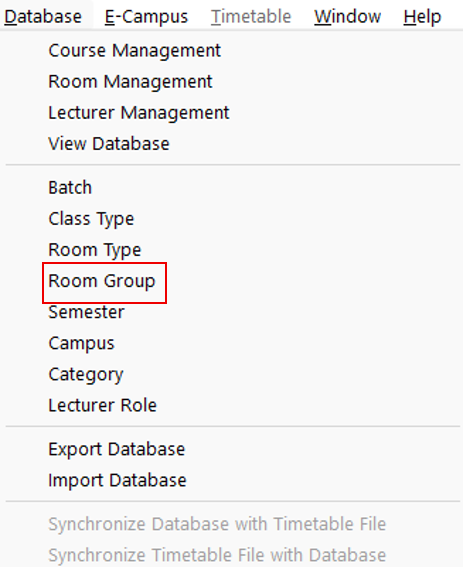
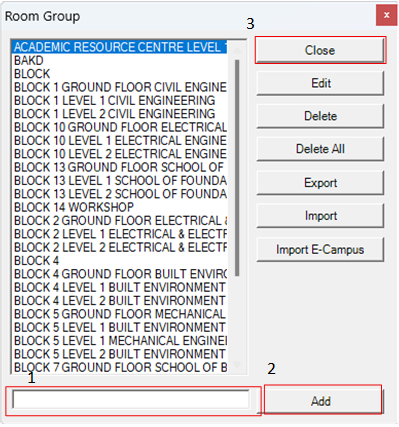
To add or edit a Room Group, open the Database menu from the top menu bar and select Room Group from the drop-down menu. This will open the Room Group Management window, where you can create new room groups or update existing ones.
As shown below, you can either add a new Room Group manually or import room directly from E-Campus. This window supports automatic saving, so any changes are saved immediately. Once you have finished adding or updating room information, simply click Close to exit the window.
5.2.4.4 Lecturer
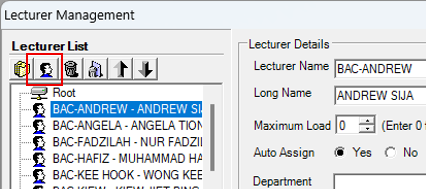
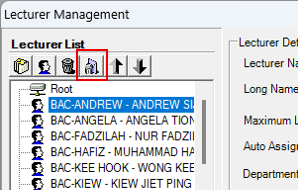
As shown in the Figure 5.2.4.8 below, click the Add icon to add a new lecturer.
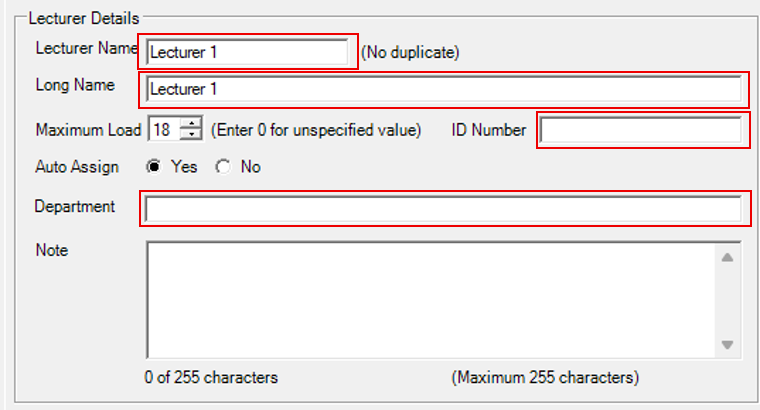
Enter the required lecturer information, including the Lecturer Name, Long Name, ID Number and the assigned Department. All changes are saved automatically. Simply click Close when you have finished.
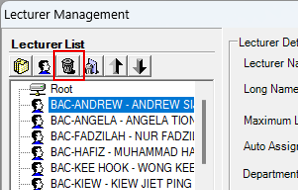
Click lecturer name that you wanted to delete. Then click the Delete (dustbin) icon to remove the selected lecturer from the system.
Use Delete All icon to delete all lecturers displayed in the Lecturer List.
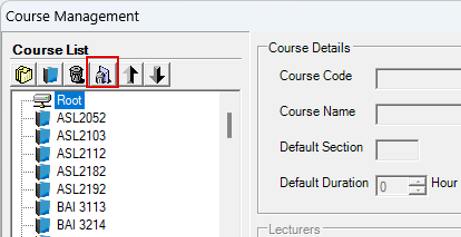
5.2.4.5 Course
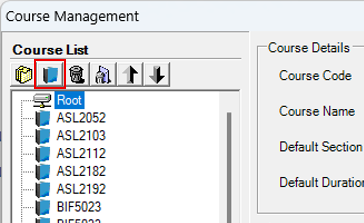
Click the Add icon to add a new course. Enter the required course information in the Course Details section.
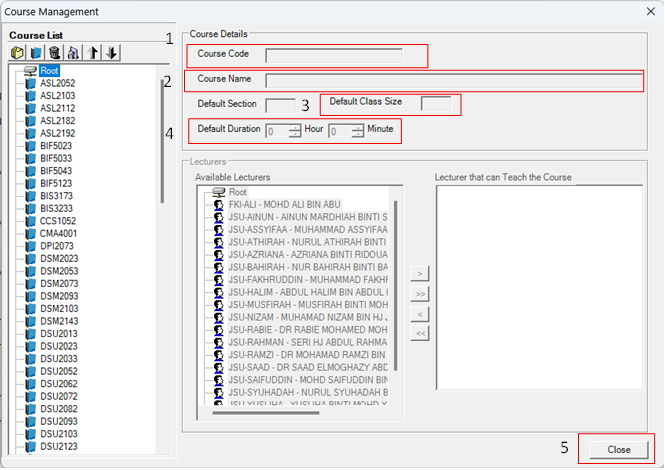
Enter the required information such as Course Code, Course Name, Default Section, Default Class Size, and Default Duration. The information entered is saved automatically. Once all required details have been completed, simply click Close to exit the Course Management window.
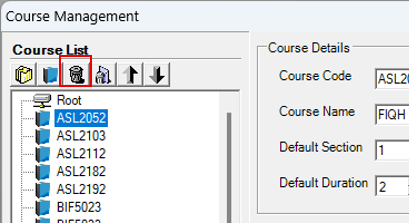
Click course name that you wanted to delete. Then click the Delete (dustbin) icon to remove the selected course from the system.
Use Delete All icon to delete all course displayed in the Course List.
5.2.4.6 Department
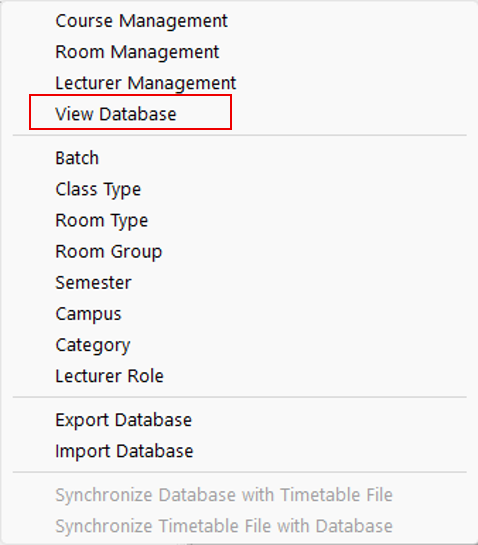
To view Department list, open the Database from the top menu bar and select View Database from the drop-down menu.
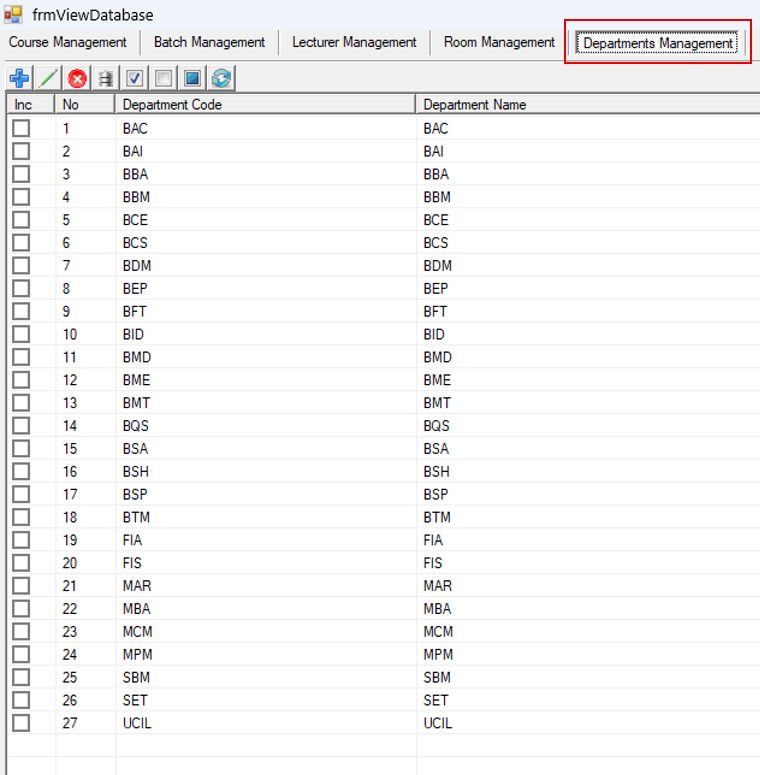
The View Database window will appear, displaying management tabs for courses, batches, lecturers, rooms, and departments. Select Department Management from the menu bar to view and manage the department records.
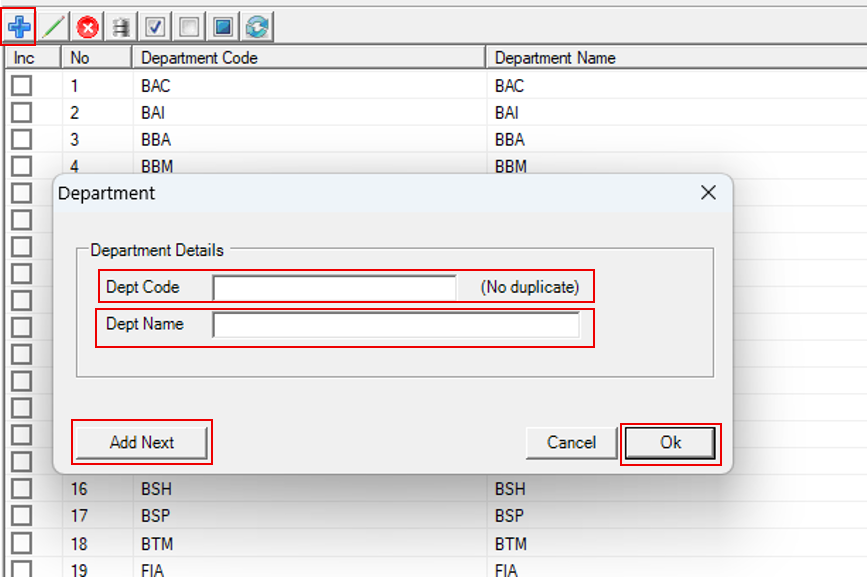
To add a department, click the plus (+) button on the top toolbar, then fill in the required Department Code and Department Name fields. Click Add Next to save the current entry and continue adding another department, or click OK when you have finished.
To edit or delete an existing department, see Section 5.2.7.7 Departments Management.
5.2.5 Import Database From E-Campus
-
Before importing, make sure the database connection has been configured as described in Chapter 4.2 Settings and Setup (Import Database). After completing the E-Campus configuration, go to E-Campus on the main menu bar and select Import Database from the drop-down menu.
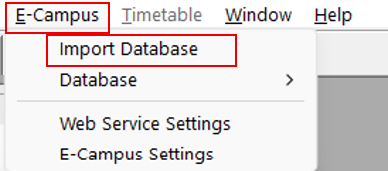
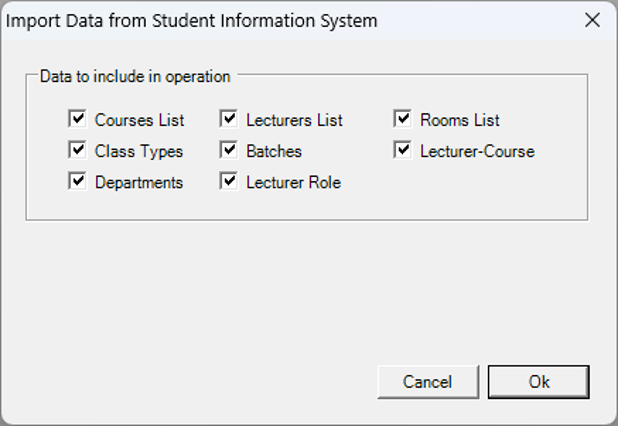
Figure 5.2.5.1: E-Campus: Import Database The Import Data from Student Information System window will appear. Select all the available options to import the entire database, or tick only the specific data required. Then, click OK to begin the import process.
After clicking OK, a progress bar will appear with the Processing... status, indicating that the selected data is being imported. Wait until the process is complete, or click Cancel to stop the import.
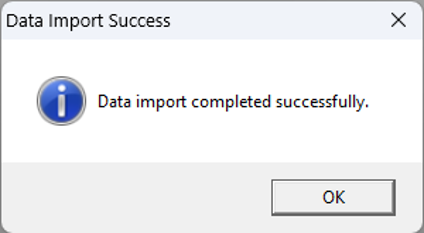
Once the import process is complete, a Data Import Success message will appear, confirming that the data has been imported successfully. Click OK to close the message.

5.2.6 Student Enrollment
Student enrollment records which students are taking which courses. The records can be brought in from TPlus E-Campus or from a CSV file, and the courses are then generated from those records.
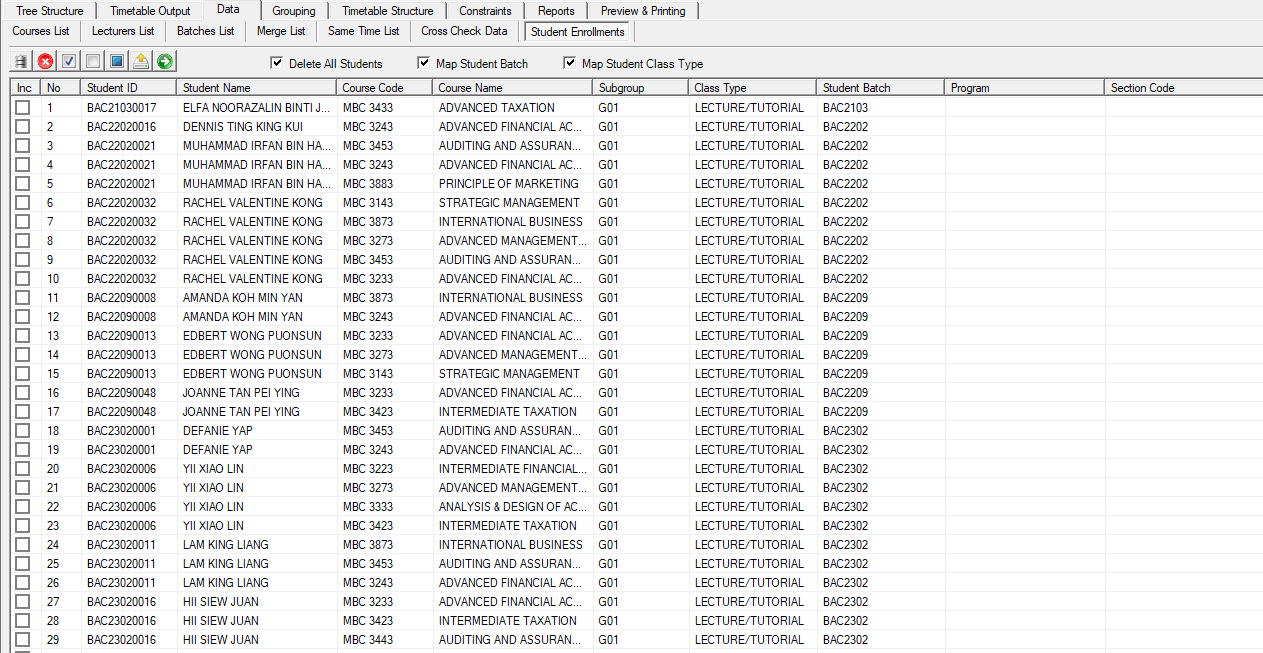
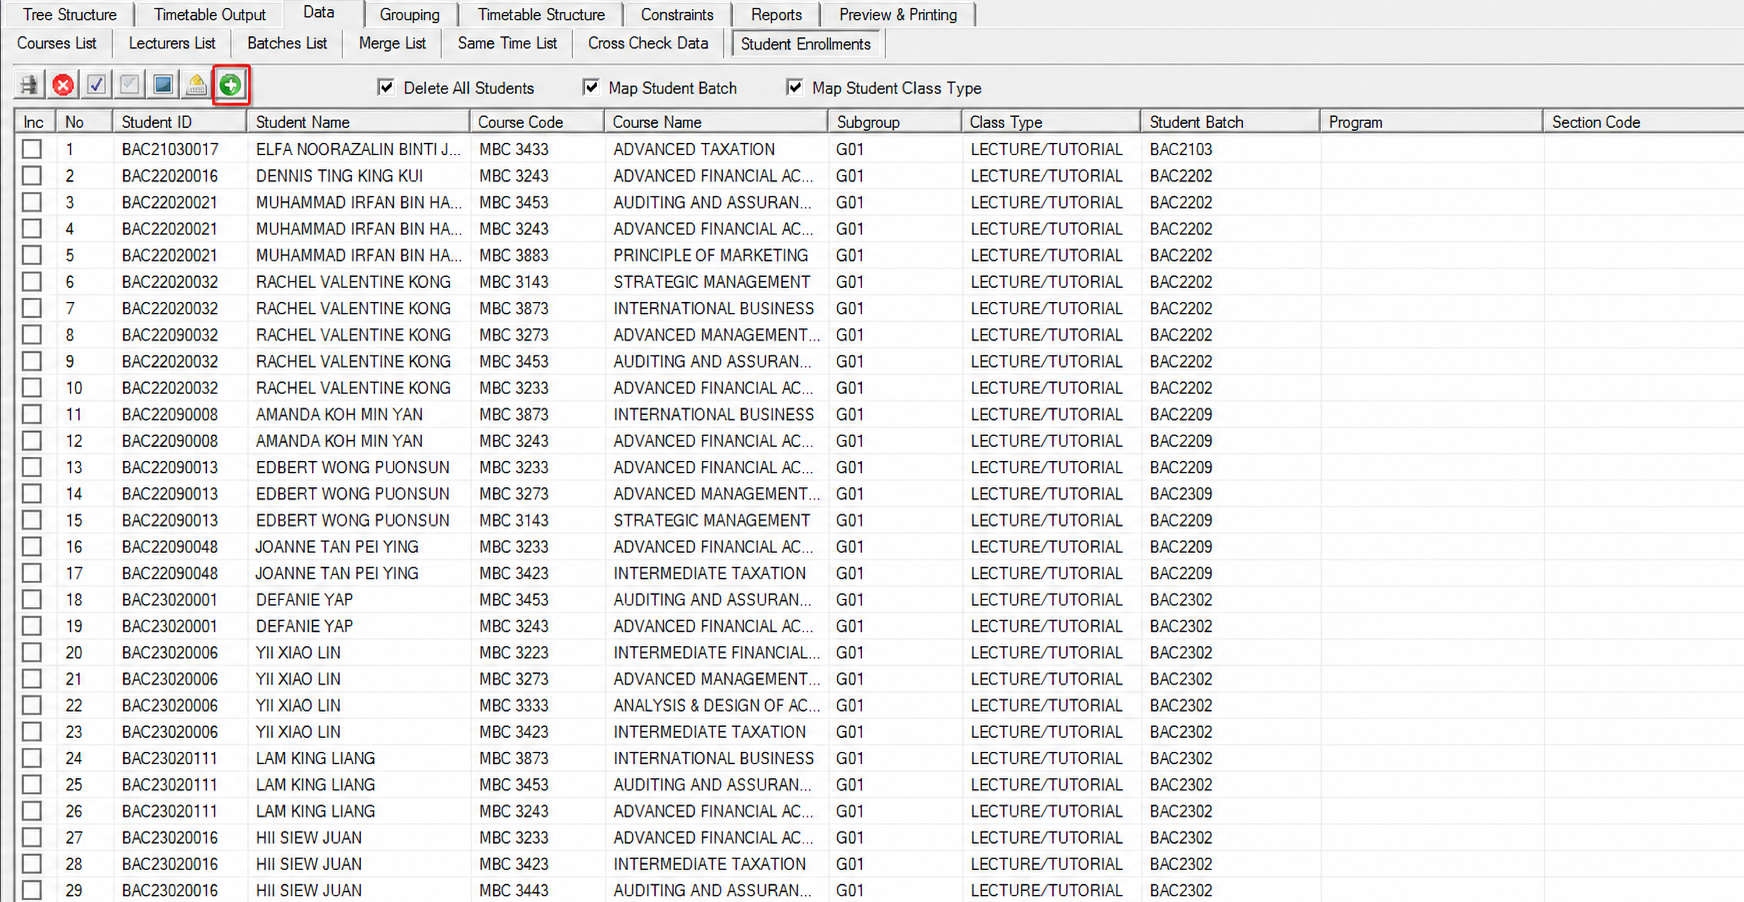
Go to the Data tab on the main module tabs, then open the Student Enrollments sub-tab.
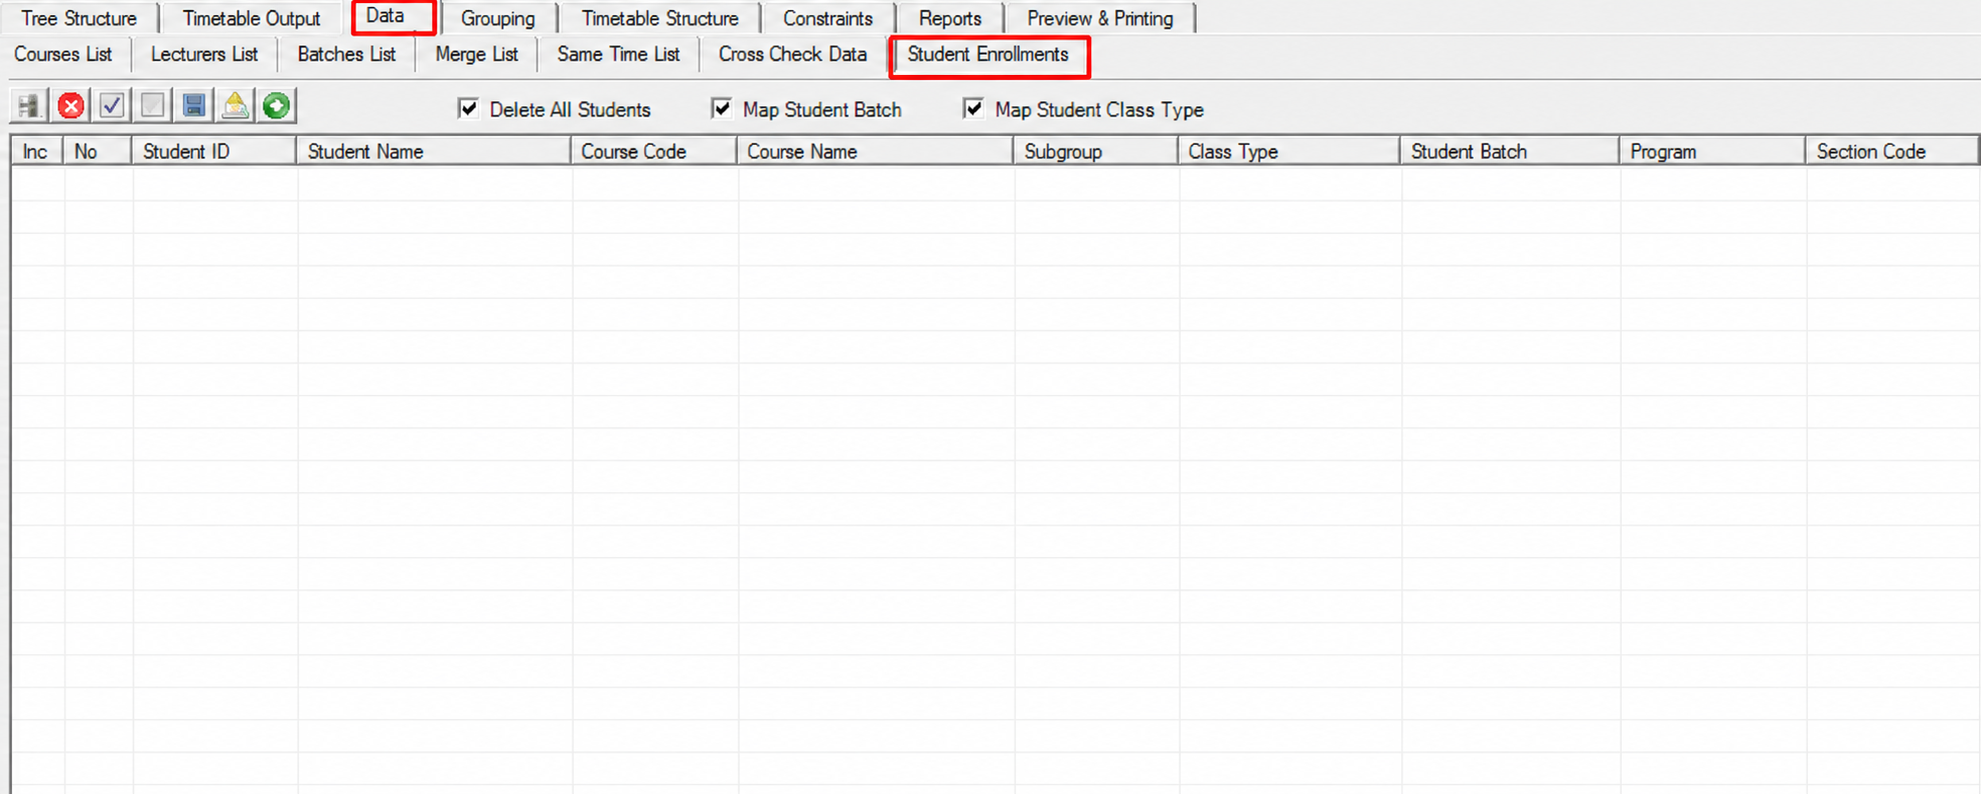
The list shows one row for every student-and-course record. Each row carries the Inc tick box used to select the row, followed by No, Student ID, Student Name, Course Code, Course Name, Subgroup, Class Type, Student Batch, Program and Section Code. The list is empty until enrollment records have been imported.
Three options sit at the top of the panel and control what happens when the records are brought in:
| Option | Description |
|---|---|
| Delete All Students | Clears the existing student records before the new ones are brought in. |
| Map Student Batch | Matches each student to their batch using the Student Batch value in the record. |
| Map Student Class Type | Matches each student to the class type using the Class Type value in the record. |
Table 5.2.6.1: Student Enrollments Options
The toolbar above the list holds seven buttons:
Opens the Import Raw Data window to bring student enrollment in from E-Campus or a CSV file.
Removes the rows that are ticked in the Inc column from the list.
Ticks the Inc checkbox on every row in the list.

Clears the Inc checkbox on every row in the list.

Reverses the current selection. Ticked rows become unticked and unticked rows become ticked.
Exports the enrollment list to a file.
Generates the courses from the enrollment records. See Section 5.2.6.2 Generate Course.
5.2.6.1 Import from E-Campus or Import CSV File
Click the Import Data icon on the toolbar. The Import Raw Data window will appear.
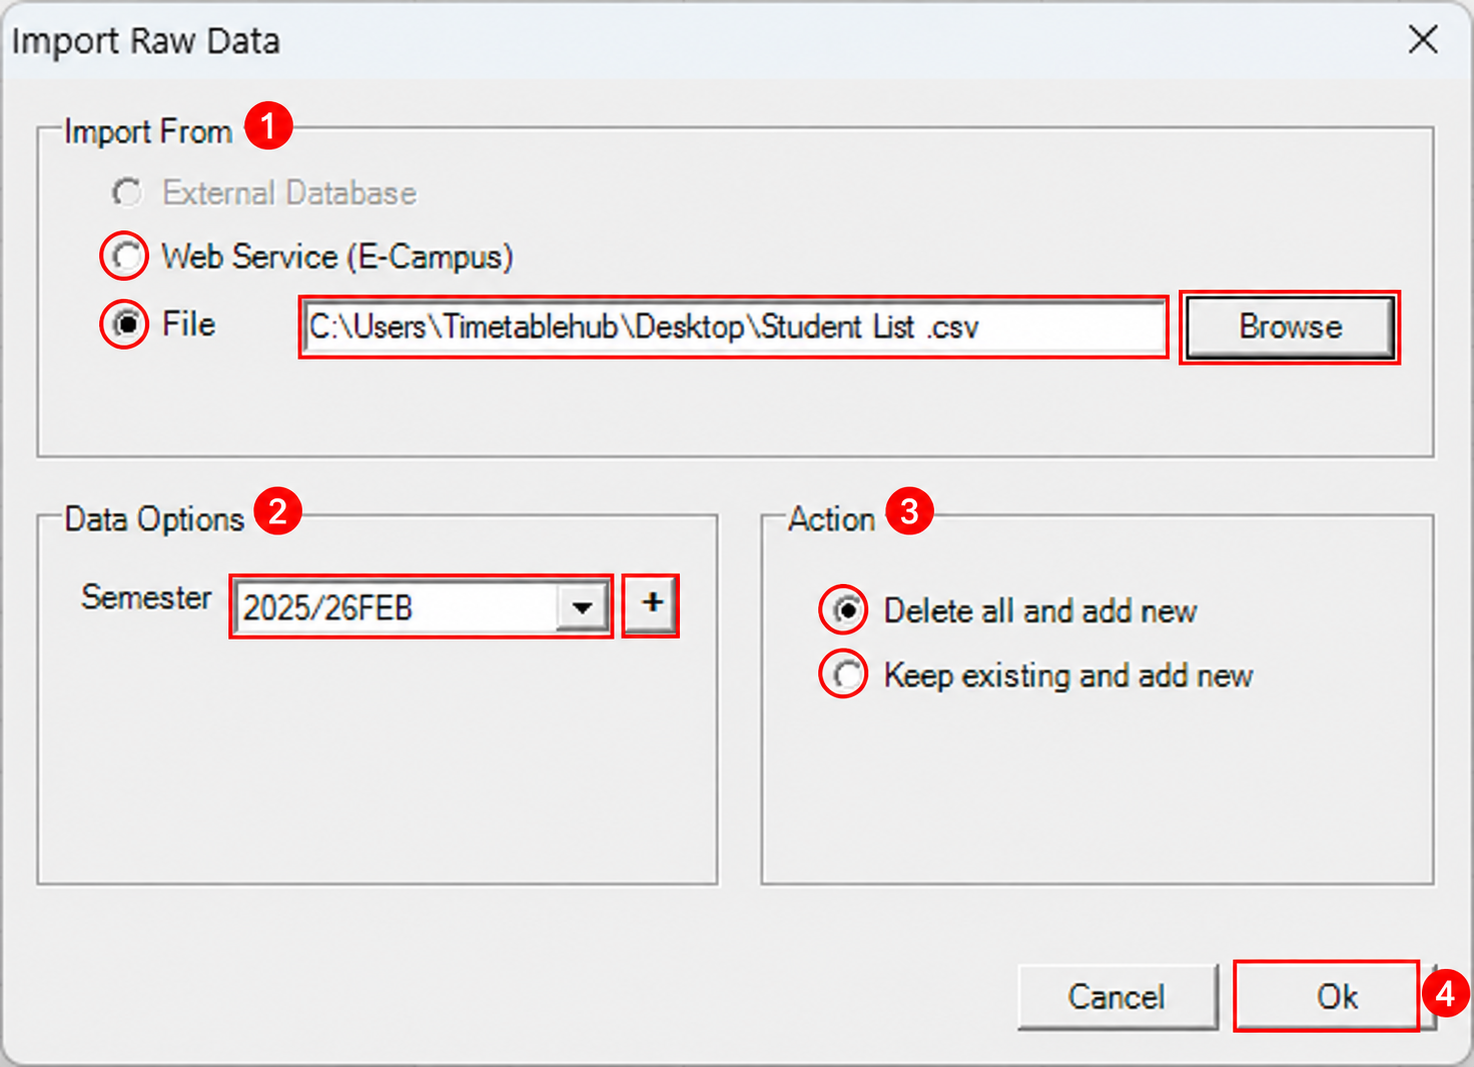
There are 6 steps to complete the import.
Step 1: Under Import From, pick the source. Choose Web Service (E-Campus), or choose File and click Browse to select a CSV file.
Step 2: Under Data Options, select the Semester, or click plus (+) to add a new one.
Step 3: Under Action, choose Delete all and add new to replace the current list, or Keep existing and add new to add to it.
Step 4: Click Ok to start, or Cancel to close without importing.
Step 5: Wait for the Processing... progress bar to finish, or click Cancel to stop it.

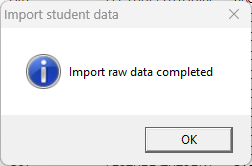
Step 6: The Import raw data completed message appears. Click OK to close it.
The records now appear in the Student Enrollments list, one row per student and course.
5.2.6.2 Generate Course
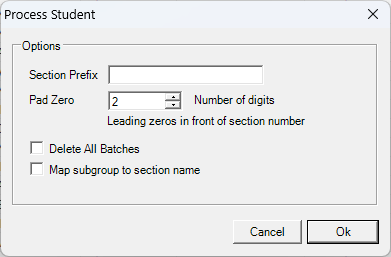
Once the enrollment records are in the list, generate the courses from them. Each student is attached to the section of the course they are enrolled in.
Step 1: On the toolbar, click the green Generate Data icon.
Step 2: The Process Student window appears. Set the options, then click Ok, or Cancel to close without generating.
Step 3: The Import raw data completed message appears. Click OK to close it.
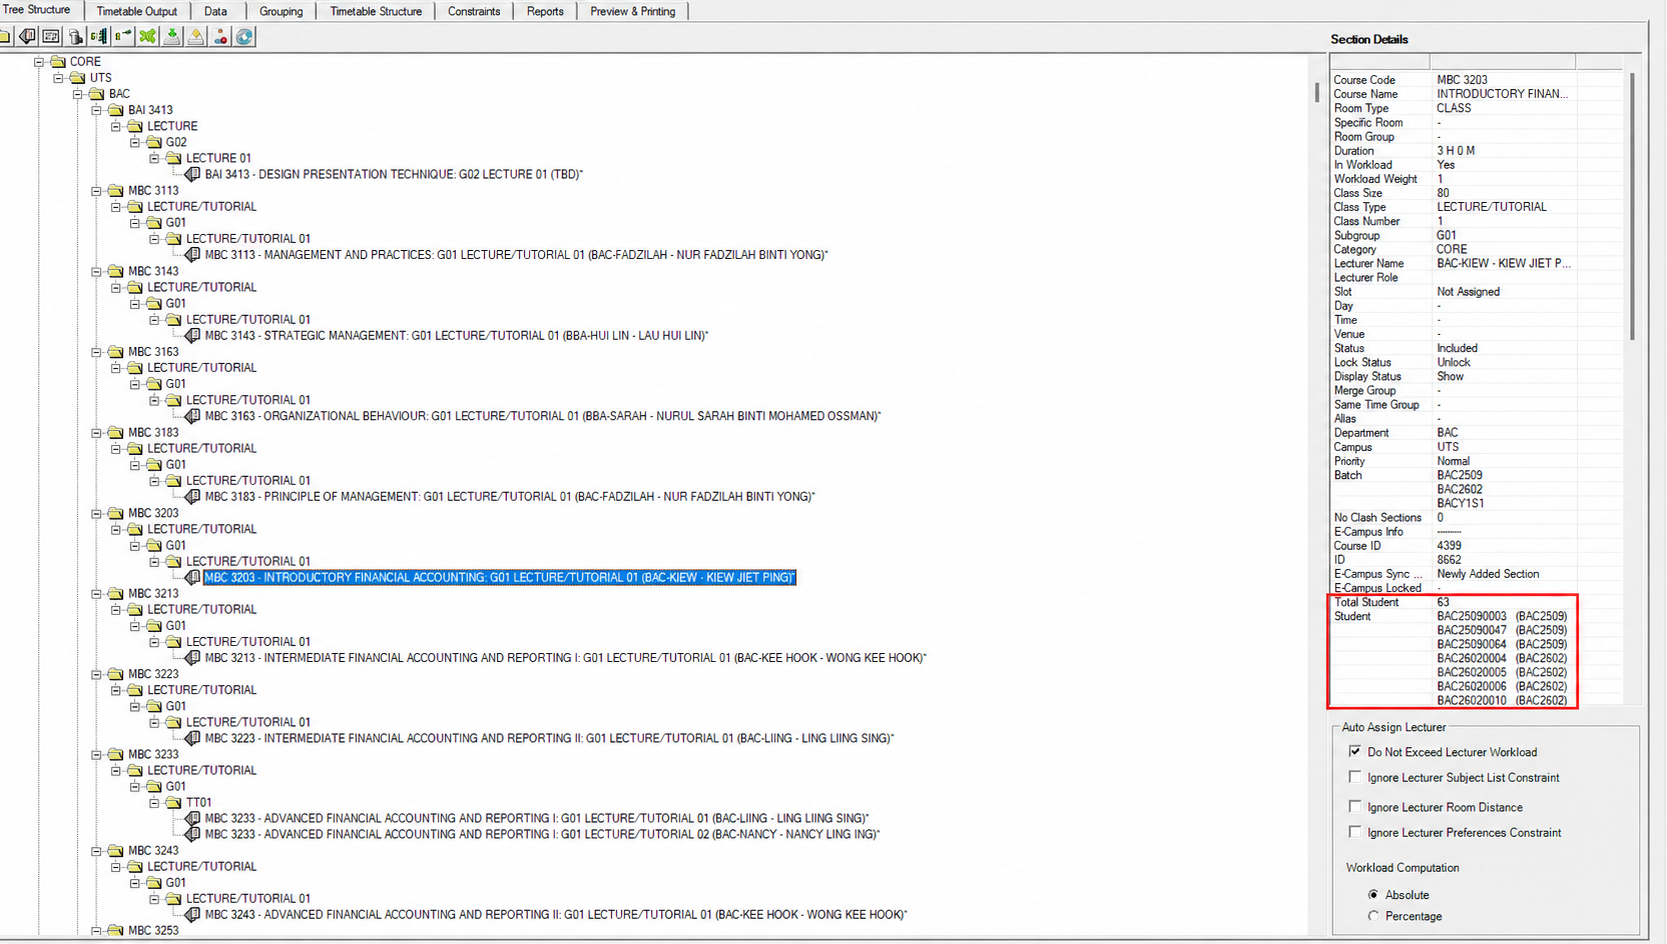
To check the result, open the Tree Structure tab and click a section. The Section Details panel on the right shows Total Student and the list of Student IDs with their batches.
5.2.7 Review and Edit Imported Data
Once the data has been imported, review it before you continue. The View Database window gathers every record in one place so you can check what was brought in and correct anything that is missing or wrong. It works the same way for records imported from E-Campus, imported from a file, or added manually.
5.2.7.1 Opening the View Database Window
Open the Database menu from the top menu bar. From the drop-down menu, select View Database.
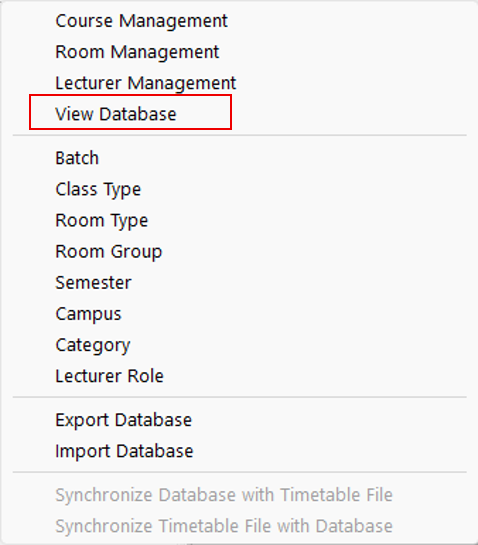
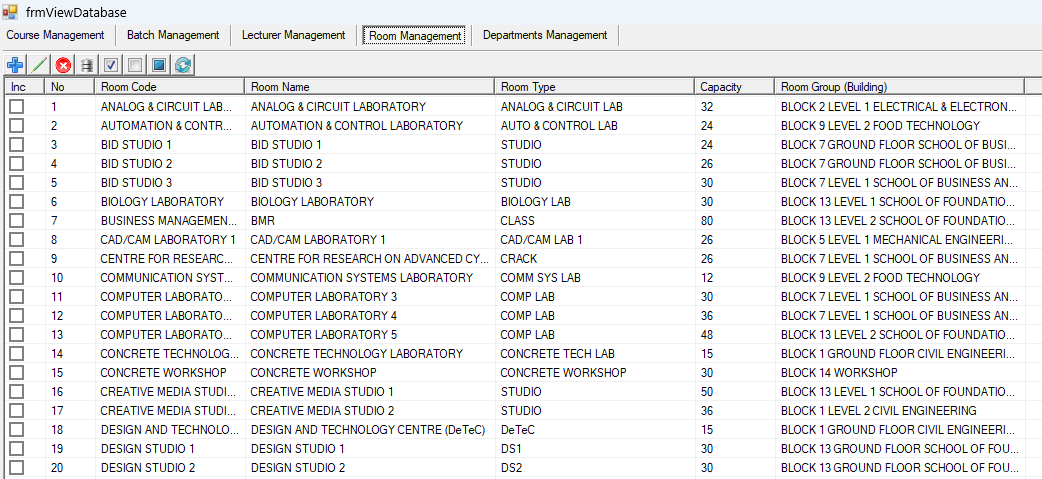
The View Database window will appear. It is divided into five tabs: Course Management, Batch Management, Lecturer Management, Room Management and Departments Management. Each tab lists the records of one type, one row per record. Click a tab to switch between them.
5.2.7.2 Editing Records
The toolbar at the top of the window works the same way on every tab, so the steps below apply to courses, batches, lecturers, rooms and departments alike.
Adds a new record to the tab that is currently open.
Opens the highlighted record so its details can be changed.
Deletes the records that are currently selected.
Imports records into the tab that is currently open.
Reloads the list so it shows the latest saved data.
To edit a record: Highlight the row you want to change, then click the pencil icon on the top toolbar. A window will appear showing that record's details. Make your changes, then click OK to save them.
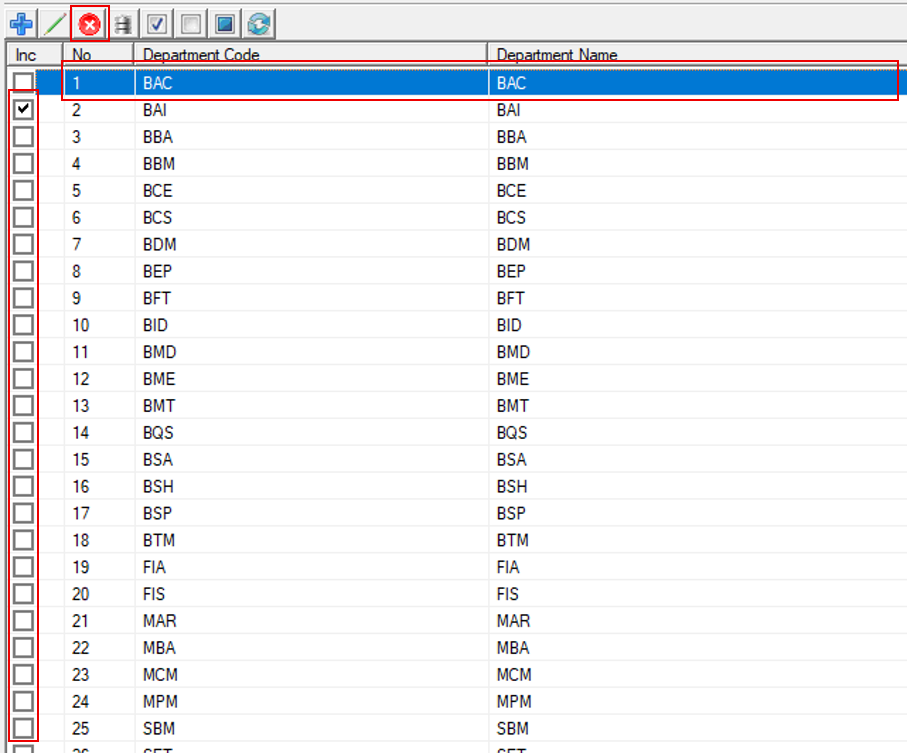
To delete records: Highlight a single row, or select several at once by ticking the checkboxes in the Inc column on the left. Then click the red circle with an “X” icon on the top toolbar and click OK to confirm the deletion.
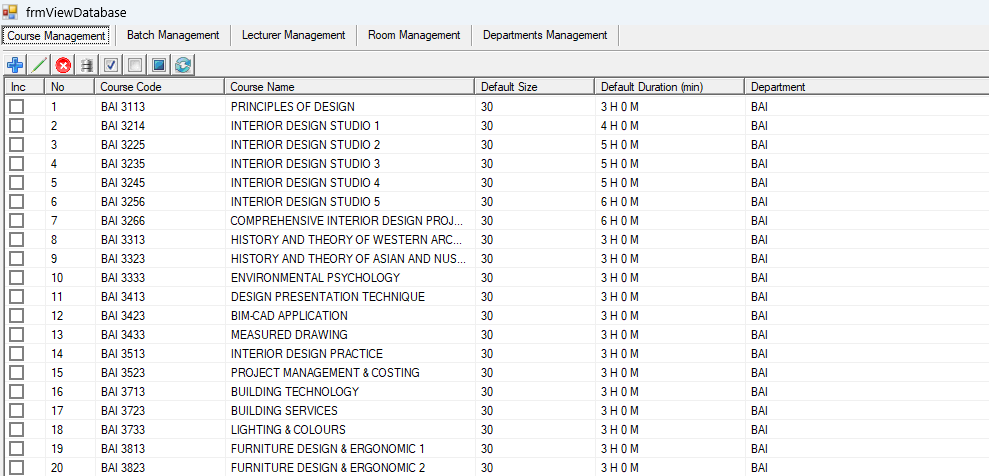
5.2.7.3 Course Management
The Course Management tab lists every course in the database, showing the Course Code, Course Name, Default Size, Default Duration (min) and Department of each one. Check that the size and duration are correct, as the system uses both when generating the timetable.
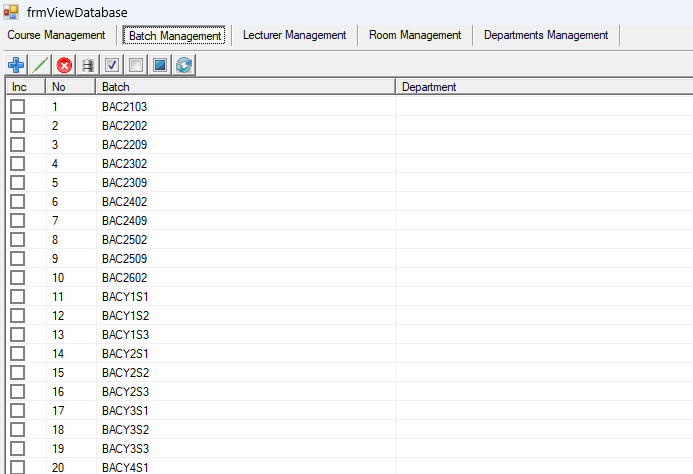
5.2.7.4 Batch Management
The Batch Management tab lists every batch in the database together with the Department it belongs to. Check that each batch that should take part in the timetable is present.
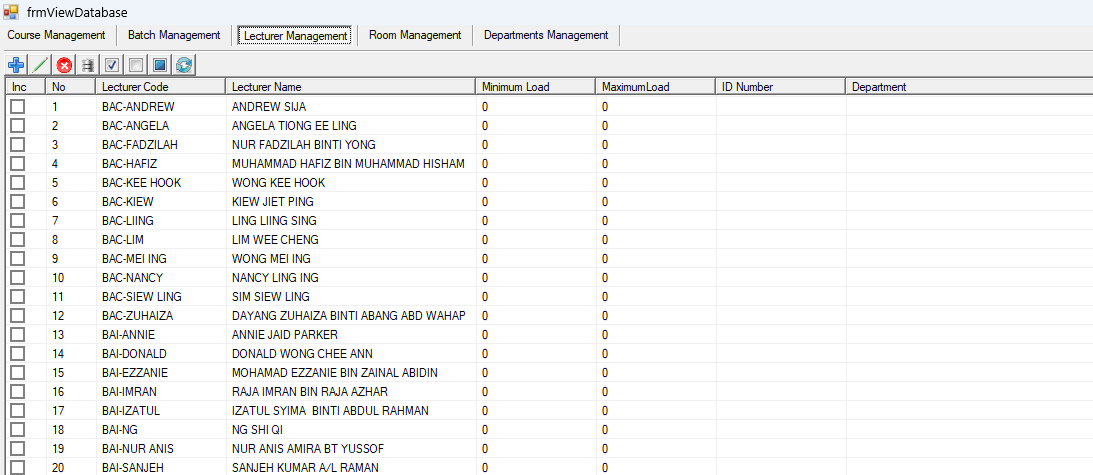
5.2.7.5 Lecturer Management
The Lecturer Management tab lists every lecturer in the database, showing the Lecturer Code, Lecturer Name, Minimum Load, Maximum Load, ID Number and Department. Imported records often arrive with a load of 0, so set the minimum and maximum load for each lecturer here if your institution uses them.
5.2.7.6 Room Management
The Room Management tab lists every room in the database, showing the Room Code, Room Name, Room Type, Capacity and Room Group (Building). Pay particular attention to the capacity, as the system uses it to decide which rooms a class will fit into.
5.2.7.7 Departments Management
The Departments Management tab lists every department in the database, showing the Department Code and Department Name. Departments are used throughout the other tabs, so correct them here first if any are wrong.
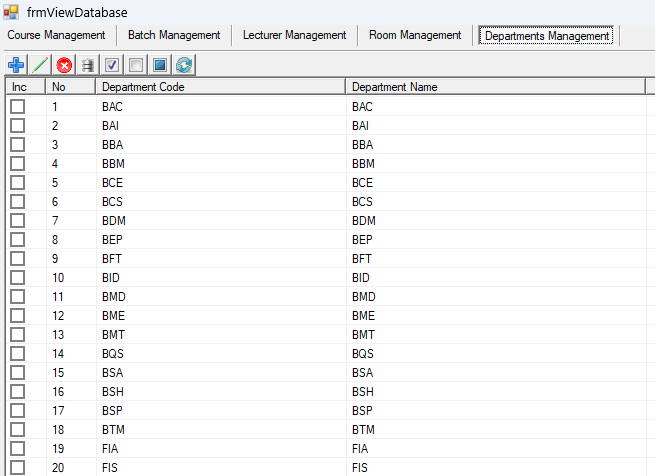
To add a new department, follow the steps in Section 5.2.4.6 Department. To change or remove an existing one, use the steps below.
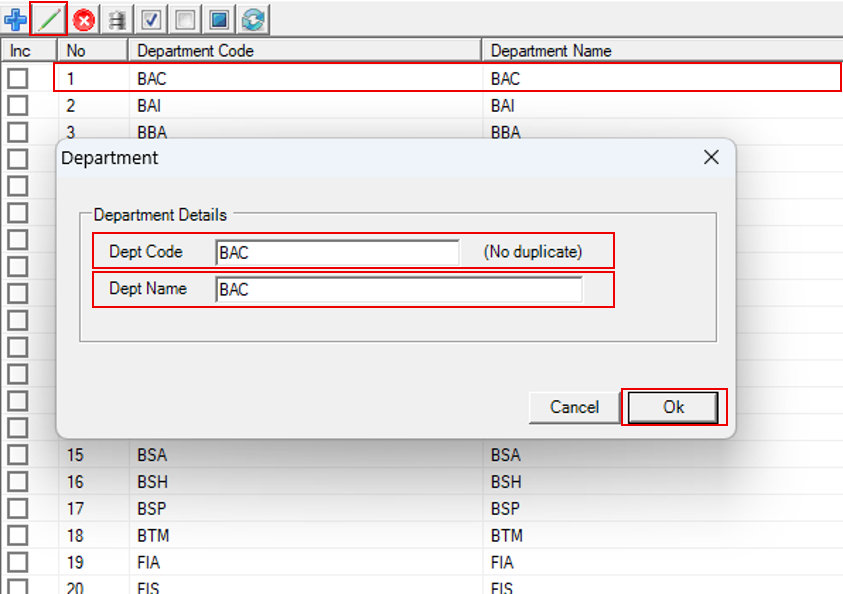
Editing a department: Highlight the department record you want to modify, then click the pencil icon on the top toolbar. The Department window will appear, allowing you to edit the Department Code and Department Name. Once the changes are complete, click OK to save them.
Deleting a department: Either highlight a single department record or select multiple departments by ticking the checkboxes on the left. Then click the red circle with an “X” icon on the top toolbar and click OK to confirm the deletion.
5.2.8 Synchronization of Database
Your records are kept in two places: the database, which is shared by all timetable files, and the timetable file you are working on. Synchronization copies records from one to the other so that both match. Both commands are found at the bottom of the Database menu.
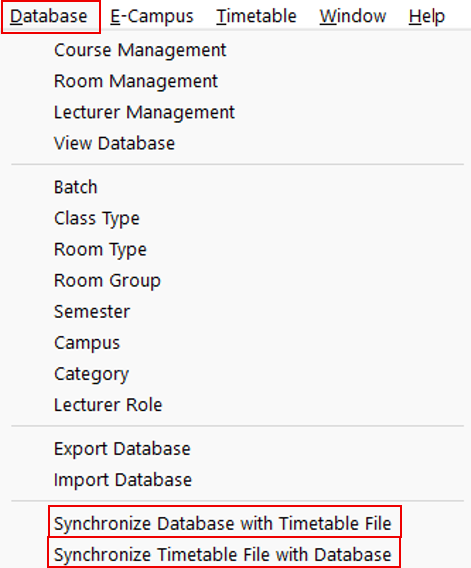
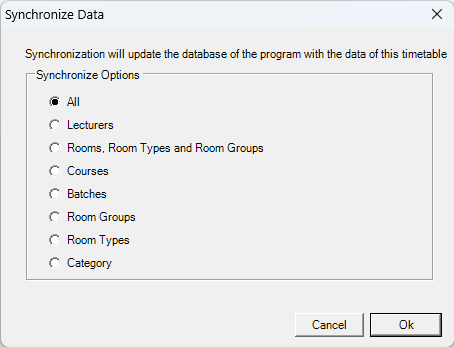
Synchronize Database with Timetable File copies records from your timetable file into the database. Use it when you have added or changed records while working in the timetable file and you want the database to have them too, so other timetable files can use them. The Synchronize Data window will appear. Leave All selected to copy everything, or pick just one type such as Lecturers, Rooms, Room Types and Room Groups, Courses, Batches, Room Groups, Room Types, or Category. Click Ok to start, or Cancel to close without any changes.
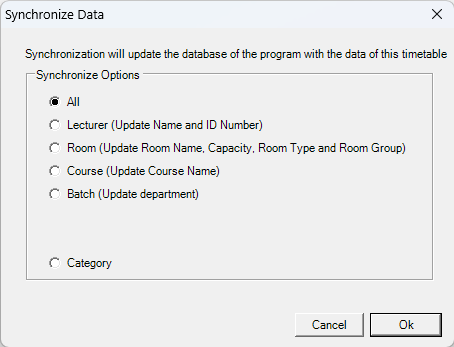
Synchronize Timetable File with Database does the opposite. It copies the latest details from the database into your timetable file. Use it when a record was changed in the database after the timetable file was made. For example a room was renamed or its capacity was corrected and you want your timetable file to show the new details. The Synchronize Data window shows what each option updates: Lecturer (name and ID number), Room (room name, capacity, room type and room group), Course (course name), Batch (department), and Category. Leave All selected to update everything, then click Ok to start, or Cancel to close without any changes.