Process & Analyze
This chapter covers how to process and analyze student, lecturer, and non academic raw data before applying constraints.
5.1 Overview
In this chapter, all raw data files must be imported first before any processing begins. You will need to import Student Raw Data, Lecturer Raw Data, and Non Academic Raw Data into the system.
Once all raw data has been imported, you can proceed to process them in the following order:
- Process Student Raw Data — must be processed first as it generates sections, courses, and student records.
- Process Lecturer Raw Data — converts lecturers into invigilators and assigns them to the Academic group.
- Process Non Academic Raw Data — converts non-academic staff into invigilators and assigns them to the Non Academic group.
After processing each raw data, analyze the results to verify accuracy before moving on. Make sure to correct any errors at this stage as they are much harder to fix once you proceed to the next phase.
5.2 Import Raw Data
Before processing any data, you must first import all raw data files into the system. Import the following raw data in any order:
- Student Raw Data
- Lecturer Raw Data
- Non Academic Raw Data
- Similar Courses (optional)
5.2.1 Import Student Raw Data
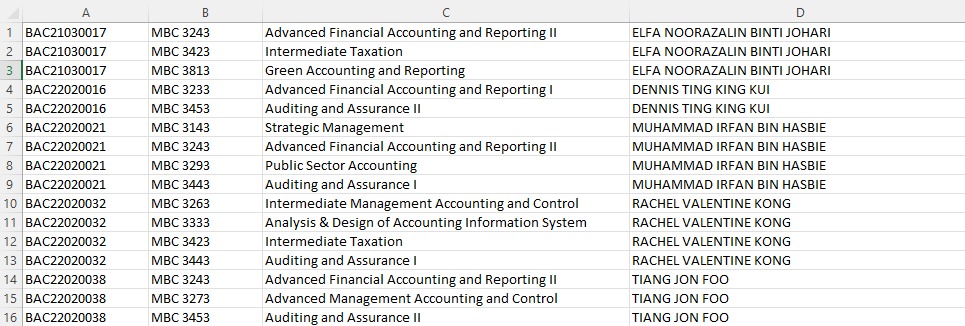
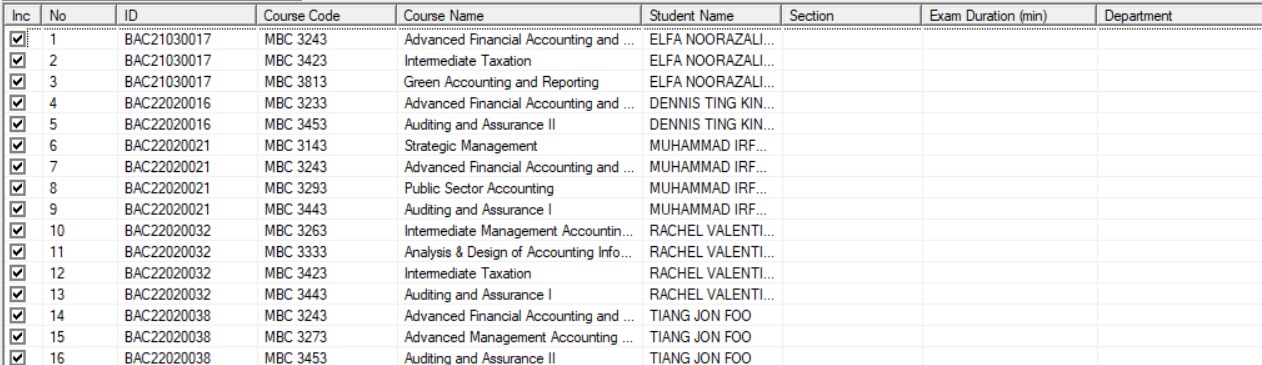
Student raw data is course-student data which tells the system how many students are enrolled in each course. The system uses this to calculate room requirements and distribute students across venues during generation.
The file must be in CSV or Excel format with the following column structure: Student ID, Course Code, Course Name, and Student Name. Below is a sample of the expected file format:
Step 1 — Open the Raw Data tab.

Step 2 — Select Student Raw Data.

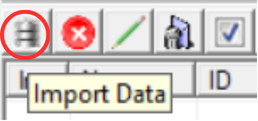
Step 3 — Click Import from File.
Step 4 — A file browser will open. Browse to the student raw data file.
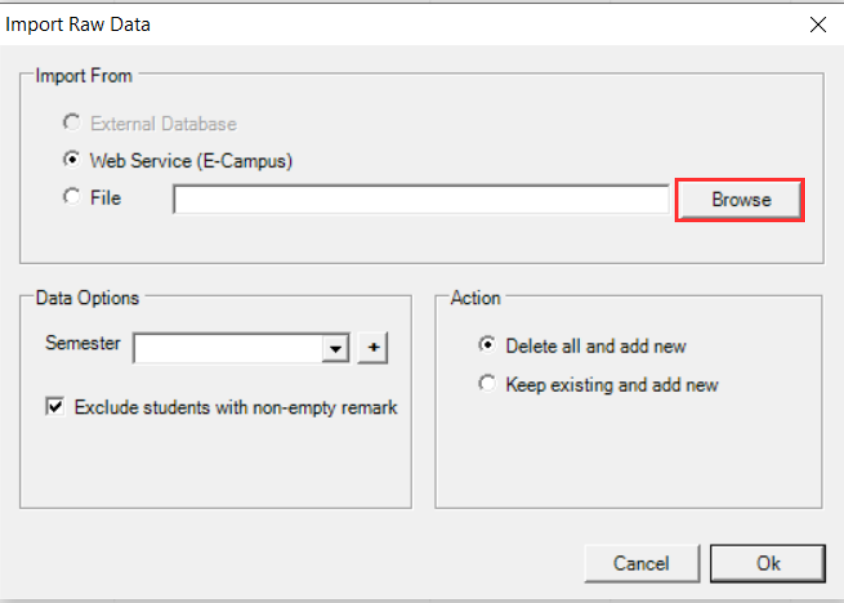
Step 5 — Select the file and click Open.

Step 6 — An import confirmation message will appear. Click OK.
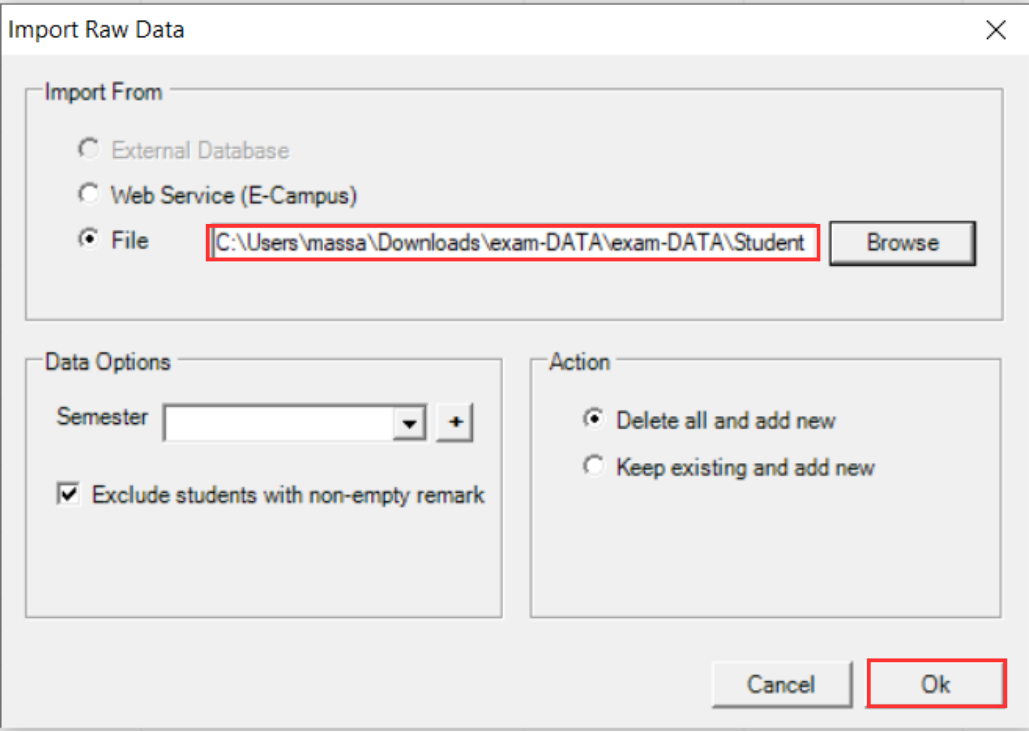
Step 7 — The student raw data list is now displayed.
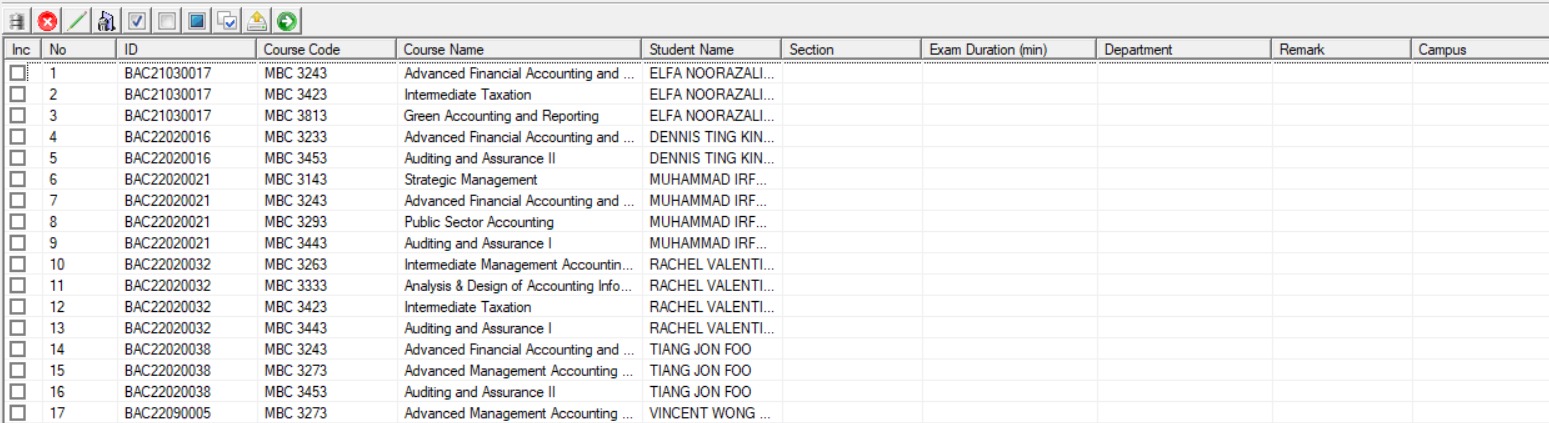
Toolbar Icons in Student Raw Data Window
Inside the Student Raw Data window, the toolbar provides quick access to common functions.
5.2.2 Import Lecturer Raw Data
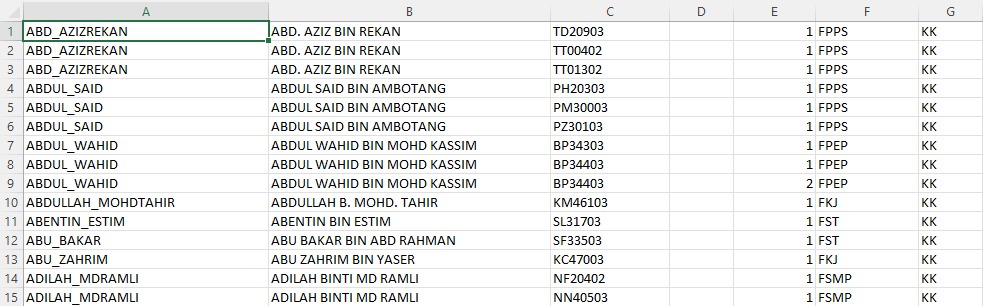
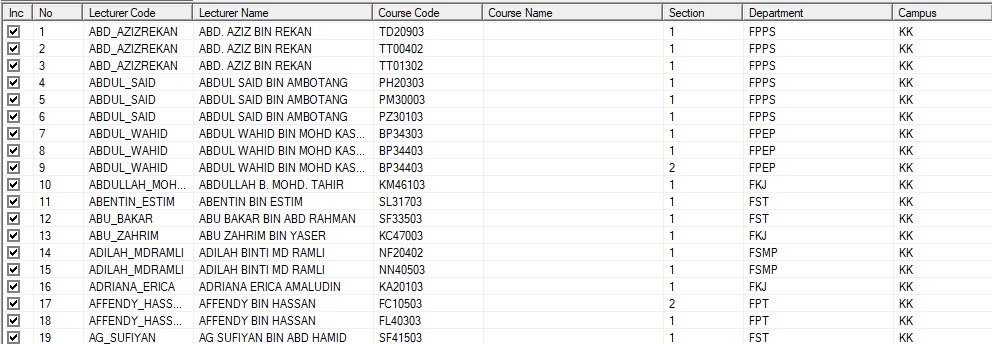
Lecturer raw data contains the list of lecturers who will be converted into invigilators for the exam schedule. The file must be in CSV or Excel format. Below is a sample of the expected file format:
Step 1 — Open the Raw Data tab.
Step 2 — Select Lecturer Raw Data.

Step 3 — Click the Import from File icon.
Step 4 — Browse and select the lecturer file.
Step 5 — Select the lecturer list file and click Open.

Step 6 — An import confirmation will appear. Click Ok to proceed.
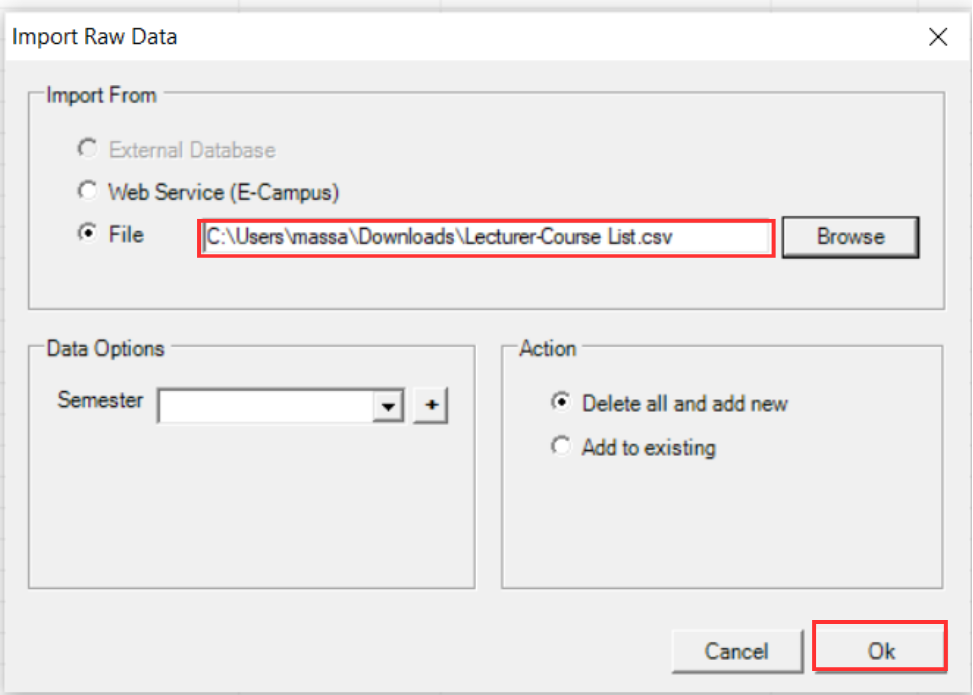
Step 7 — The lecturer raw data will be displayed. Verify the records are loaded correctly.

Toolbar Icons in Lecturer Raw Data Window
Inside the Lecturer Raw Data window, the toolbar provides quick access to common functions.
5.2.3 Import Non Academic Raw Data
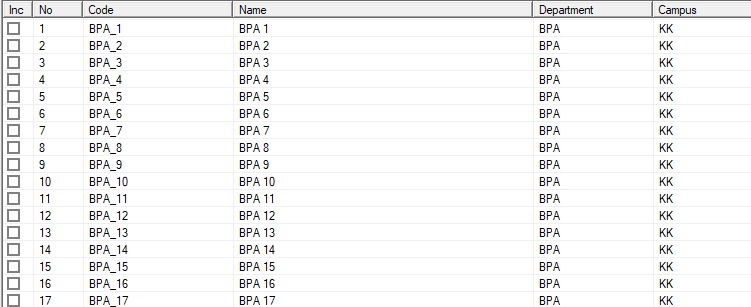
Non Academic raw data contains the list of non-academic staff who will be converted into invigilators for the exam schedule. The file must be in CSV or Excel format. Below is a sample of the expected file format:

Step 1 — Open the Raw Data tab.
Step 2 — Select Non Academic Raw Data.

Step 3 — Click the Import from File icon.
Step 4 — Browse and select the Non Academic file.
Step 5 — Select the Non Academic list file and click Open.

Step 6 — An import confirmation will appear. Click Ok to proceed.
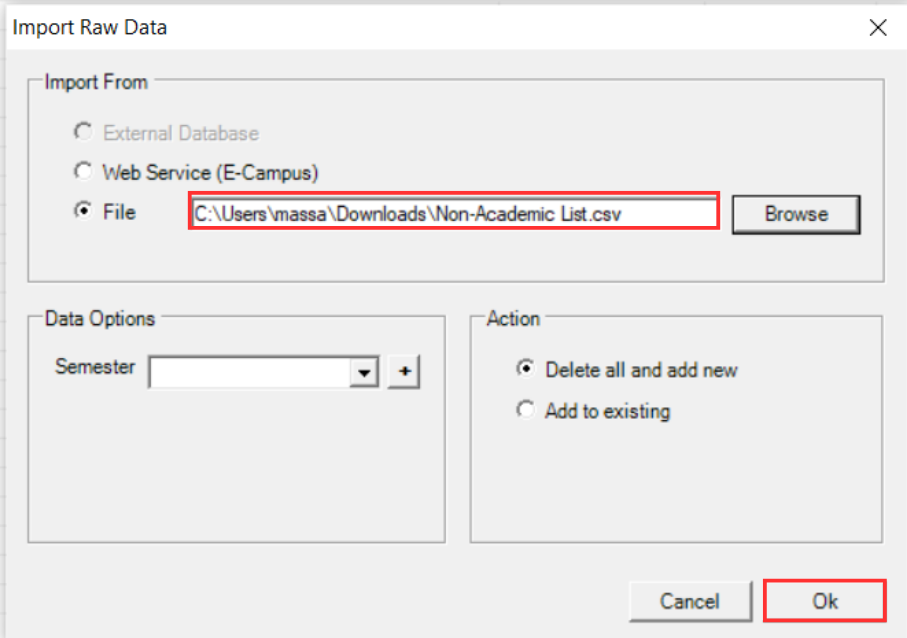
Step 7 — The Non Academic raw data will be displayed. Verify the records are loaded correctly.
Toolbar Icons in Non Academic Raw Data Window
Inside the Non Academic Raw Data window, the toolbar provides quick access to common functions.
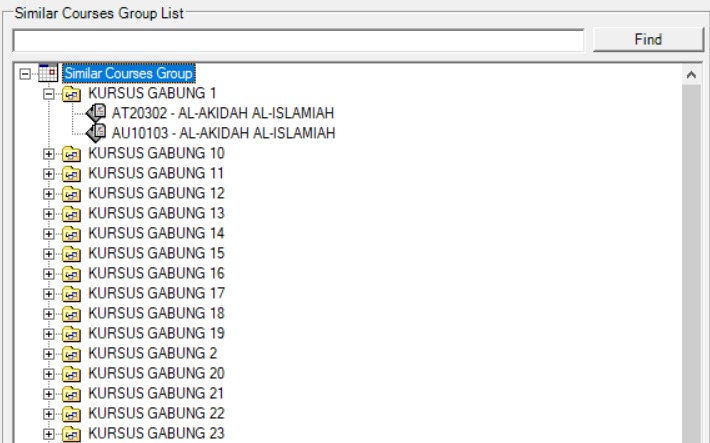
5.2.4 Similar Courses (Optional)
Similar Courses data is only required when there are courses that share the same exam and need to be scheduled in the same time slot. This may occur when courses have different course codes but the same course name, or different course names but share the same exam content.
By importing Similar Courses data, the system will group these courses together and ensure they are assigned to the same exam slot during schedule generation. This prevents scheduling conflicts for students who are enrolled in courses that share the same exam.
Step 1 — Open the Raw Data tab.
Step 2 — Select Similar Courses.

Step 3 — Click the Import from File icon.

Step 4 — A file browser will open. Browse to the similar courses file.
Step 5 — Select the file and click Open.

Step 6 — An import confirmation message will appear. Click OK.
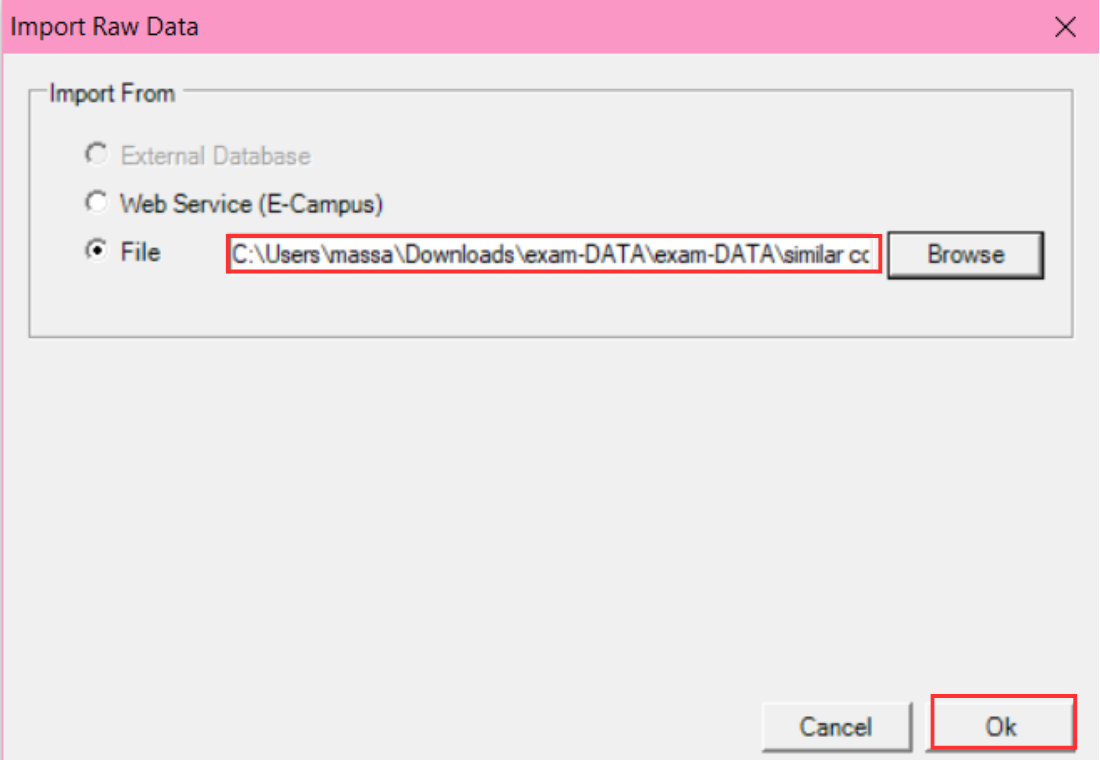
Step 7 — The similar courses data list is now displayed.
5.3 Processing Raw Data
After importing all raw data, the next step is to process each raw data type. The processing must be done stage by stage in the following order:
- Stage 1: Process Student Raw Data (Course-Student)
- Stage 2: Process Lecturer Raw Data
- Stage 3: Process Non Academic Raw Data
Each stage must be completed before moving on to the next. The system relies on the processed data from the previous stage to correctly generate the schedule.
5.4 Process & Analyze Student Raw Data (Course-Student)
After all raw data has been imported, begin processing with Student Raw Data first. Processing activates the data so the system can generate sections, courses, and student records.
Step 1 — Navigate back to Student Raw Data under the Raw Data tab. Click Check All icon  to check all student raw data, then click Process Student Raw Data icon
  .
.
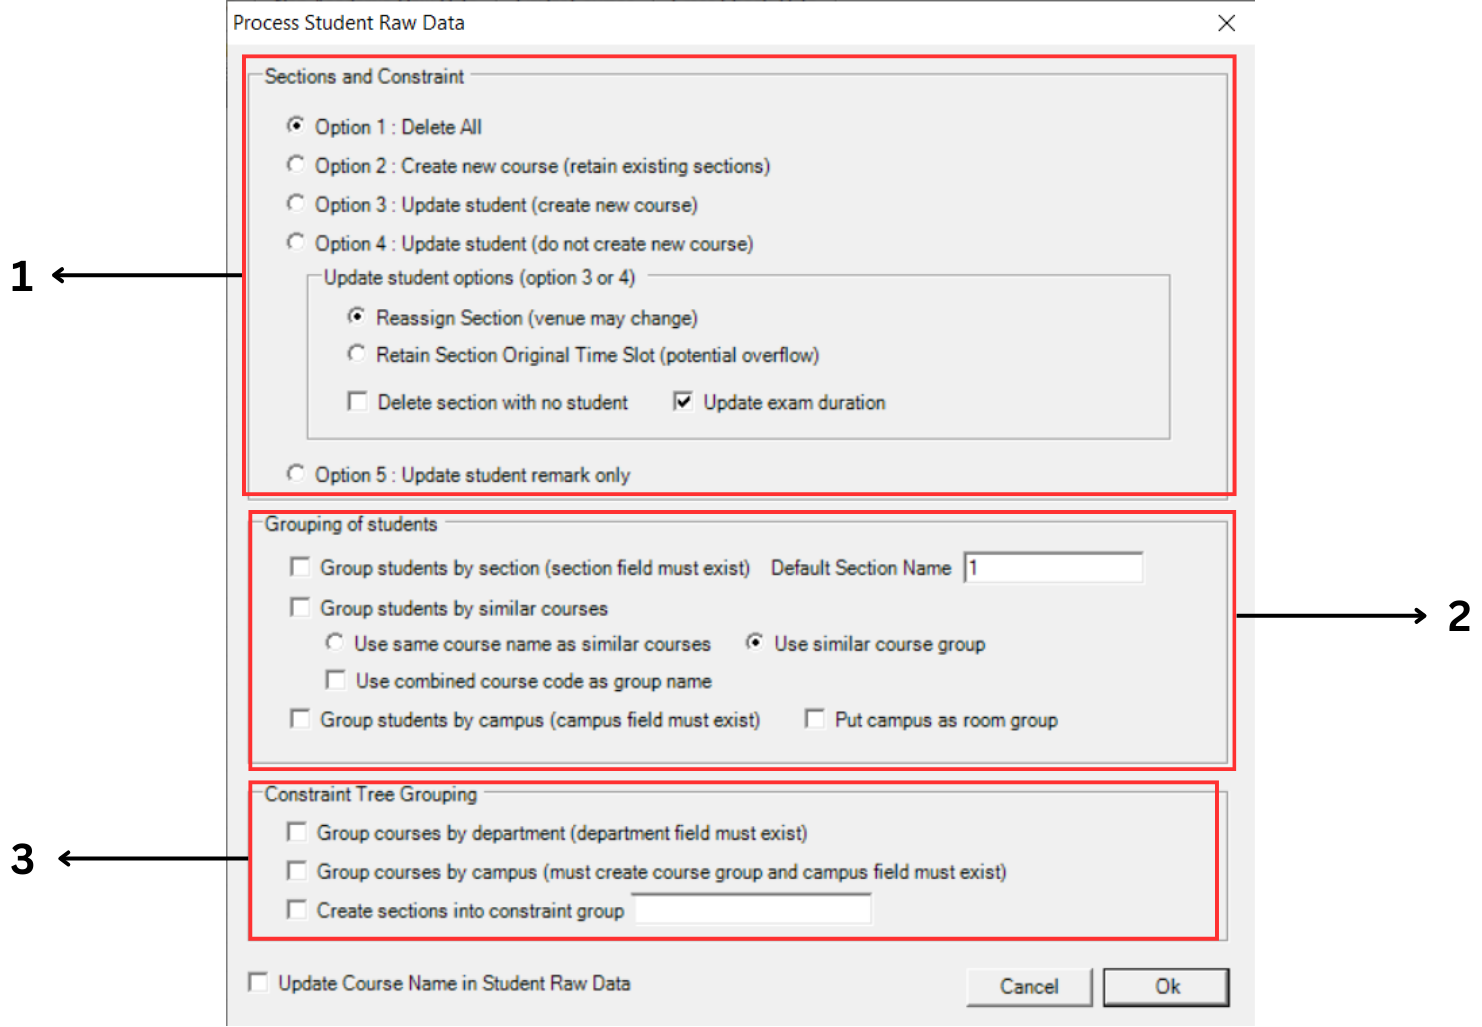
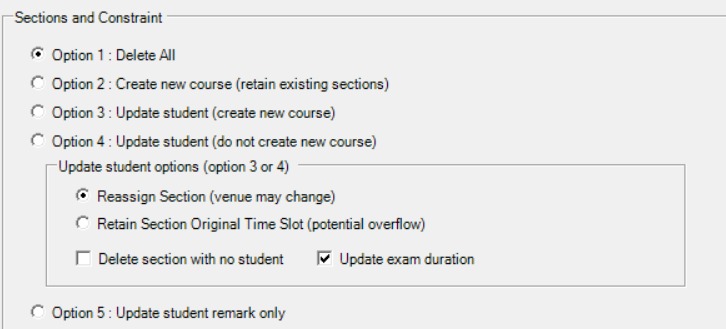
1. Sections and Constraint
| Option | Description |
|---|---|
| Option 1: Delete All | Tick option 1 to delete all. This will delete all previous processed data and replace new ones. Choose this if you are first time user. |
| Option 2: Create new course (retain existing sections) | Tick option 2 to create new course but retain existing sections. Choose this if you are second time user. |
| Option 3: Update Student (create new course) | Tick option 3 to update student with create new course. |
| Option 4: Update Student (do not create new course) | Tick option 4 to update student without create new course. |
| Option 5: Update student remark only | Tick option 5 to update student remark only. |
If you choose Option 3 or Option 4, an additional Update Student Options panel will appear.
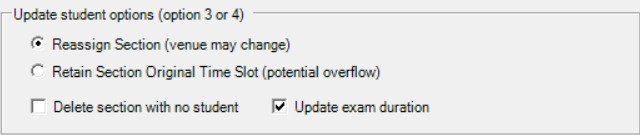
- Reassign Section — venue may change
- Retain Section Original Time Slot — potential overflow
2. Grouping of Students
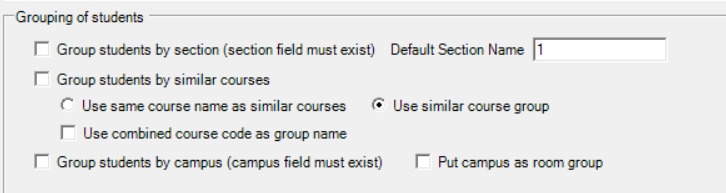
You may choose to group the students by sections and by similar courses.
If you don't tick at group students by section, Default Section Name column will appear. You may fill the default section name there.

If you tick on Group Students by similar course, you are able to choose between use same course name as similar courses OR use similar course group. You may also use combined course code as group name.

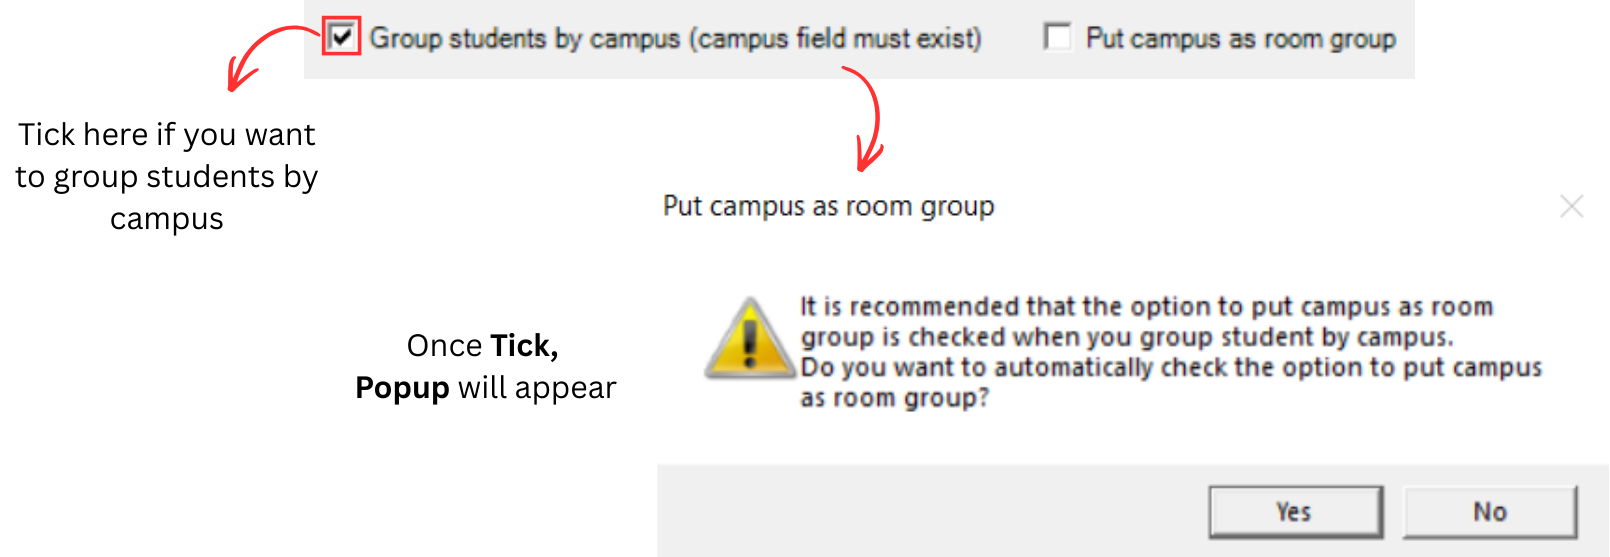
You can tick if you want to group students by campus. Note that if you tick here, a popup will appear saying it is recommended to put campus as room group.
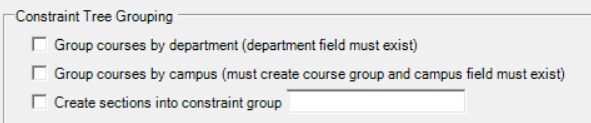
- You can tick if you want to Group courses by department and department field must exist.
- You can tick if you want to Update Course Name in Student Raw Data.
- You can tick if you want to Create sections into constraint group and you can put the name in blank section on the right side.

3. Additional Options
Below is the recommended options to process Student Raw Data.

Click Ok to process Student Raw Data, and then go to Constraints Tree and Data Course List to see the result.
1. Constraints Tree
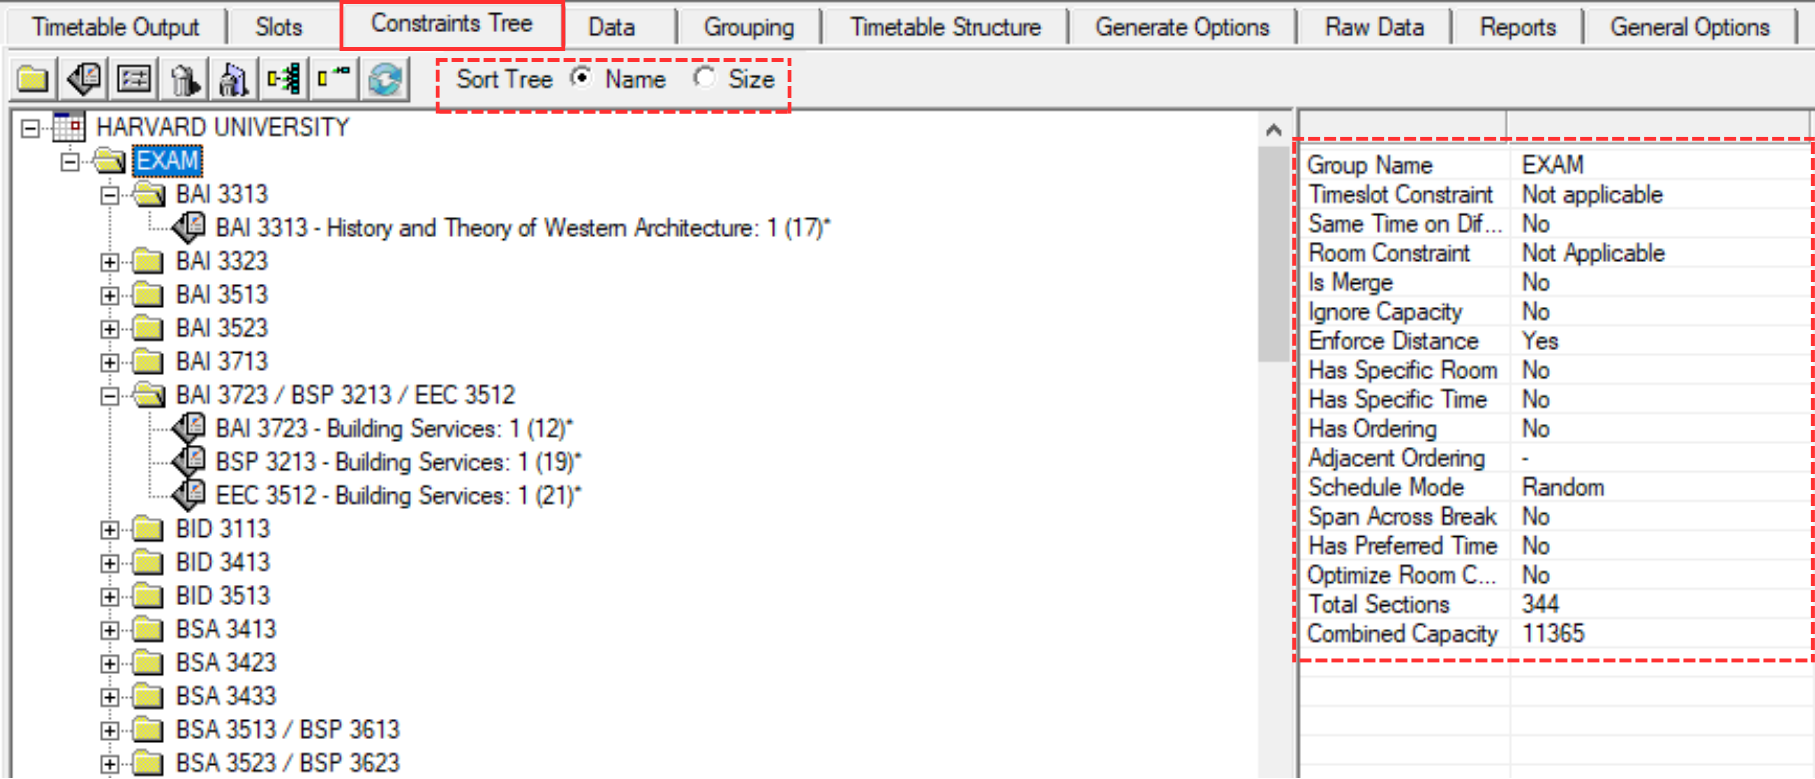
The Constraints Tree displays the hierarchical structure of all exam groups and their sections. You can sort the tree by Name or Size using the toolbar. When you select a group, the properties panel on the right shows the constraint settings for that group, such as Total Sections and Combined Capacity. These constraint properties can be configured later in the Apply Constraints chapter.
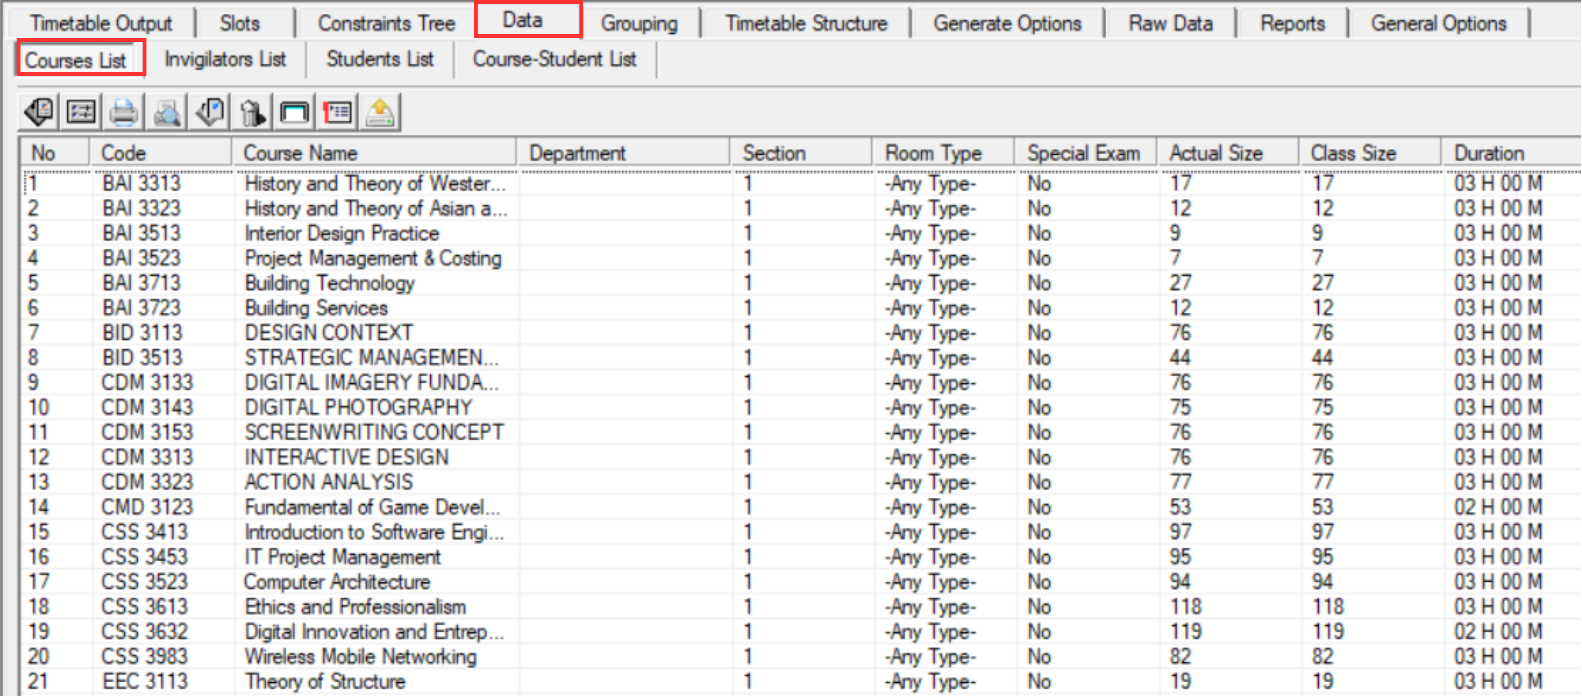
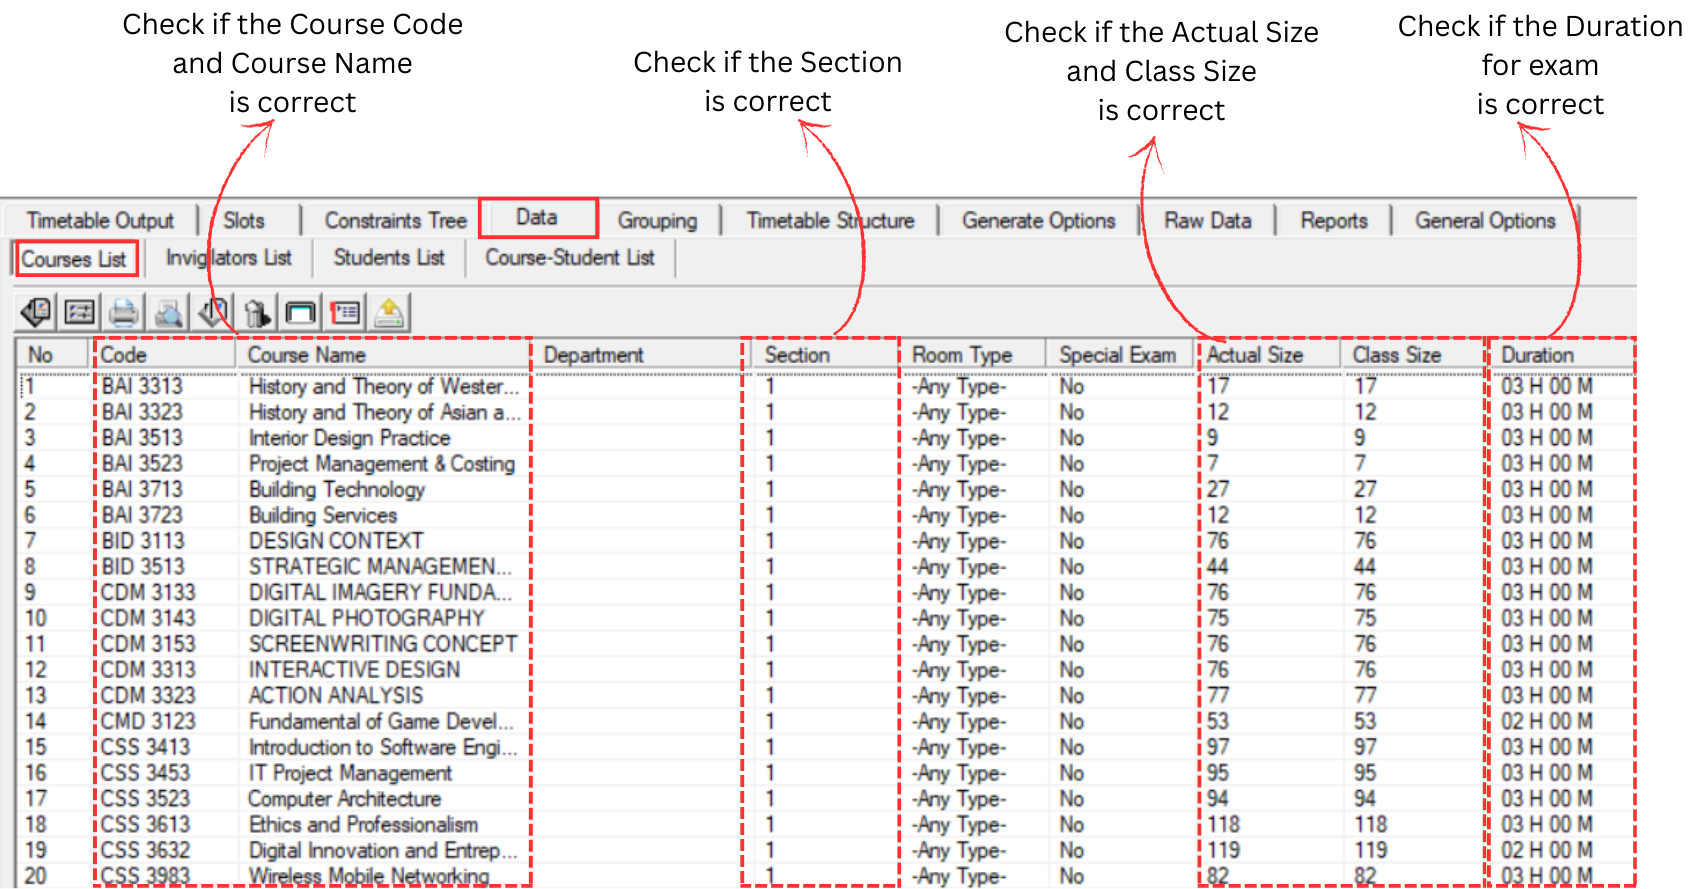
2. Data Course List
Analyze Student Raw Data
After checking the processed data, the next step is to analyze the results to ensure accuracy before applying constraints. Student raw data can be analyzed at:
- Constraints Tree
- Course List
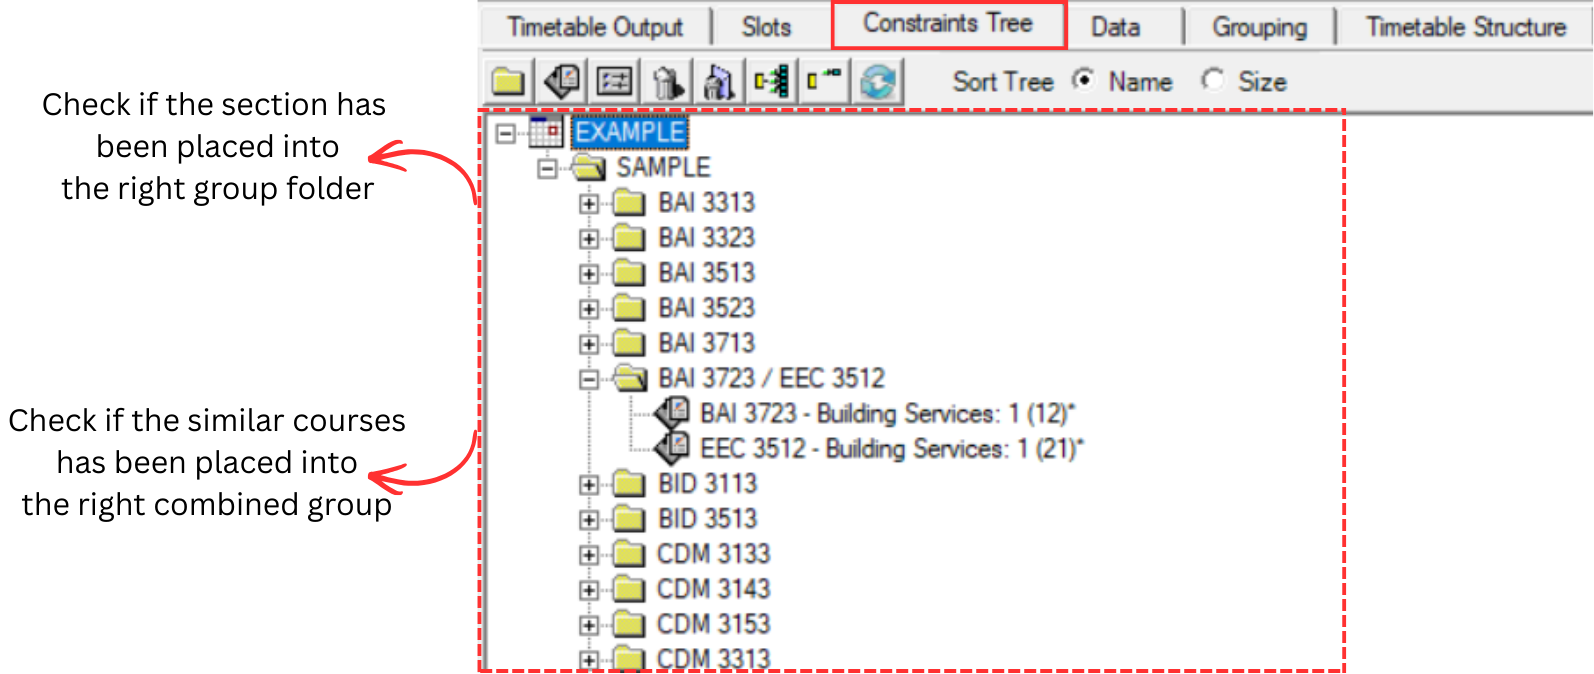
Constraints Tree
Check if the sections have been placed into the right group folder, and verify that similar courses have been placed into the right combined group.
Course List
Review the course list to ensure all course codes, names, sections, and durations are correct after processing.
5.5 Process & Analyze Lecturer Raw Data
After processing Student Raw Data, proceed to process Lecturer Raw Data. Lecturer records will be converted to invigilators and assigned to the appropriate group (e.g., Academic).
Step 1 — Navigate back to Lecturer Raw Data under the Raw Data tab. Click Check All icon to check all lecturer raw data, then click Process Lecturer Raw Data icon .
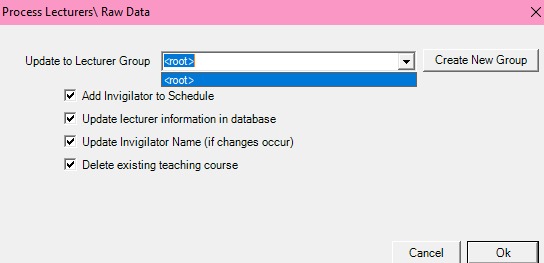
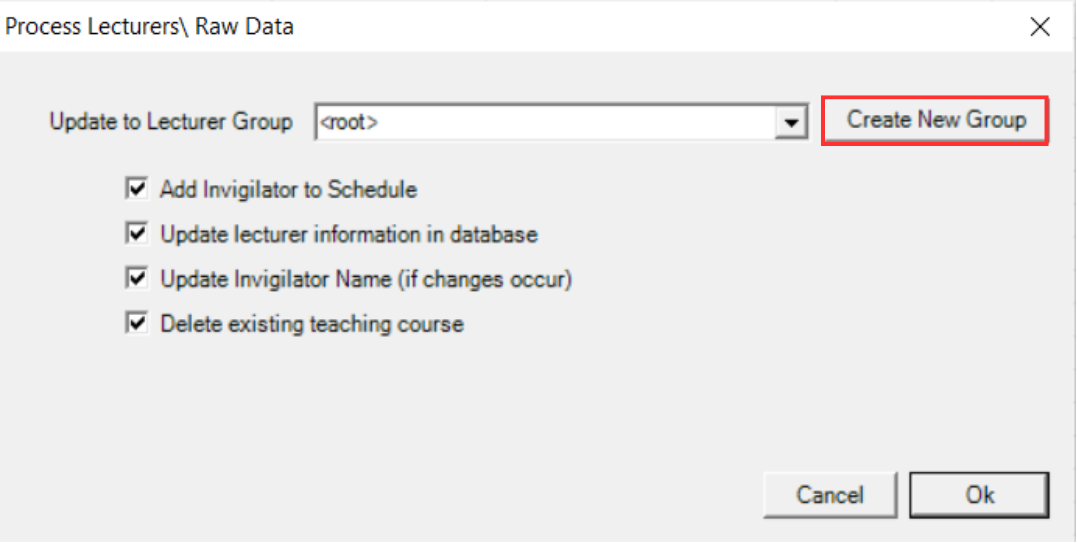
Step 2 — Before processing, a Lecturer Group (invigilator group) must be selected. Click the Update to Lecturer Group dropdown to check available groups. By default, only <root> is available.
Step 3 — Since no group exists yet, click Create New Group to create one.
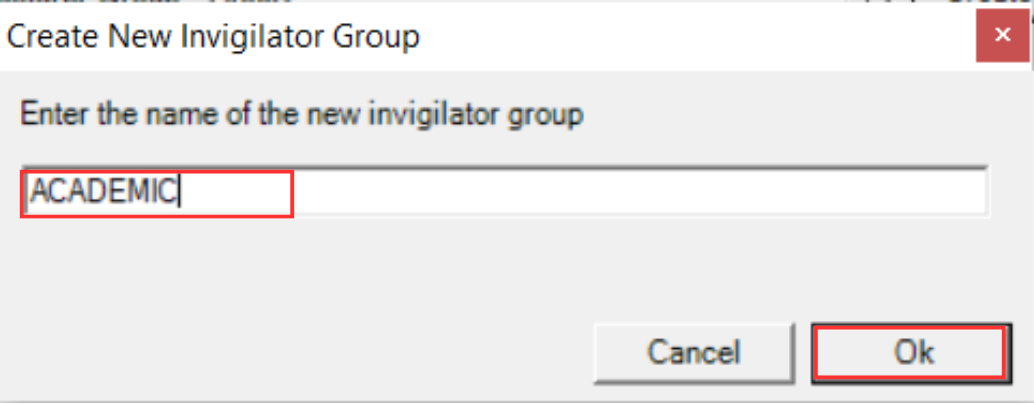
Step 4 — Enter the group name (for example: ACADEMIC), then click OK.
Step 5 — After creating the group, click the dropdown button and select the newly created group (e.g., ACADEMIC).
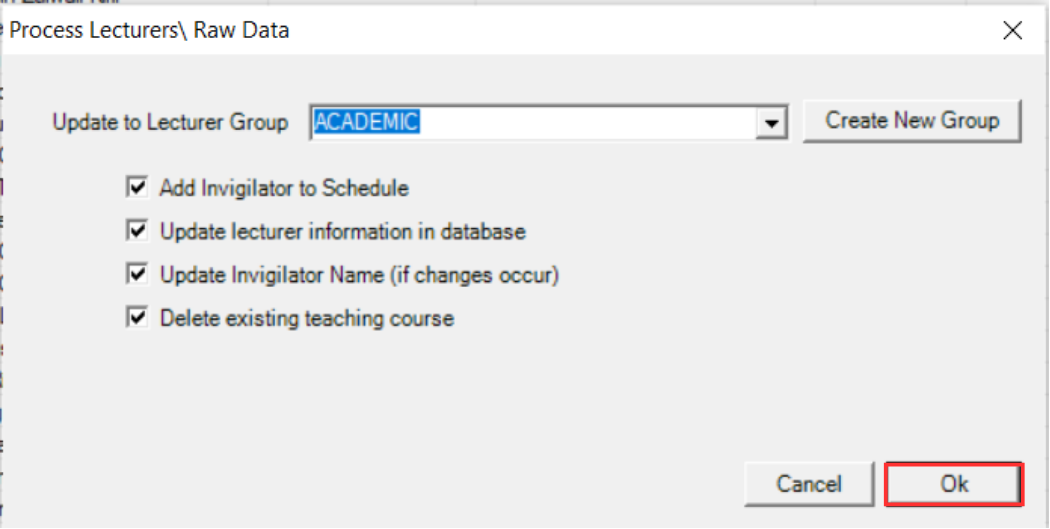
The following tick options are available when processing:
- Add Invigilator to Schedule — Adds the lecturer as an invigilator in the exam schedule.
- Update Lecturer Information in Database — Updates the lecturer details stored in the database.
- Update Invigilator Name — Updates the invigilator name if any changes have occurred.
- Delete Existing Teaching Course — Removes previously assigned teaching courses before importing new data.
Step 6 — Click OK to start processing Lecturer Raw Data.
Analyze Lecturer Raw Data
After processing, analyze the results to ensure all lecturer records have been correctly converted to invigilators.
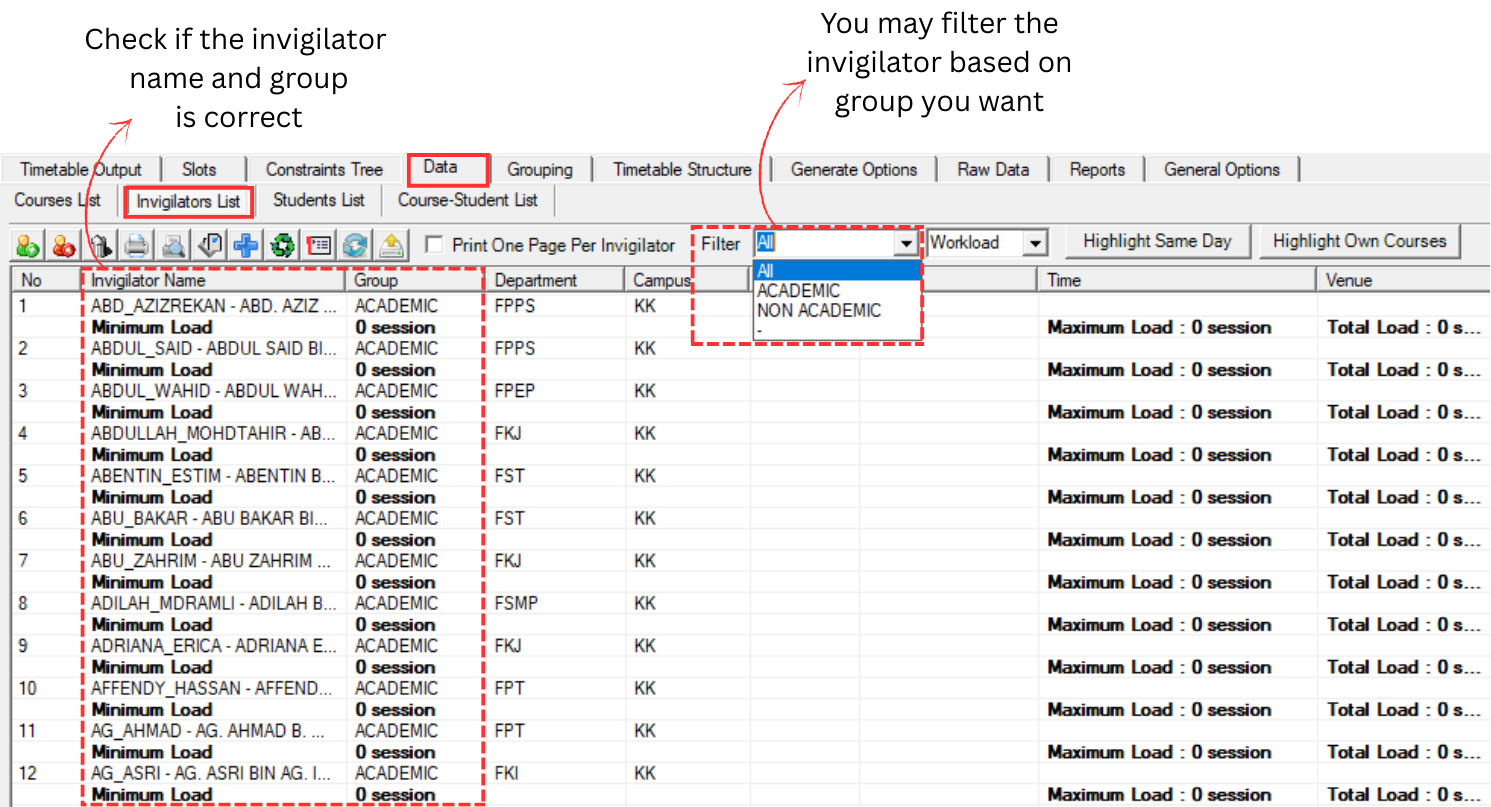
Invigilator List
Check if the invigilator name and group are correct. You may filter the invigilator based on the group you want. Also verify that each invigilator's campus is assigned correctly.
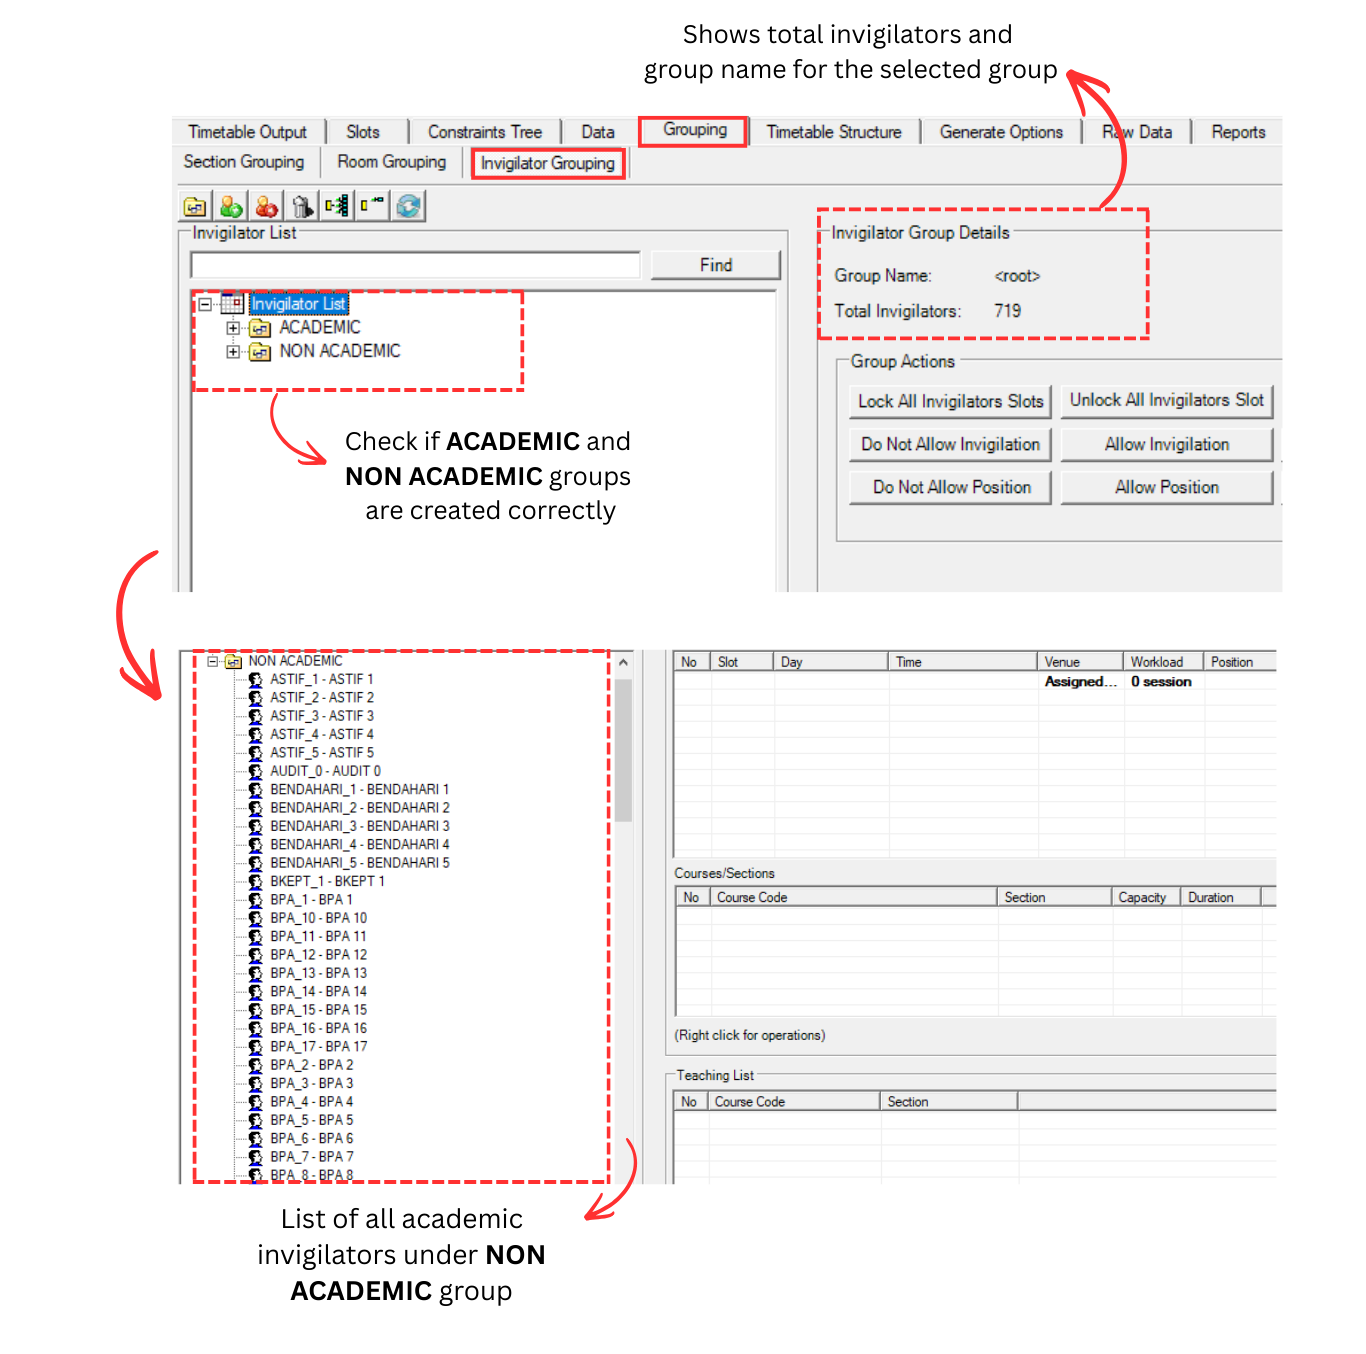
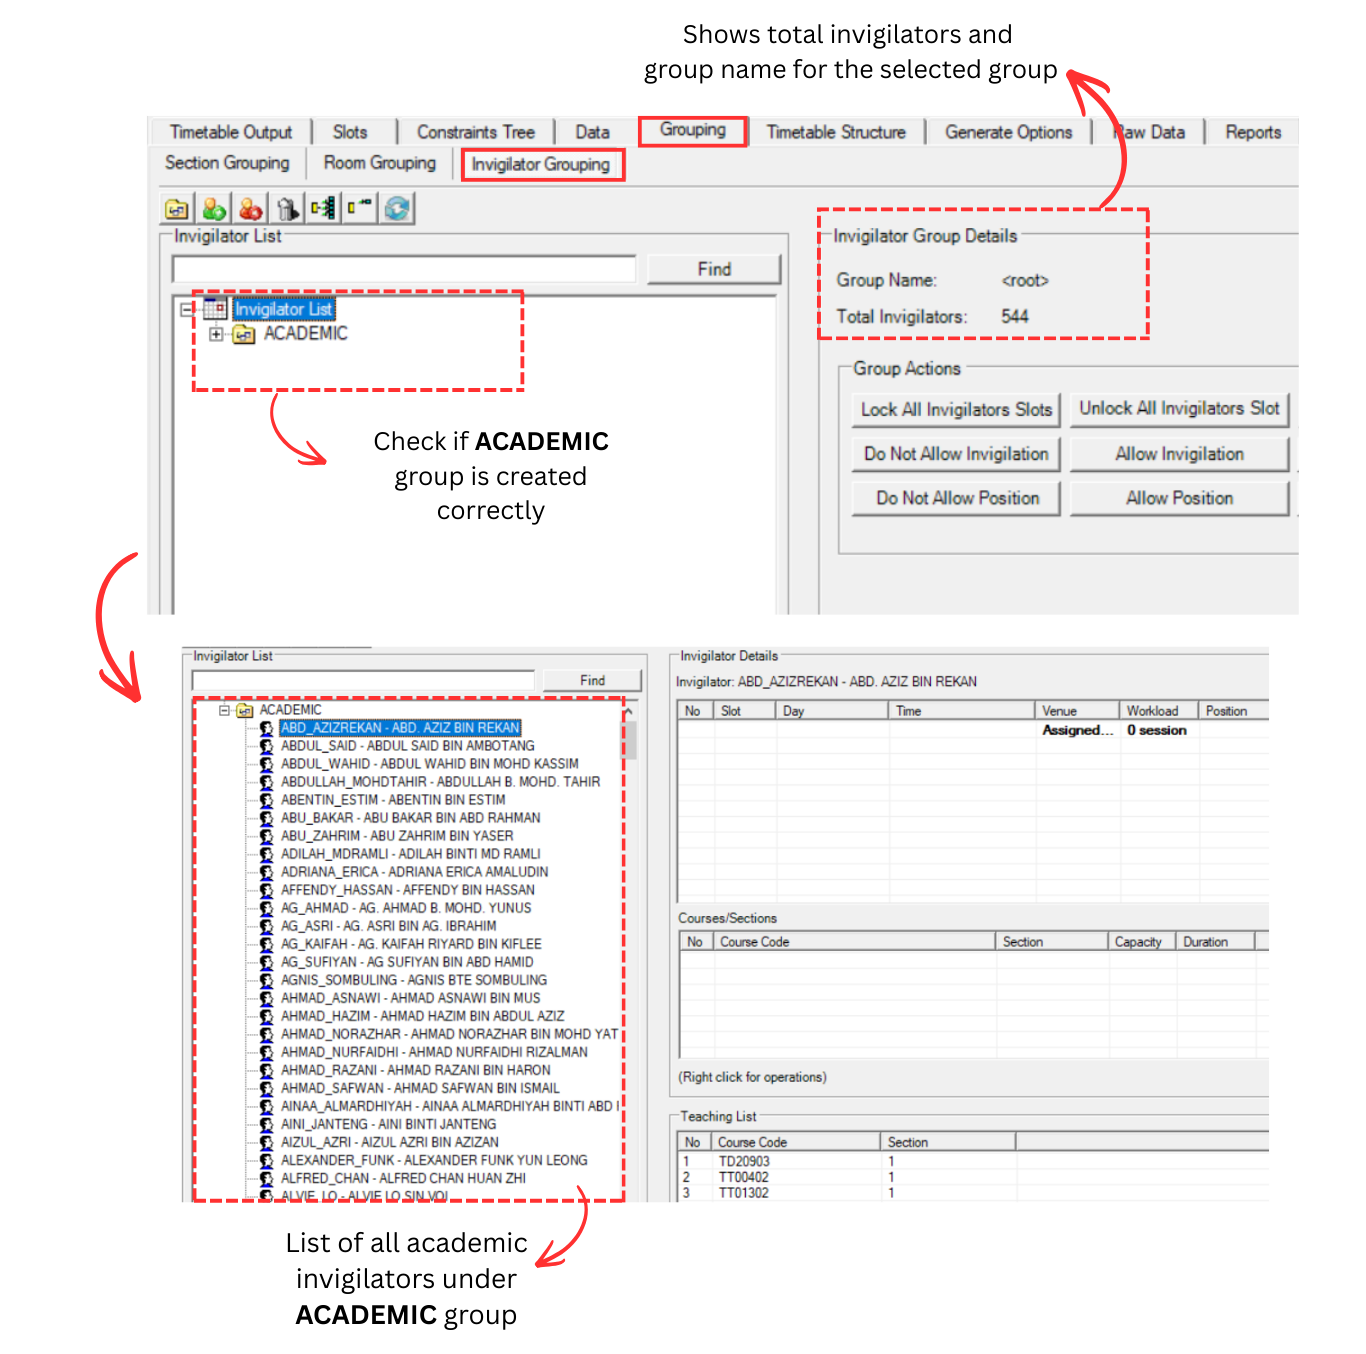
Invigilator Grouping
You can also verify lecturer data at Grouping > Invigilator Grouping. This view displays the invigilator groups (e.g. ACADEMIC, NON ACADEMIC) along with group details and available group actions.
Expand the ACADEMIC group to view all academic invigilators. When you select an invigilator, the right panel shows the Invigilator Details (schedule, workload, position), Courses/Sections assigned, and the Teaching List of that invigilator.
5.6 Process & Analyze Non Academic Raw Data
After processing Lecturer Raw Data, proceed to process Non Academic Raw Data. Non Academic staff will be converted to invigilators and assigned to the Non Academic group.
Step 1 — Navigate back to Non Academic Raw Data under the Raw Data tab. Click Check All icon to check all Non Academic raw data, then click Process Non Academic Raw Data icon .
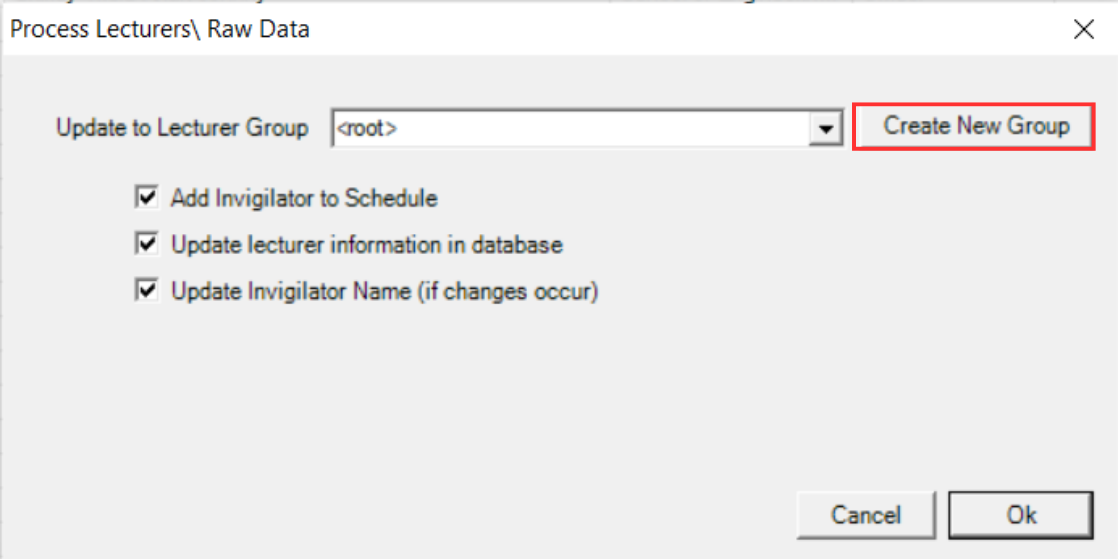
Step 2 — Before processing, a Non Academic invigilator group must be selected. Click the Update to Lecturer Group dropdown to check available groups. By default, only <root> is available.
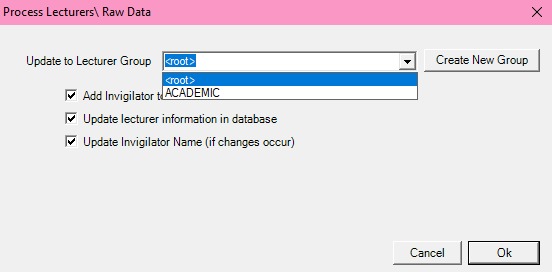
Step 3 — Since no group exists yet, click Create New Group to create one.
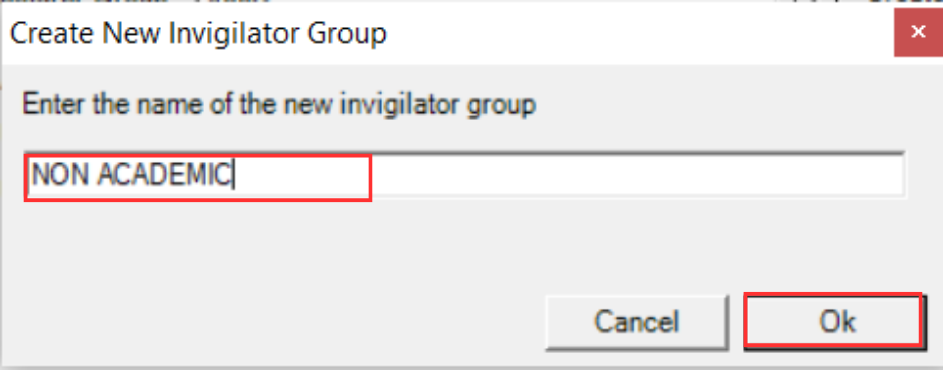
Step 4 — Enter the group name (for example: NON ACADEMIC), then click OK.
Step 5 — After creating the group, click the dropdown button and select the newly created group (e.g., NON ACADEMIC).
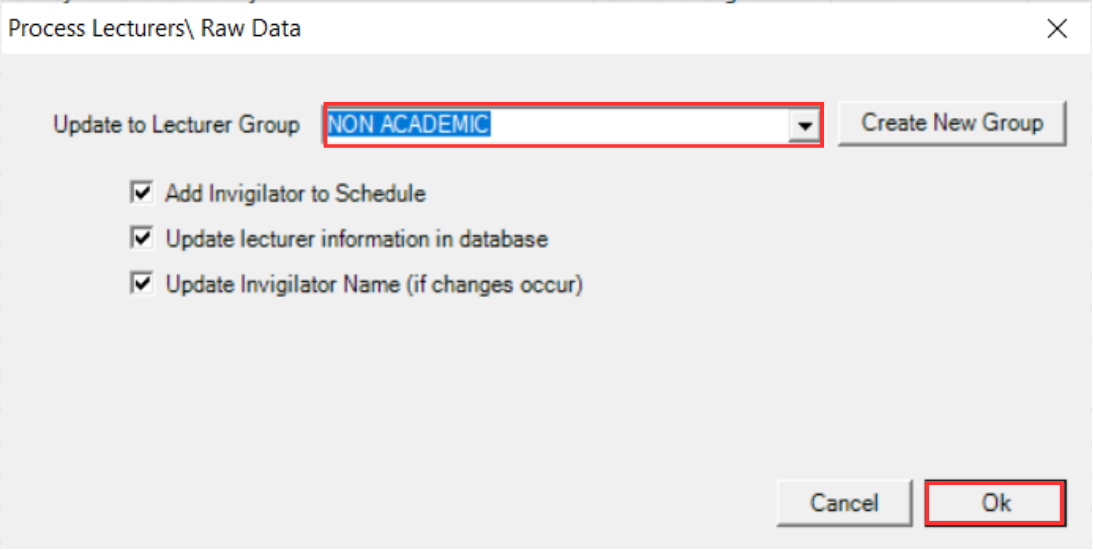
The following tick options are available when processing:
- Add Invigilator to Schedule — Adds the Non Academic staff as an invigilator in the exam schedule.
- Update Lecturer Information in Database — Updates the staff details stored in the database.
- Update Invigilator Name — Updates the invigilator name if any changes have occurred.
Step 6 — Click OK to start processing Non Academic Raw Data.
Analyze Non Academic Raw Data
After processing, analyze the results to ensure all Non Academic staff have been correctly converted to invigilators.
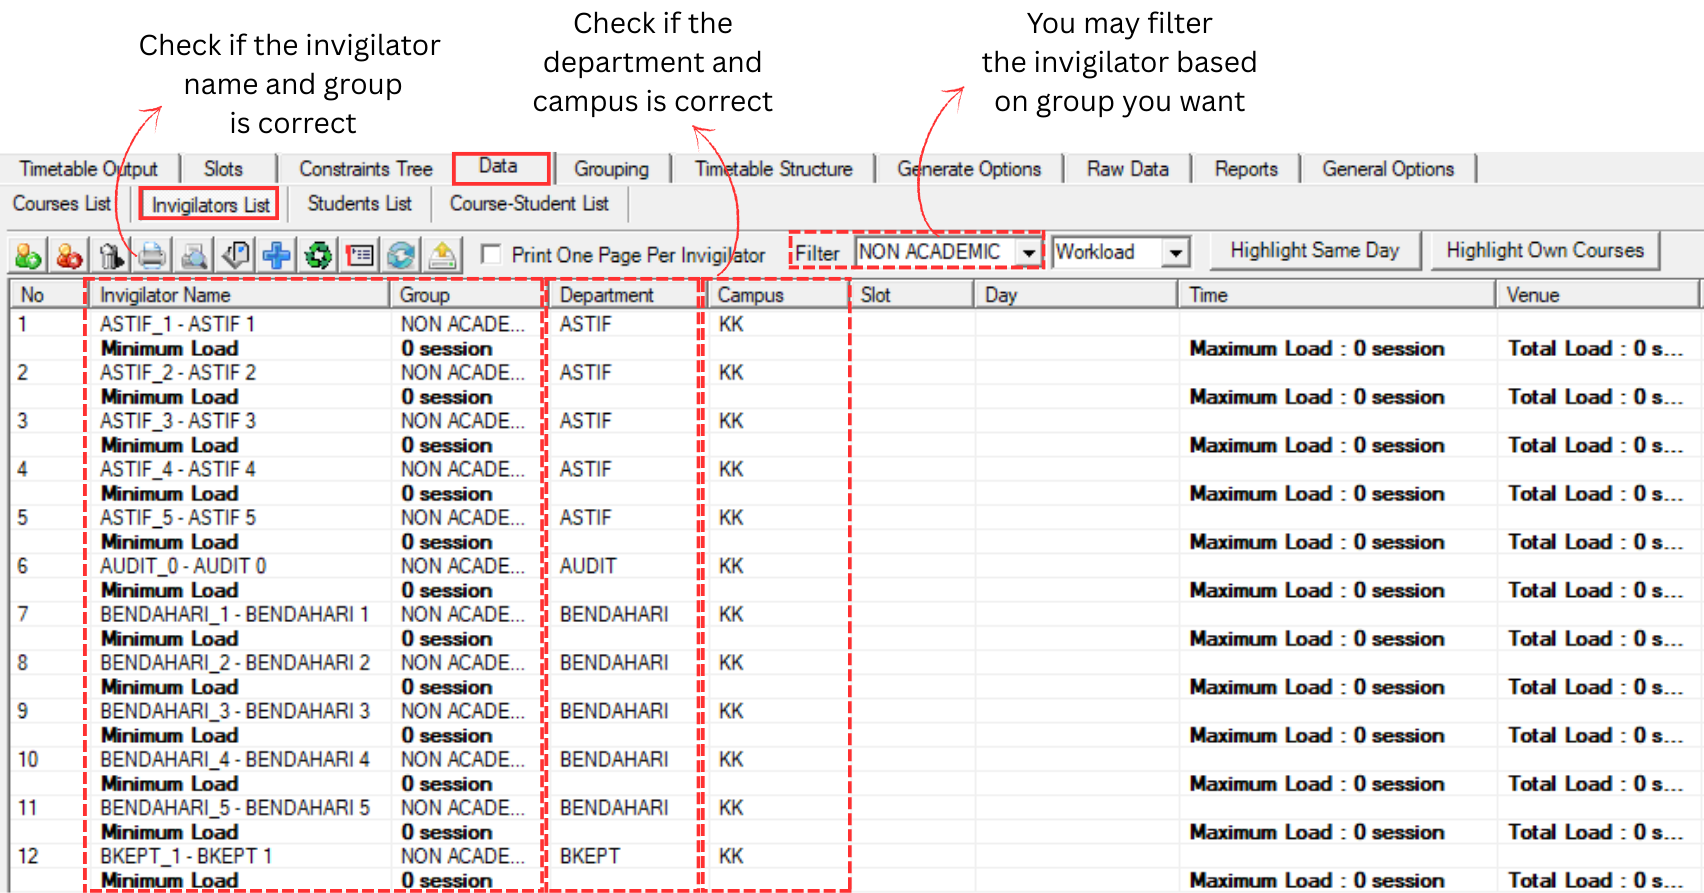
Invigilator List
Check if the invigilator name and group are correct. You may filter the invigilator based on the group you want. Also verify that each invigilator's campus is assigned correctly.
Invigilator Grouping
You can also verify Non Academic data at Grouping > Invigilator Grouping. Expand the NON ACADEMIC group to view all non-academic invigilators. Non-academic staff will not have teaching courses, so the Teaching List will be empty.