Generate Invigilators & Seating
Generate and manage invigilators, positions, and seating arrangement.
8.1 Overview
This chapter covers generating and managing invigilators, invigilator positions, and seating arrangement. After all courses have been generated and locked in the previous chapter, you can proceed with the following steps:
- Generate Invigilators — Set constraints and assign invigilators to exam slots
- Analyze & Edit Invigilators — Review and adjust invigilator assignments
- Generate Invigilator Positions — Define and assign positions (e.g., Chief Invigilator)
- Analyze & Edit Positions — Review and adjust position assignments
- Generate Seating Arrangement — Generate student seating
- Analyze & Edit Seating — Review and adjust seating arrangement
8.2 Generate Invigilators
After all courses have been generated and locked, you can now assign invigilators. Before generating, you need to set the invigilator constraints first, then configure the generate options.
8.2.1 Set Constraints for Invigilator
There are 2 places where you can set constraints for Invigilator:
- Data — Invigilators List
- Grouping — Invigilator Grouping
Invigilators List
Step 1: Click the Data tab and then click the Invigilators List tab to open up the Invigilators List window.

The Invigilators List window displays all invigilators with their details such as name, group, department, campus, minimum load, maximum load, maximum position, and total position.
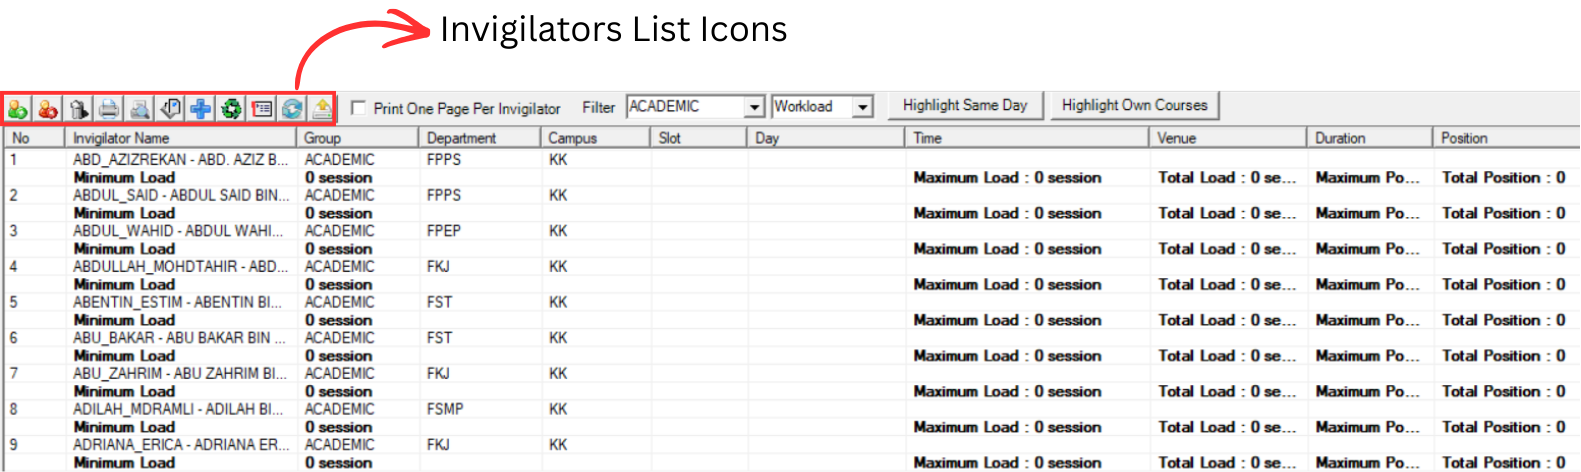
Inside the Invigilators List window, you will be able to see icons on the top left side. Each icon has a specific function:
Step 2: To set constraints for an invigilator, double click the lecturer OR click the lecturer until highlighted in blue and then click the Set Preferences icon to open up the Lecturer Constraints window.

Lecturer Constraints Window
The Lecturer Constraints window has 3 sections that you can configure:
- Invigilator Details — Edit invigilator information and permissions
- Time Slot Preferences — Define which time slots the invigilator is available
- Workload — Set maximum load, maximum position, and minimum load
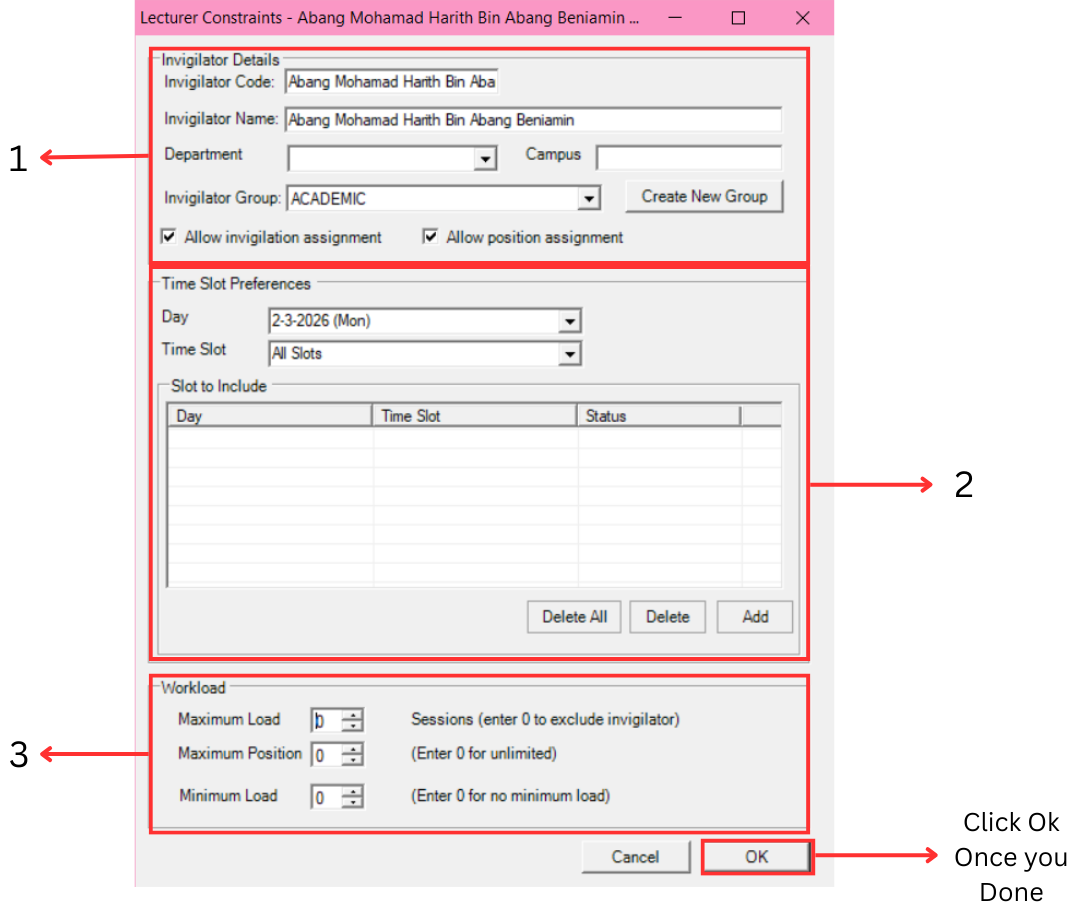
1. Invigilator Details
In this section, you can view and edit the invigilator's information.

- Invigilator Code — You can make changes to the invigilator code.
- Invigilator Name — You can make changes to the invigilator name.
- Department — Click the dropdown button
 to choose the department.
 - Invigilator Group — Click the dropdown button to choose the invigilator group. You can also click Create New Group to create a new invigilator group by entering the group name (e.g., Academic).
- Allow invigilation assignment — Tick this checkbox to allow the invigilator to be assigned to invigilation duties. If unticked, the invigilator will be excluded from invigilation assignment.
- Allow position assignment — Tick this checkbox to allow the invigilator to be assigned to positions. If unticked, the invigilator will be excluded from position assignment.
2. Time Slot Preferences
In this section, you can define which time slots the invigilator is available or preferred to work. Lecturers can define the time slot or day to include by adding to the Slot to Include box.
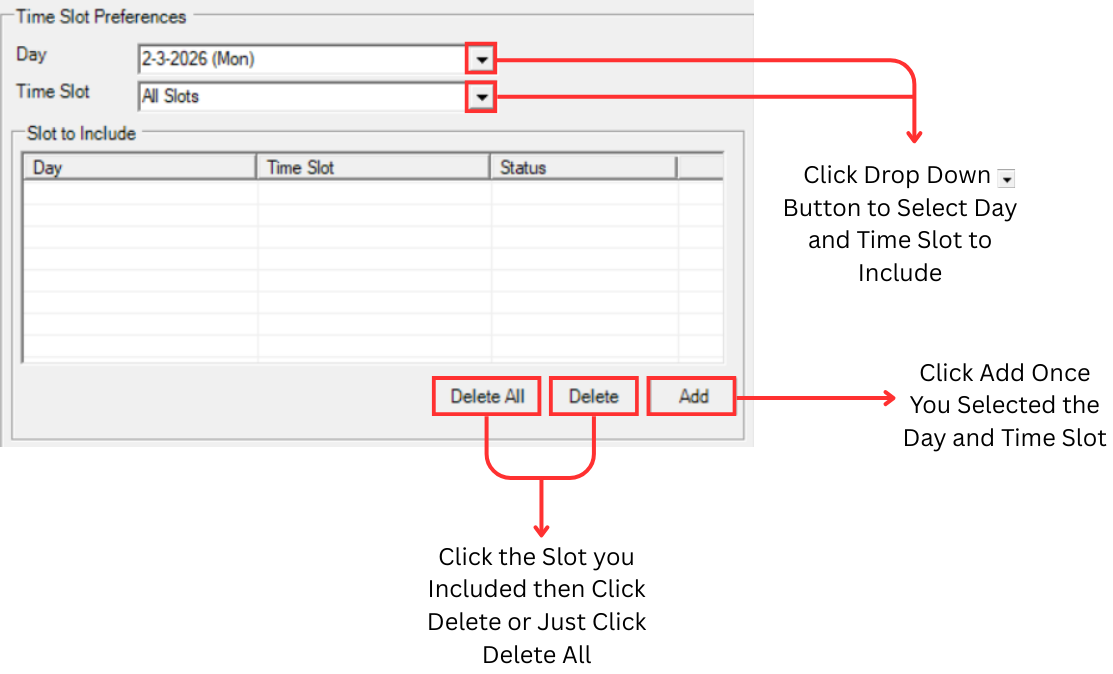
- Day — Click the dropdown to select the day you want to include.
- Time Slot — Click the dropdown to select the time slot you want to include. You can select All Slots to include all time slots for that day.
- Add — Click Add once you have selected the day and time slot to add it to the Slot to Include list.
- Delete — Click the slot you want to remove in the list, then click Delete to remove it.
- Delete All — Click Delete All to remove all slots from the list.
3. Workload
In this section, you can set the workload limits for the invigilator.
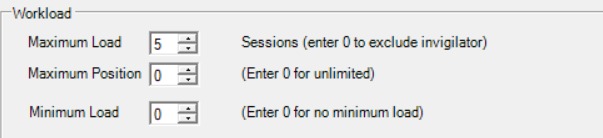
- Maximum Load — The maximum number of sessions the invigilator can be assigned. Enter 0 to exclude the invigilator from invigilation entirely.
- Maximum Position — The maximum number of positions the invigilator can hold. Enter 0 for unlimited positions.
- Minimum Load — The minimum number of sessions the invigilator should be assigned. Enter 0 for no minimum load requirement.
- Maximum Load = 0 → The invigilator will be excluded from invigilation (not assigned at all).
- Maximum Position = 0 → The invigilator can hold unlimited positions.
- Minimum Load = 0 → There is no minimum requirement (the invigilator may or may not be assigned).
Click OK once you are done to save the constraints.
Invigilator Grouping
The second place to set constraints is through the Invigilator Grouping tab. This allows you to manage invigilators by groups and apply group-level actions.
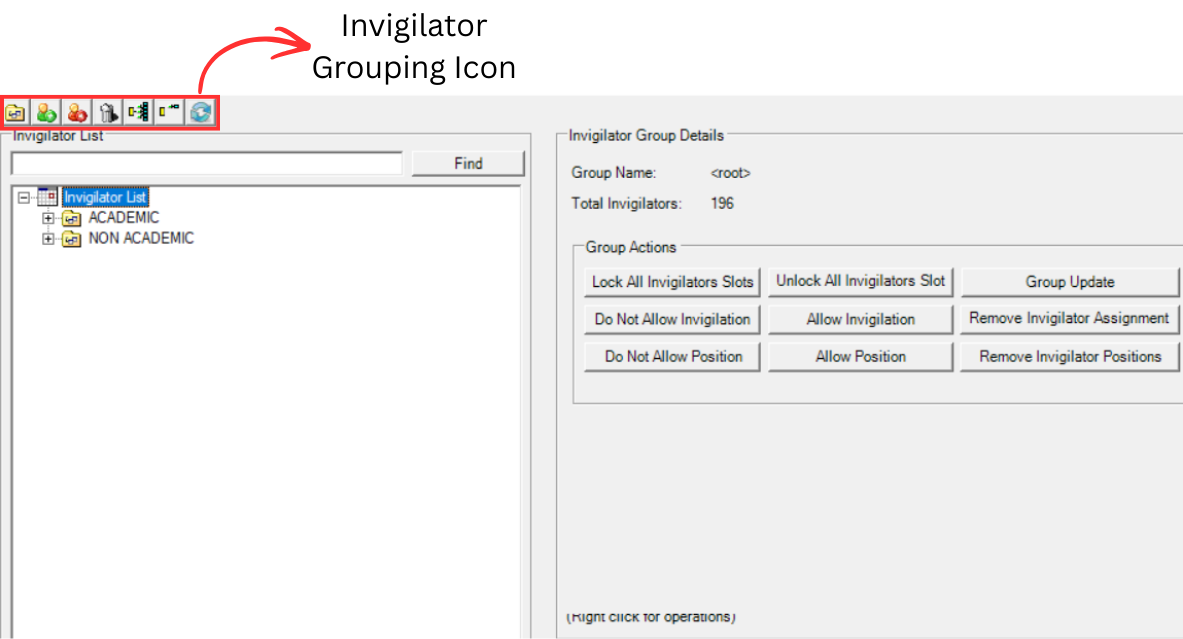
Step 1: Click the Grouping tab and then click the Invigilator Grouping tab to open up the Invigilator Grouping window.

The Invigilator Grouping window shows the invigilator groups on the left (e.g., Academic, Non-Academic) and the Group Actions on the right. You can perform the following group actions:
| Action | Description |
|---|---|
| Lock All Invigilators Slots | Lock all invigilators in the selected group so their assignments cannot be changed. |
| Unlock All Invigilators Slot | Unlock all invigilators in the selected group. |
| Do Not Allow Invigilation | Prevent all invigilators in the group from being assigned to invigilation duties. |
| Allow Invigilation | Allow all invigilators in the group to be assigned to invigilation duties. |
| Remove Invigilator Assignment | Remove all invigilation assignments for invigilators in the group. |
| Do Not Allow Position | Prevent all invigilators in the group from being assigned to positions. |
| Allow Position | Allow all invigilators in the group to be assigned to positions. |
| Remove Invigilator Positions | Remove all position assignments for invigilators in the group. |
Inside the Invigilator Grouping window, you will also see icons on the top left side:
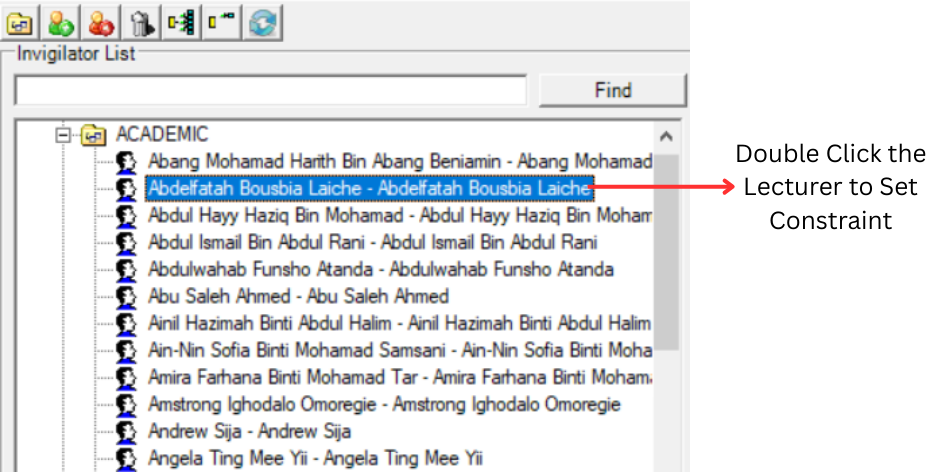
Step 2: To set constraints for an individual invigilator from the grouping view, double click the lecturer to open up the Lecturer Constraints window and set the constraint. This opens the same Lecturer Constraints window as described above.
8.2.2 Set Constraints at Generate Option
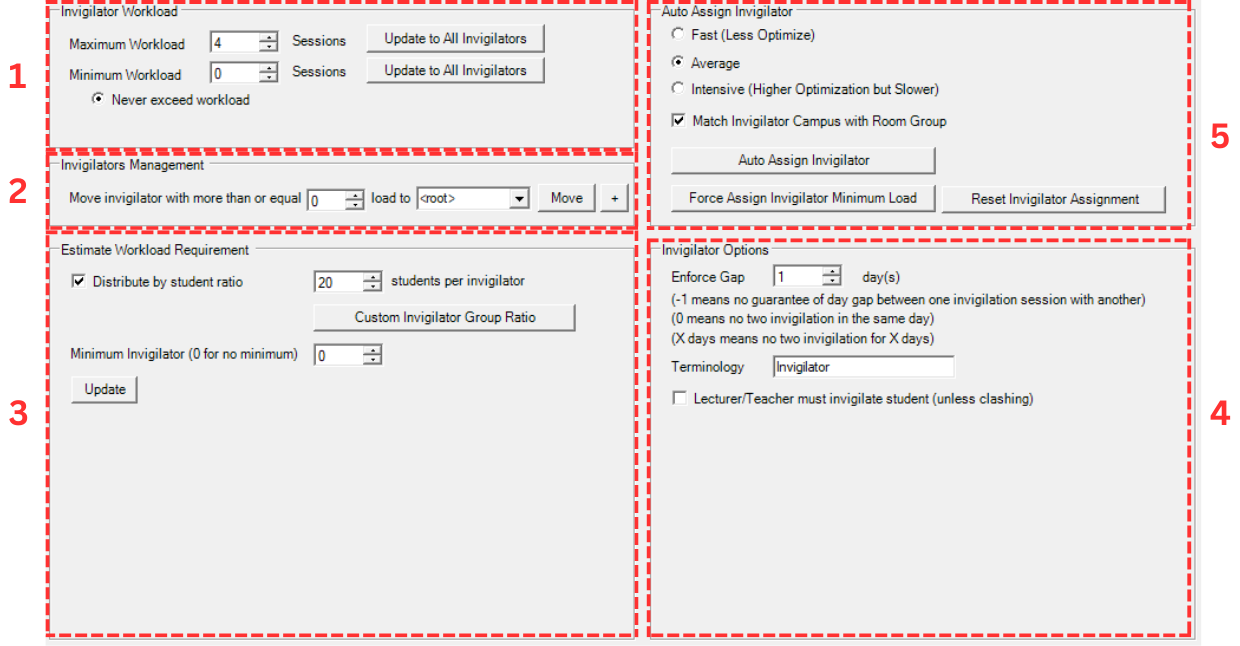
Step 1: Click the Generate Options tab and then click Invigilator to set the invigilator constraints.

The Invigilator window at Generate Options has 5 areas that you can configure:
- Invigilator Workload — Set maximum and minimum workload for all invigilators
- Invigilators Management — Move invigilators between groups based on load
- Estimate Workload Requirement — Set student-to-invigilator ratio
- Invigilator Options — Configure gap, terminology, and assignment rules
- Auto Assign Invigilator — Generate and assign invigilators
1. Invigilator Workload
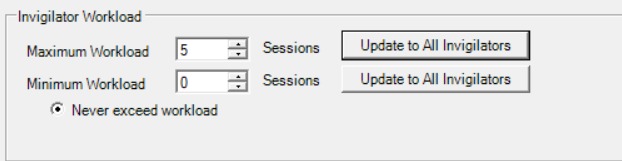
- Maximum Workload — The maximum number of sessions an invigilator can be assigned. Sessions means slots. For example, if you enter maximum workload 5, it means 5 sessions (slots).
- Minimum Workload — The minimum number of sessions an invigilator should be assigned.
- Update to All Invigilators
 — Click this button after making any changes to Maximum Workload or Minimum Workload to apply the changes to all invigilators.
 - Never exceed workload — Select this radio button if you do not want any invigilator to exceed the maximum workload limit under any circumstances.
- Allow exceed workload if number of section taught exceeds workload — Select this radio button if you want to allow the system to exceed the workload limit when an invigilator teaches more sections than the workload allows. This is useful when a lecturer has many sections and needs to invigilate all of them.
2. Invigilators Management
This section allows you to move invigilators between groups based on their load. For example, if you want to group invigilators that have more than or equal to 4 load, you may use this option.
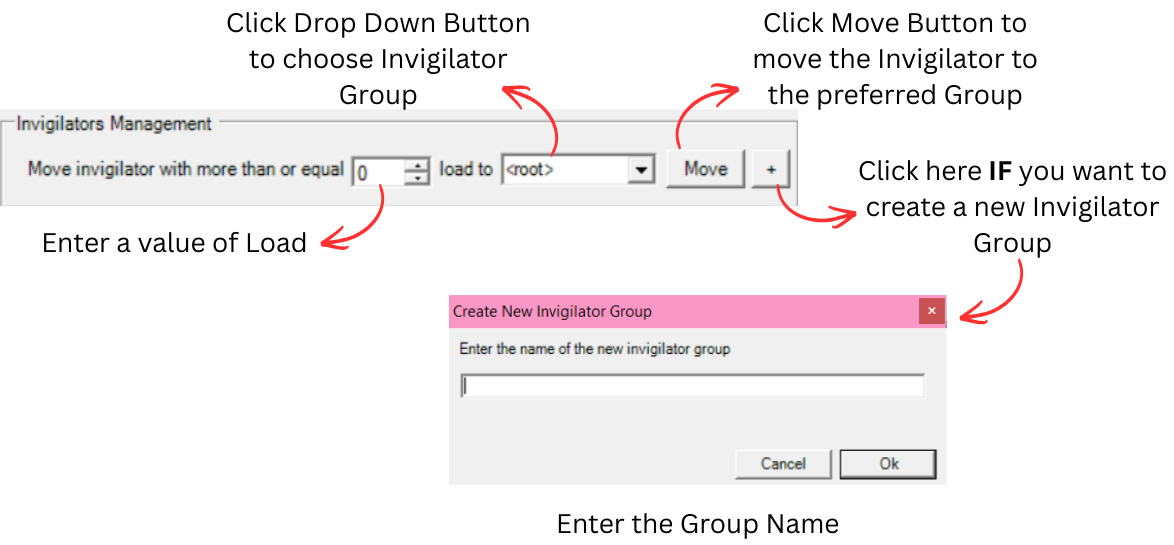
- Move invigilator with more than or equal — Enter a value of load to filter invigilators.
- load to — Click the dropdown button to choose the invigilator group you want to move them to.
- Move — Click the Move button to move the filtered invigilators to the selected group.
- + — Click this button if you want to create a new invigilator group. Enter the group name and click OK.
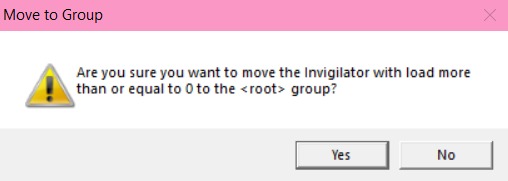
A confirmation window will appear after you click the Move button. Click Yes to proceed.
3. Estimate Workload Requirement
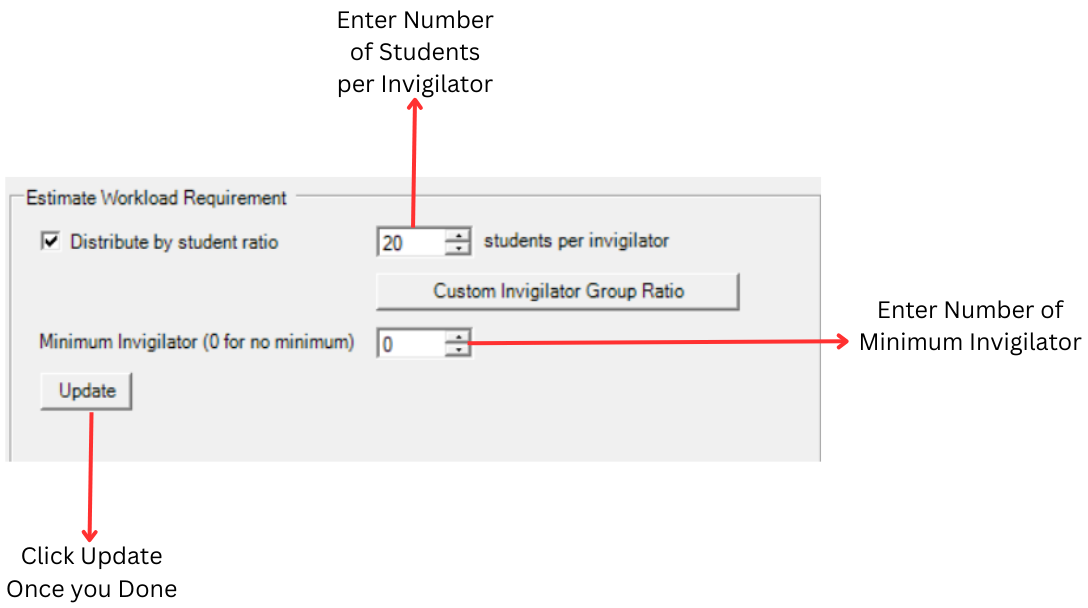
- Distribute by student ratio — Tick this checkbox and enter the number of students per invigilator. For example, if you set 20, then for every 20 students there will be 1 invigilator assigned.
- Minimum Invigilator (0 for no minimum) — Enter the minimum number of invigilators required per session. For example, enter 2 if you need at least 2 invigilators to invigilate the examination. Enter 0 for no minimum.
- Custom Invigilator Group Ratio — Click this button to set the ratio individually for each invigilator group, meaning each group will have a different ratio from each other.
- Update — Click Update once you are done to apply the settings.
After clicking Custom Invigilator Group Ratio, a new window will appear:
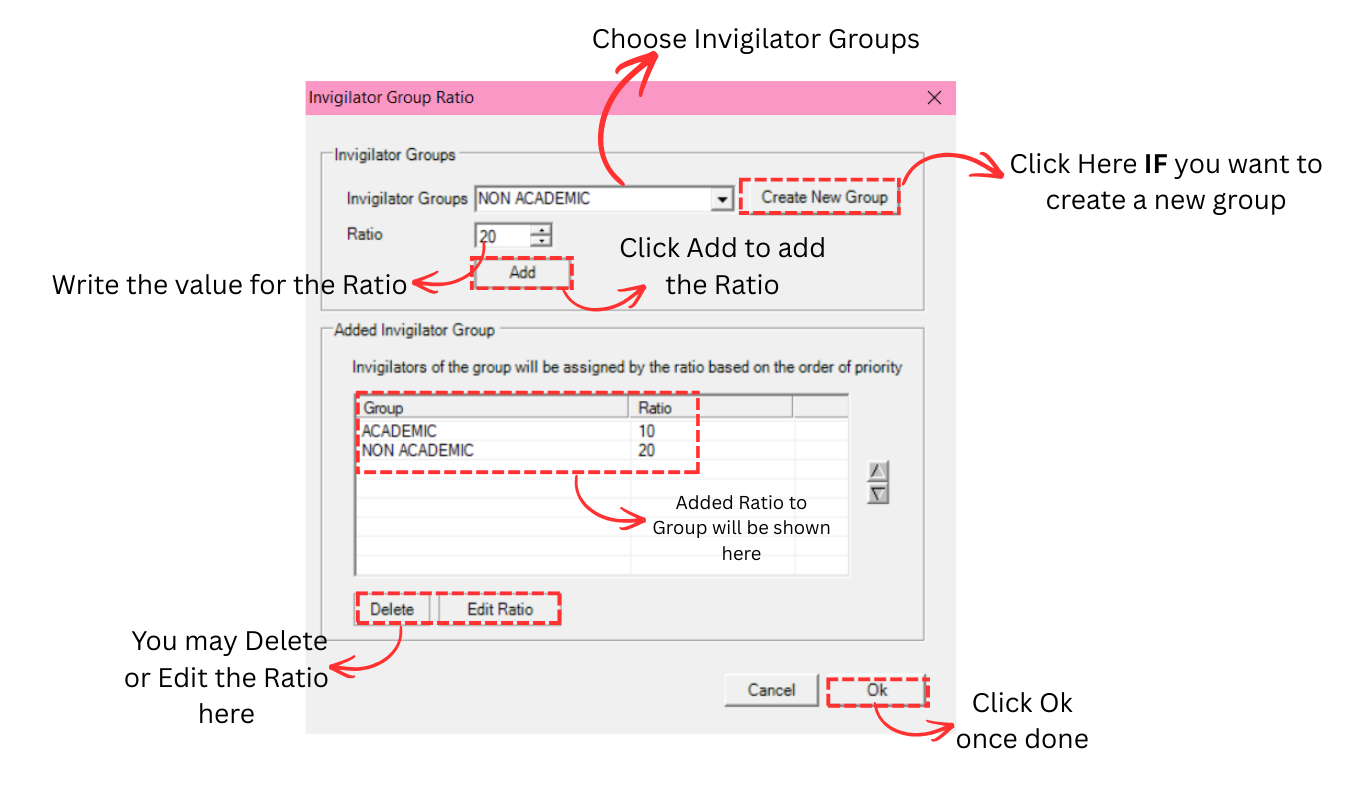
- Invigilator Groups — Choose the invigilator group from the dropdown.
- Ratio — Write the value for the ratio (number of students per invigilator for this group).
- Add — Click Add to add the ratio for the selected group. The added ratio will be shown in the list below.
- Create New Group — Click this if you want to create a new invigilator group.
- Delete / Edit Ratio — You may delete or edit the ratio for any group in the list.
- Click OK once done. Invigilators of the group will be assigned by the ratio based on the order of priority.
4. Invigilator Options
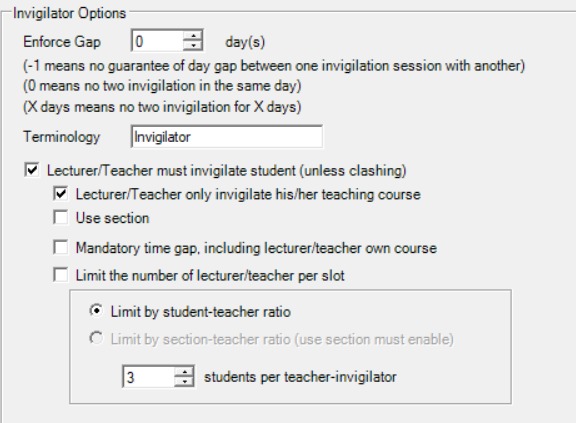
Enforce Gap:

If you want to enforce a gap, you may change the value of the day in the field:
- -1 — No guarantee of day gap between one invigilation session with another. Meaning there might be two invigilation sessions in a day.
- 0 — No two invigilation in the same day. Meaning there will be only one per day.
- X days — No two invigilation for X days. Meaning there will be a gap of X days between invigilation sessions.
Terminology:

You may choose the name for the invigilator that suits your preferences. The default is Invigilator.
Lecturer/Teacher Must Invigilate Student:
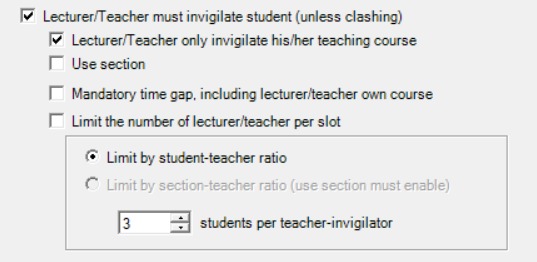
- Lecturer/Teacher must invigilate student (unless clashing) — The lecturer of the subject/course needs to invigilate the course. But they can invigilate other courses as well. If there is a time clash, the system will skip the assignment.
- Lecturer/Teacher only invigilate his/her teaching course — If you tick this, the lecturer of the subject/course will only be able to invigilate their own course and not the others.
- Use section — This will help to generate invigilator based on their section. Some of the courses will have a few sections and each section might have different lecturer/teacher.
- Mandatory time gap, including lecturer/teacher own course — This will apply the time gap (Enforce Gap) for the lecturer to invigilate, including their own courses.
- Limit the number of lecturer/teacher per slot — This will limit the number of invigilators per slot. There are two options under this:
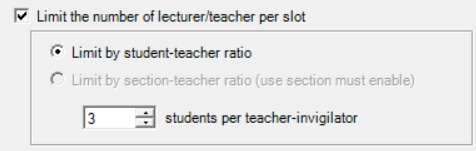
- Limit by student-teacher ratio — This option will use the ratio set under Estimate Workload Requirement to determine the number of invigilators per slot.
- Limit by section-teacher ratio — You need to tick Use Section to use this option. For example, each course has a few sections and each section has their own lecturer. This will limit the number of lecturers for the section to invigilate by having the ratio of students to avoid having too many invigilators per slot.
- X students per teacher-invigilator — Enter the number of students per teacher-invigilator for the ratio calculation.
5. Auto Assign Invigilator
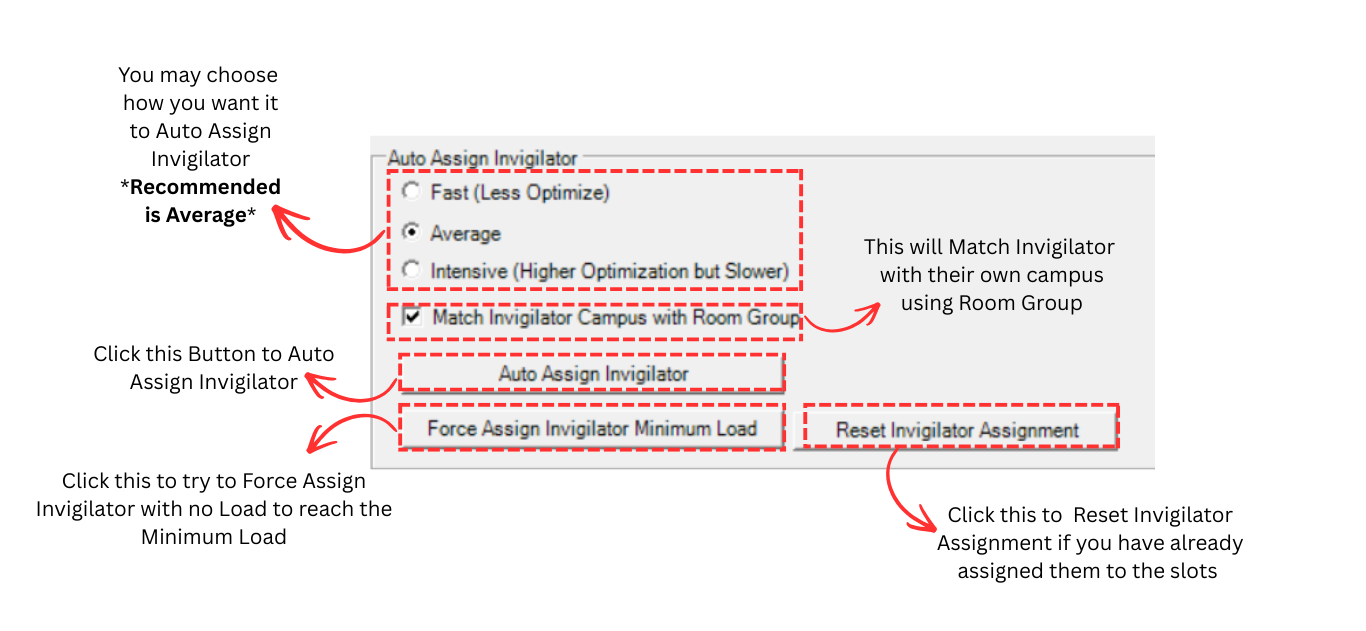
Generation Quality:
You may choose how you want to auto assign invigilators:
- Fast (Less Optimize) — Assigns invigilators quickly but with less optimization.
- Average — A balanced option that provides good optimization within a reasonable time. This is the recommended setting.
- Intensive (Higher Optimization but Slower) — Spends more time to produce a highly optimized assignment.
Match Invigilator Campus with Room Group:
Tick this checkbox to match invigilators with their own campus using the Room Group. This ensures that invigilators are only assigned to rooms within their campus.
Action Buttons:
- Auto Assign Invigilator — Click this button to automatically assign invigilators to the scheduled exams based on the constraints and options you have configured.
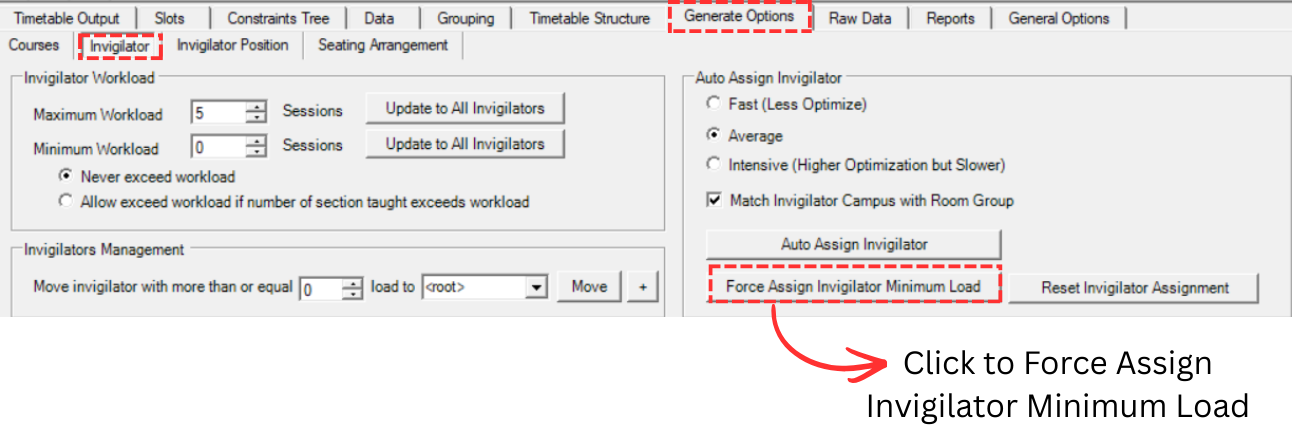
- Force Assign Invigilator Minimum Load — Click this button to force assign invigilators who have not yet reached their minimum load. This is useful to ensure all invigilators meet the minimum workload requirement.
- Reset Invigilator Assignment — Click this button to reset all invigilator assignments if you have already assigned them to the slots and want to start over.
8.2.3 Assign Invigilator
After setting all constraints and generate options, you can now assign invigilators to the scheduled exams. There are 3 actions you can perform:
- Auto Assign Invigilator — Automatically assign invigilators to all slots
- Force Assign Invigilator Minimum Load — Force assign invigilators who have not reached their minimum load
- Lock Invigilator — Lock invigilator assignments to prevent changes
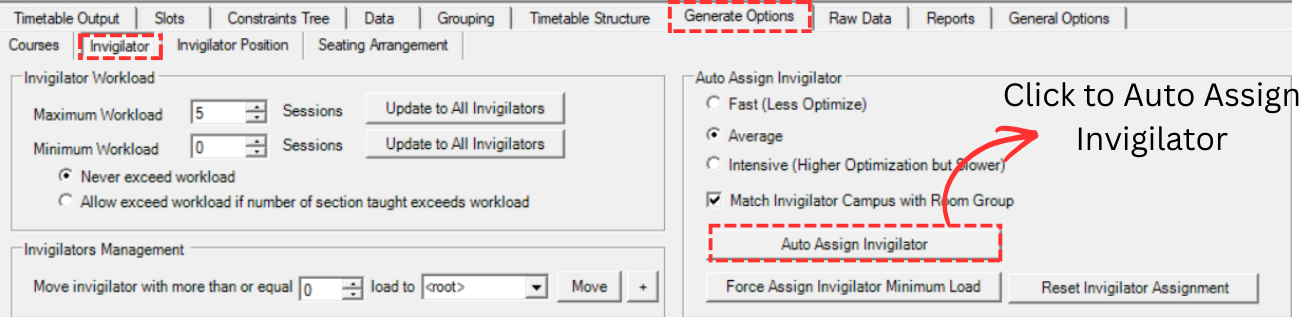
1. Auto Assign Invigilator
Step 1: To auto assign invigilators, click the Auto Assign Invigilator button at Invigilator under the Generate Options tab.
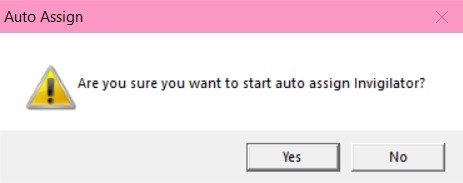
Step 2: A confirmation popup will appear asking "Are you sure you want to start auto assign Invigilator?". Click Yes to proceed.
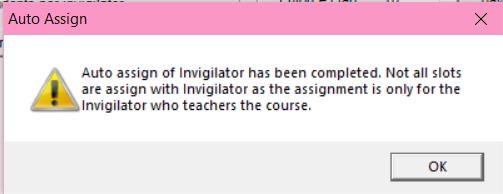
Step 3: After the auto assign process is completed, a result popup will appear. You may get one of the following two messages:
All slots have been assigned:
This means all slots have been successfully assigned with a sufficient number of invigilators. No further action is needed for assignment.

Not all slots are assigned:
This means the auto assign has been completed, but not all slots have been assigned with invigilators. The assignment was only for the invigilator who teaches the course. You may need to use Force Assign Invigilator Minimum Load to fill the remaining slots.
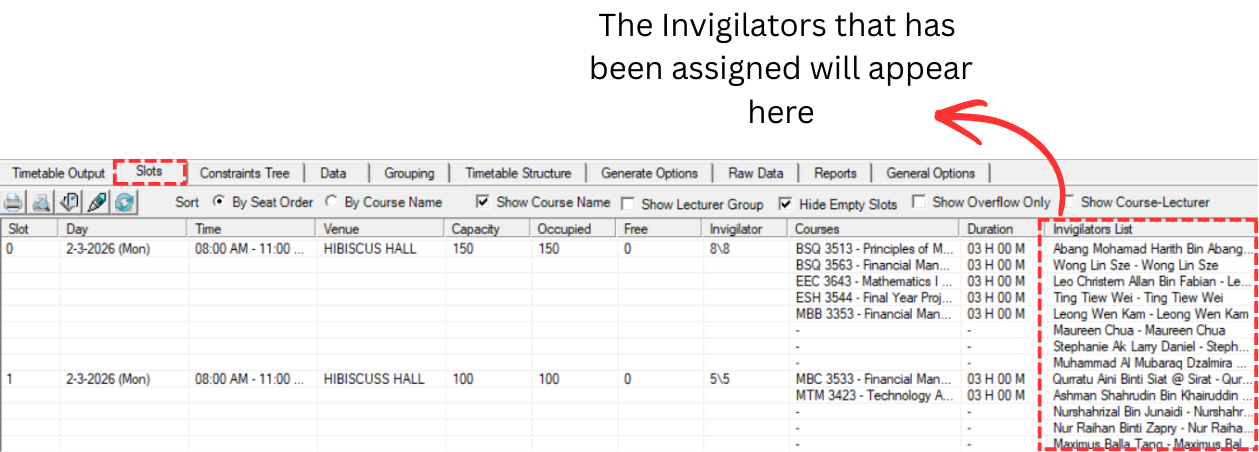
Step 4: Once done, you can go to the Slots tab to view the Invigilators List. The invigilators that have been assigned will appear in the Invigilators List column for each slot.
2. Force Assign Invigilator Minimum Load
You may use this function if not all slots are assigned with invigilators after auto assign. Force assign minimum load will auto assign invigilators to make sure they meet their minimum load requirement.
Step 1: To force assign, click the Force Assign Invigilator Minimum Load button at Invigilator under the Generate Options tab.
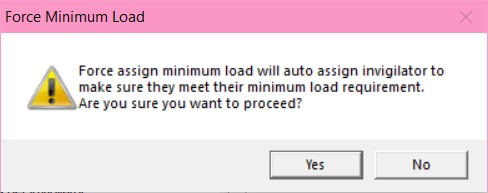
Step 2: A confirmation popup will appear saying "Force assign minimum load will auto assign invigilator to make sure they meet their minimum load requirement. Are you sure you want to proceed?". Click Yes to proceed.
Step 3: Once done, another popup will appear saying "Force minimum load assignment completed". Click OK.

3. Lock Invigilator
If the invigilators are confirmed and you want to lock them, there are two ways of doing so:
- Lock Invigilators in a Slot
- Lock All Invigilators
Lock Invigilators in a Slot
To lock only invigilators in a specific slot, there are 3 simple steps doing so.
Step 1: Go to Slots tab.
Step 2: Right click on any slot.
Step 3: Click Lock/Unlock and then select Lock Invigilators in this Slot.
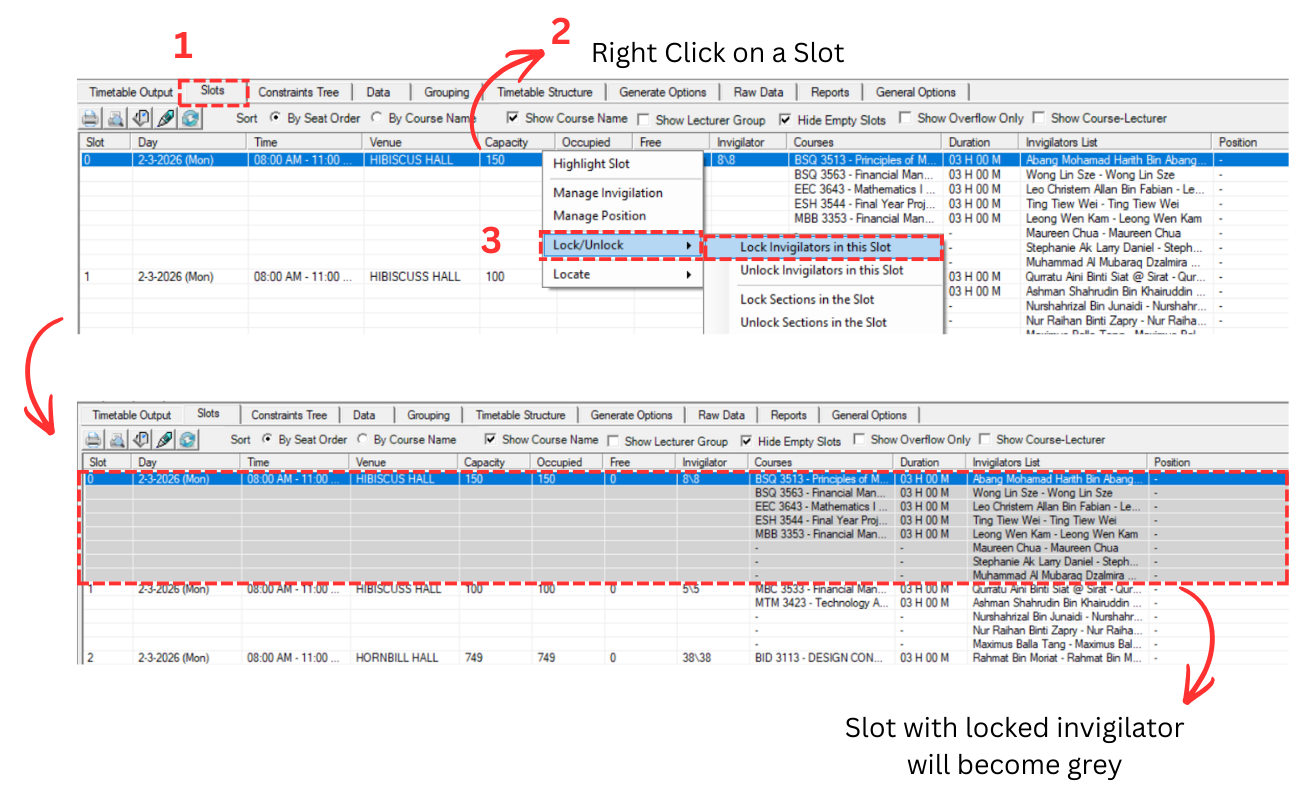
The slot with locked invigilators will become grey, indicating that the invigilator assignments for that slot are fixed and cannot be changed.
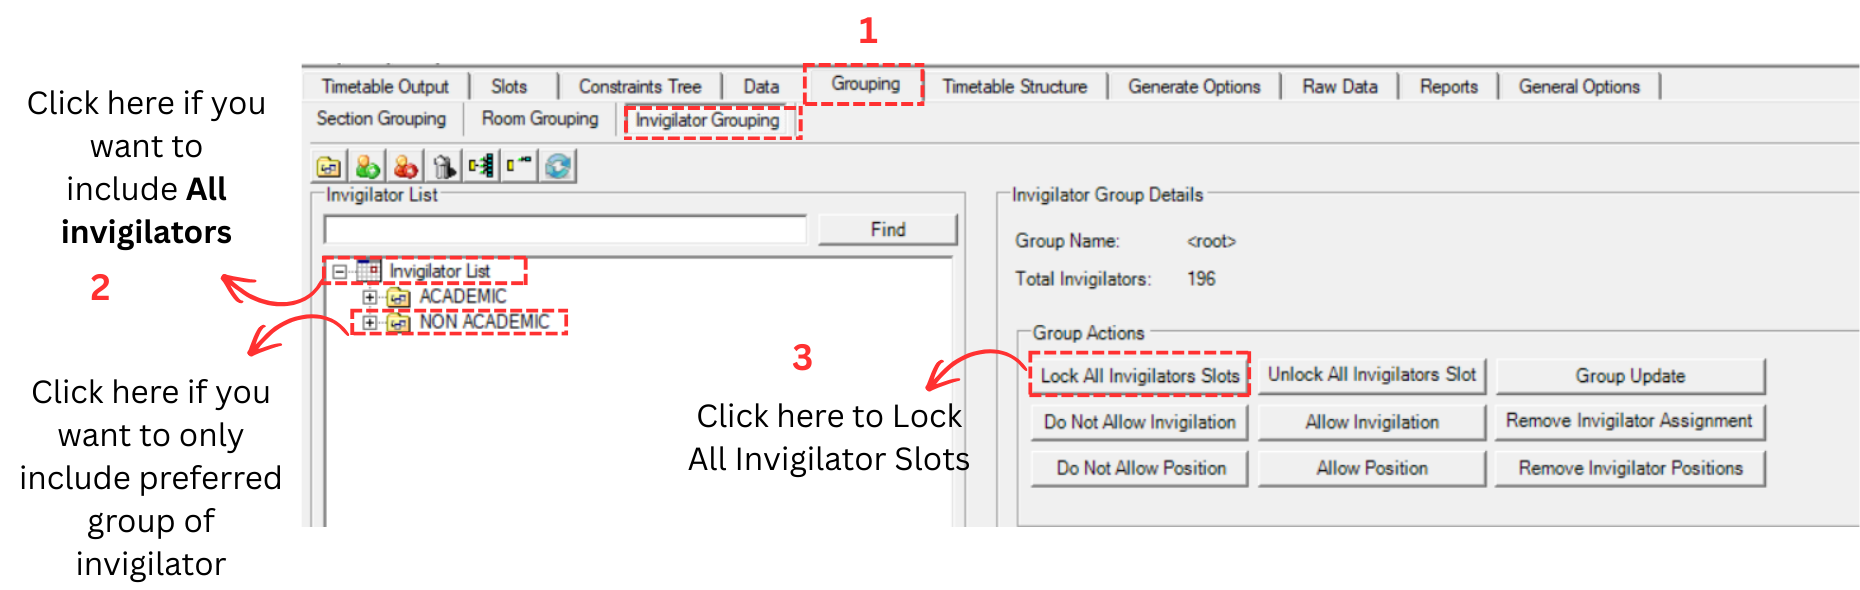
Lock All Invigilators
To lock all invigilators, there are 3 simple steps doing so.
Step 1: Go to Grouping tab and select Invigilator Grouping.
Step 2: Click on any preferred group of invigilator. OR you can click on the icon above all folders to include ALL invigilators.
Step 3: Click on Lock All Invigilators Slots from the Group Actions.
8.3 Analyze & Edit Invigilators
After assigning invigilators, review and verify the assignments before proceeding to invigilator positions.
8.3.1 Analysis
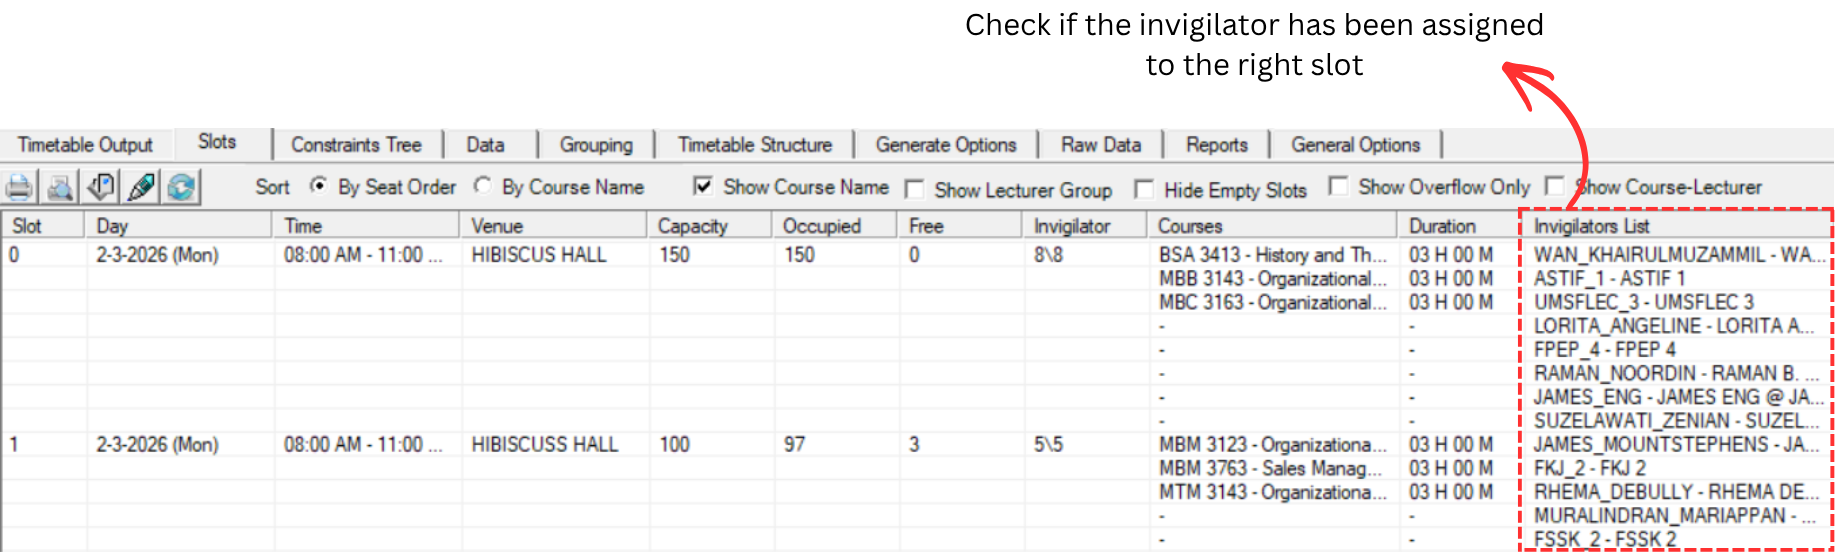
Slots
You may analyze the Invigilator to know if the invigilator has been placed in the right slot.
To edit, you may refer to the 8.3.2 Editing Invigilators.
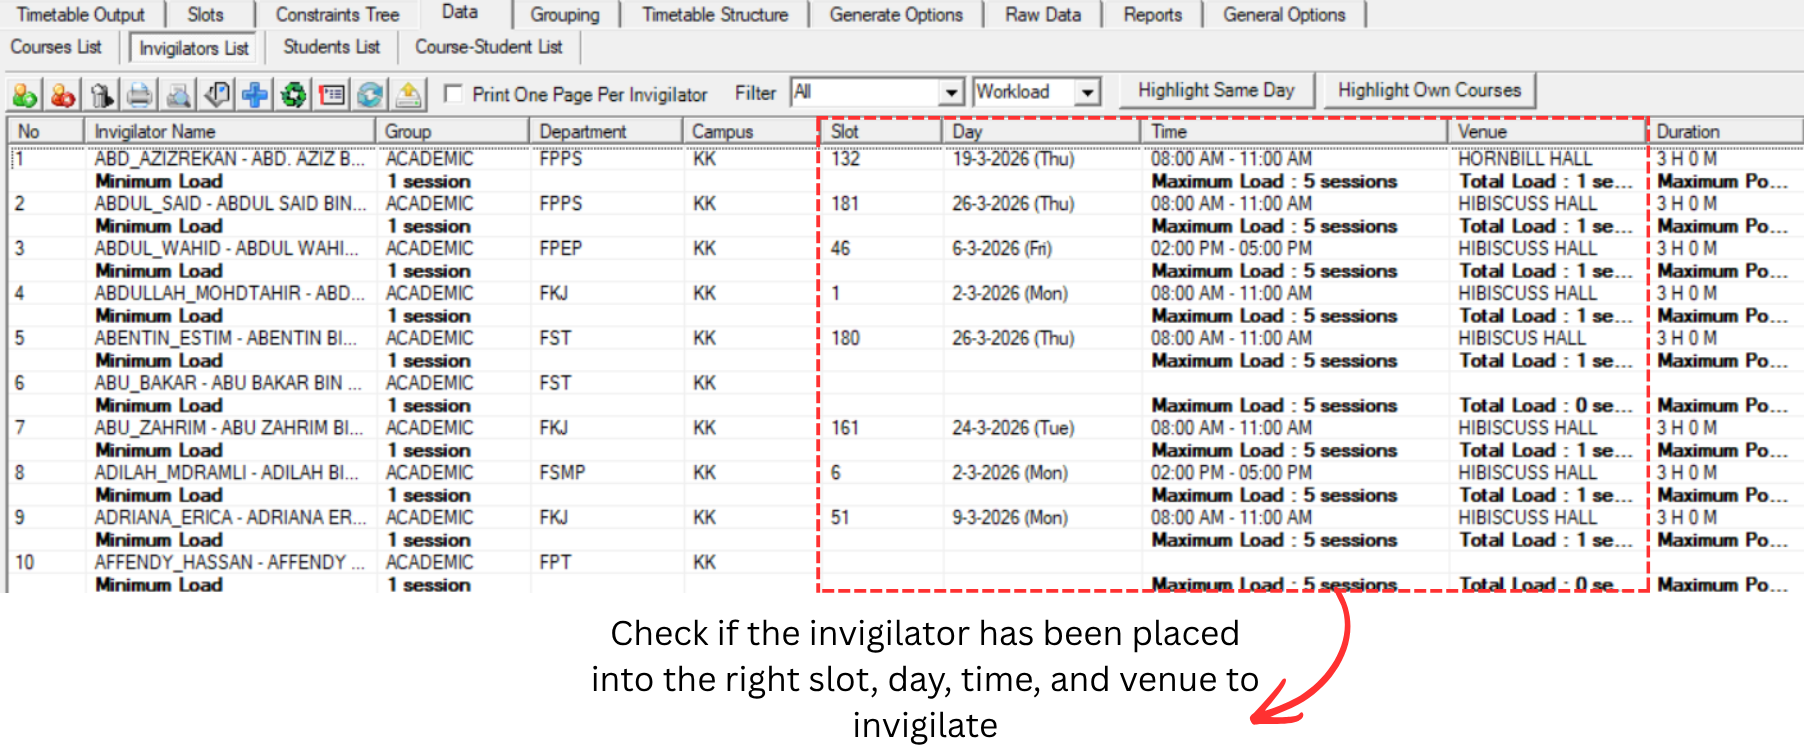
Invigilator List
To access Invigilator List, you need to go to Data and select Invigilators List.
You may analyze the Invigilator List to know if the invigilator has been placed in the right slot.
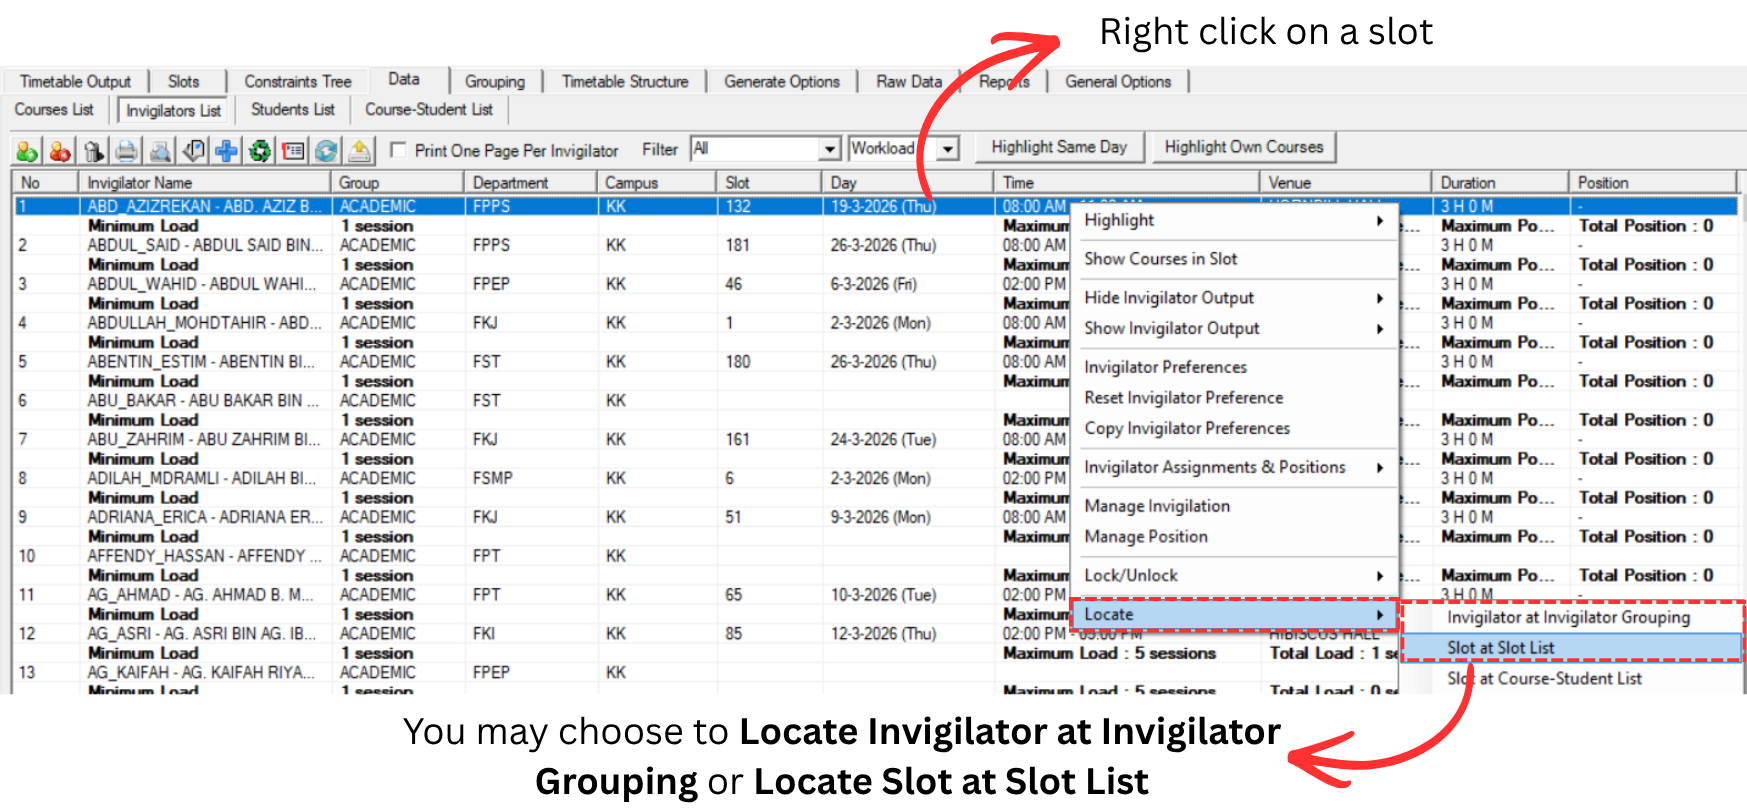
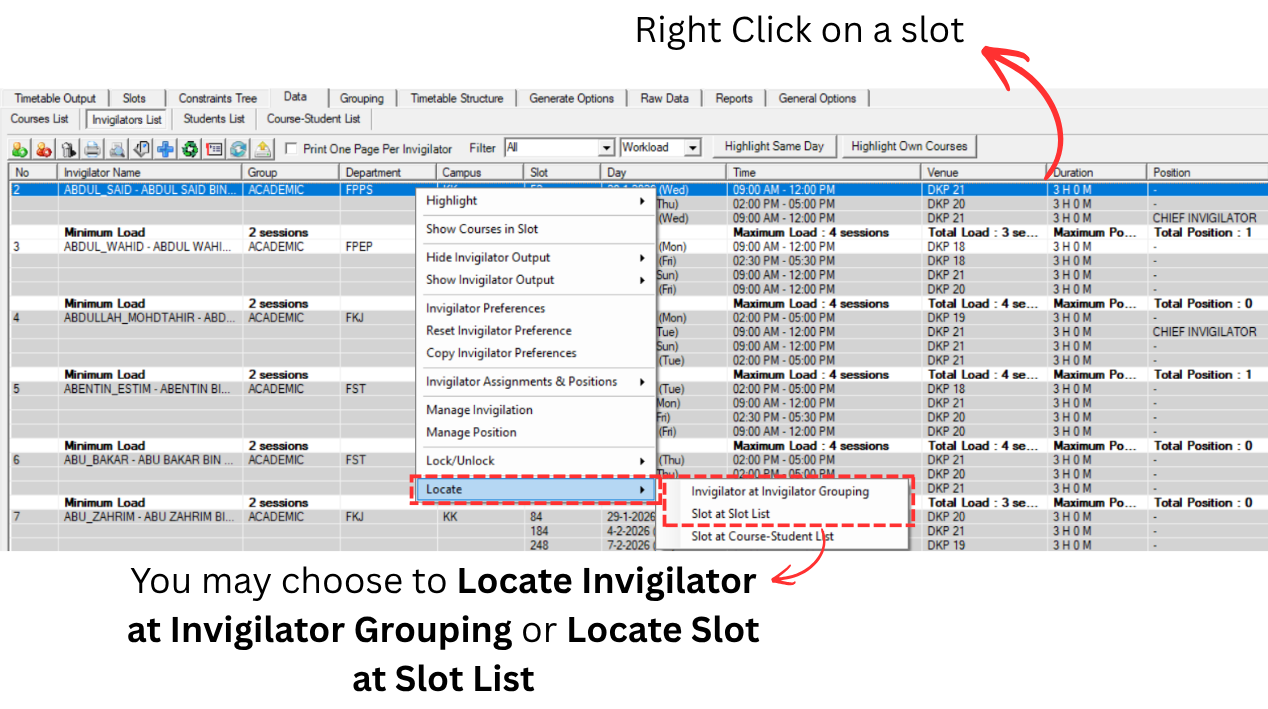
To Locate the invigilator, you may right click and select Locate. You may choose to Locate Invigilator at Invigilator Grouping or Locate Slot at Slot List.
To edit the invigilator at slot, please use Locate Slot at Slot List.
To edit, you may refer to the 8.3.2 Editing Invigilators.
Invigilator Grouping
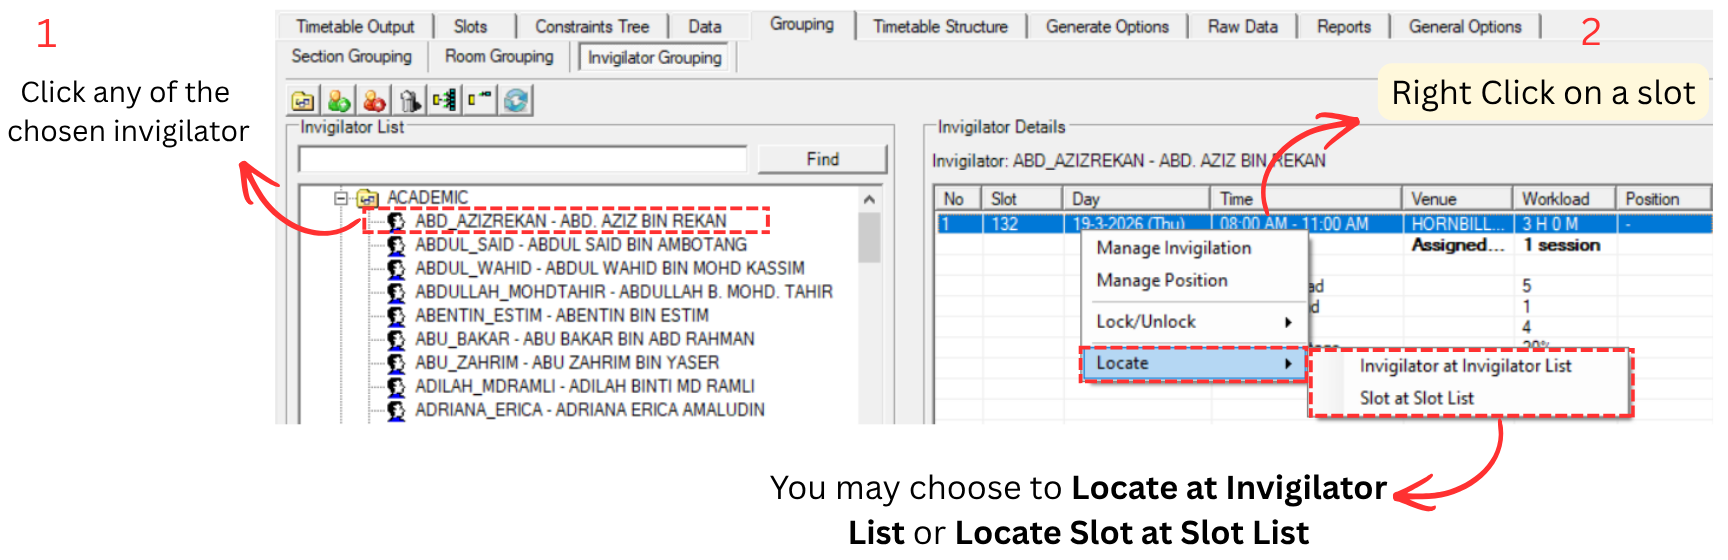
To access Invigilator Grouping, you need to go to Grouping and select Invigilators Grouping.
You may analyze the Invigilator Grouping to know if the invigilator has been placed in the right slot.
To Locate the invigilator, you may right click on slot and select Locate. You may choose to Locate Invigilator at Invigilator List or Locate Slot at Slot List.
To edit the invigilator at slot, please use Locate Slot at Slot List.
To edit, you may refer to the 8.3.2 Editing Invigilators.
8.3.2 Editing Invigilators
Highlight
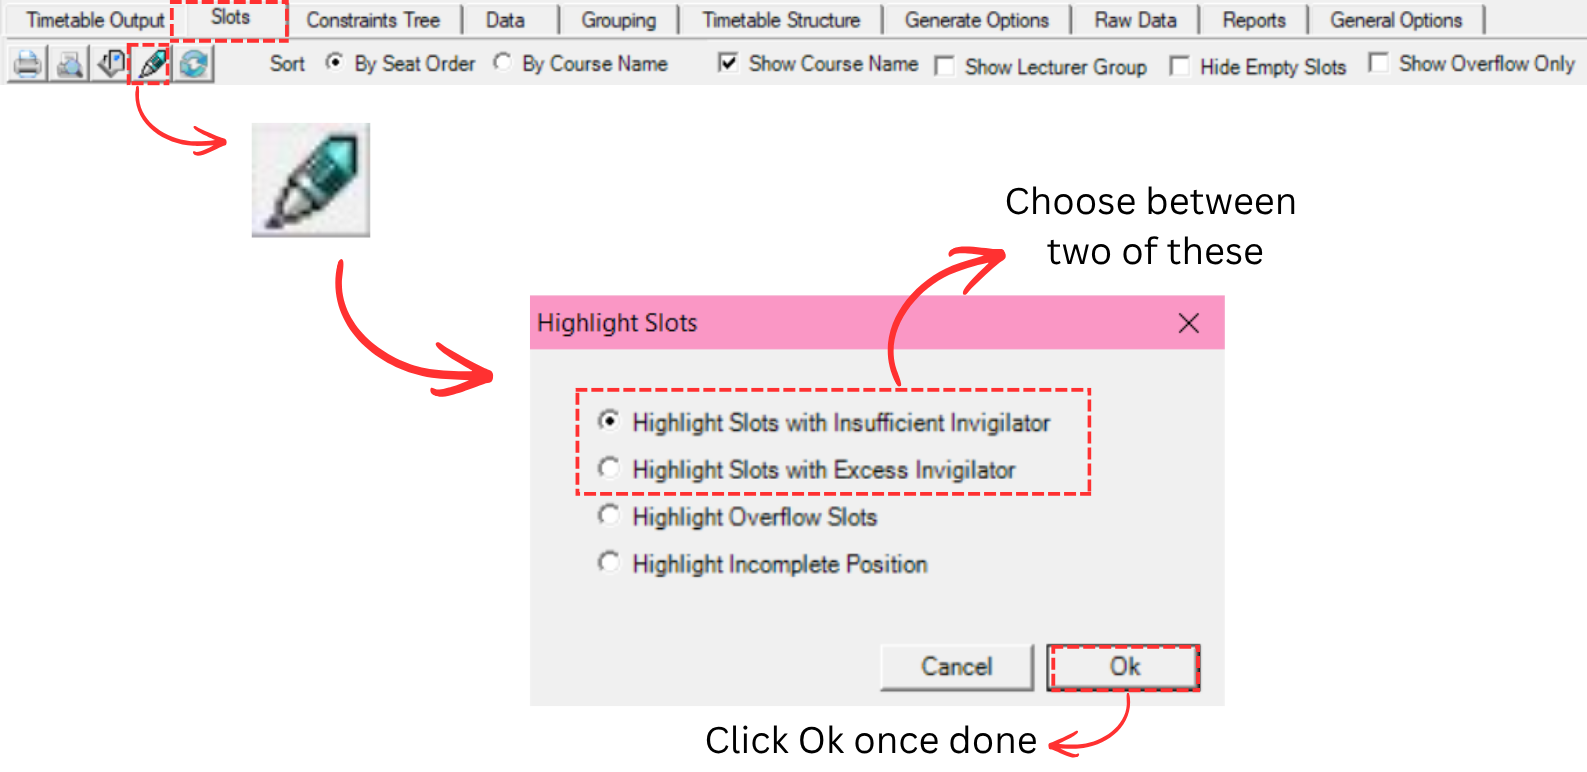
There are two things you able to highlight to edit Invigilator.
- Highlight Slots with Insufficient Invigilator
- Highlight Slots with Excess Invigilator
To Highlight, go to Slot and Click Highlights Icons. ![]()
Highlight Slots with Insufficient Invigilator
If you choose to highlight this, it will highlight slot that do not have enough invigilator. Refer to the diagram below.

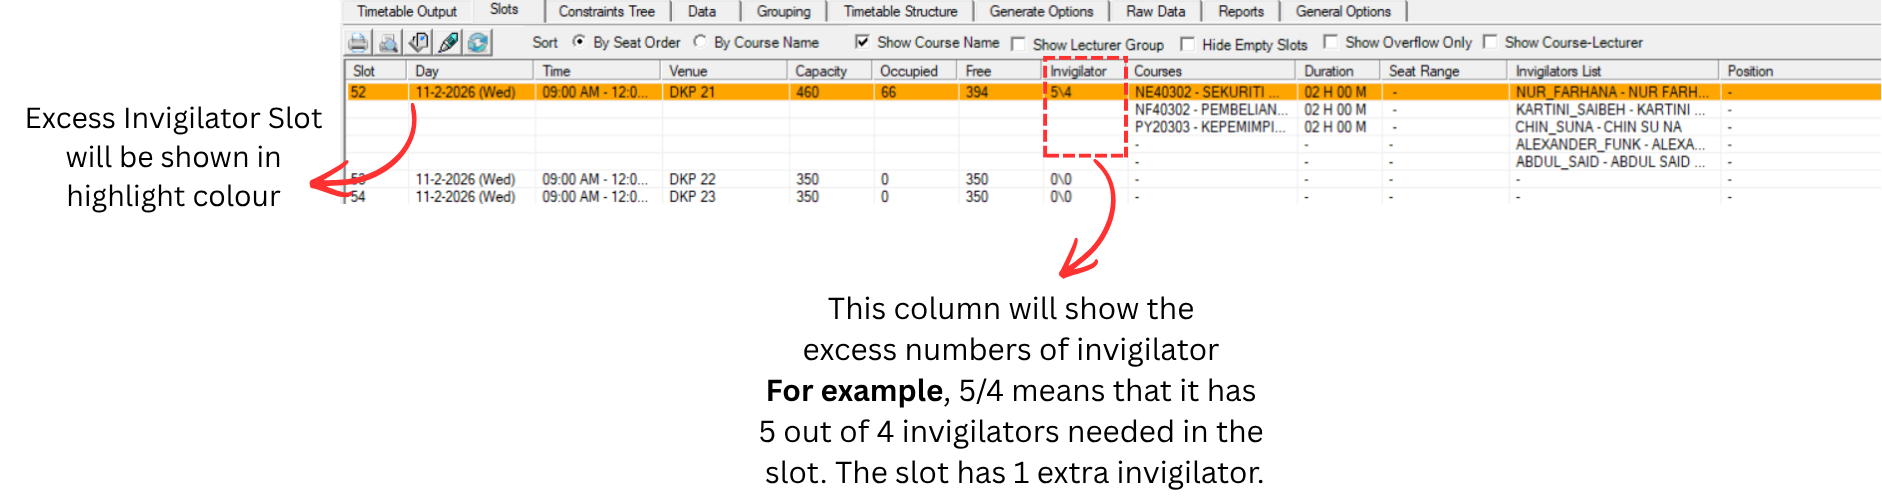
Highlight Slots with Excess Invigilator
If you choose to highlight this, it will highlight slot that have more than enough invigilator. Refer to the diagram below.
Remove Invigilator from Slot
You can remove an invigilator from a slot in 3 locations:
- Slots — Remove invigilator directly from the slot using Manage Invigilation
- Invigilator Grouping — Remove invigilator assignment from the grouping view
- Generate Options — Reset all invigilator assignments at once
Remove Invigilator at Slots
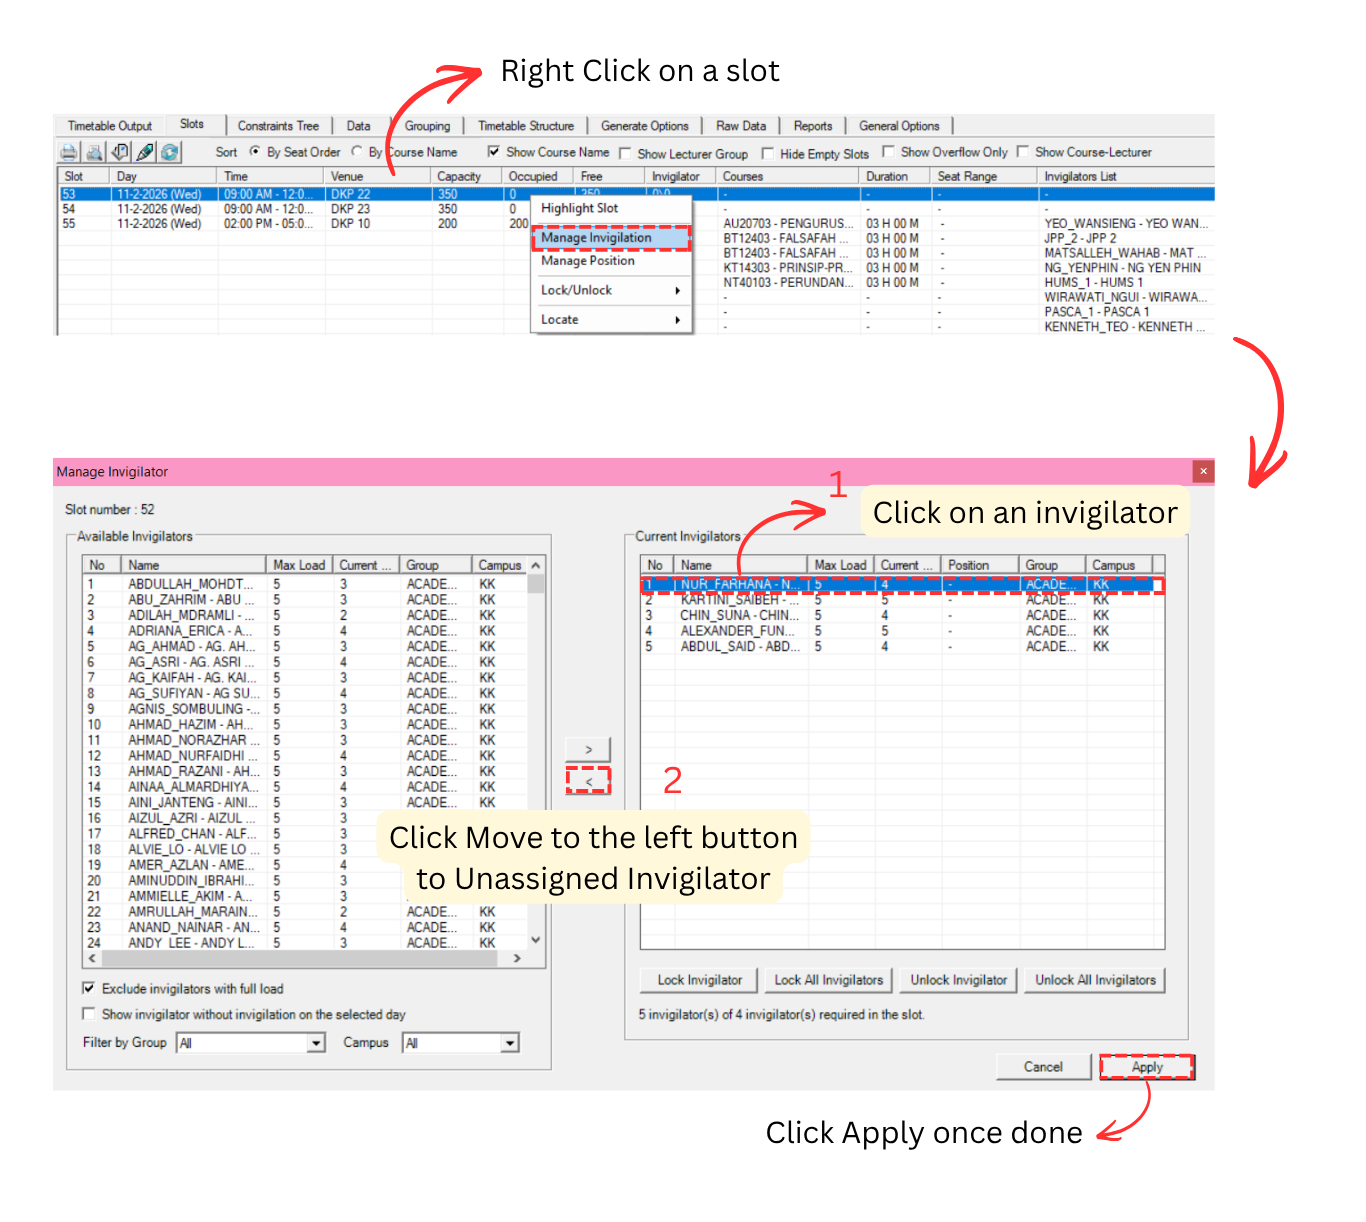
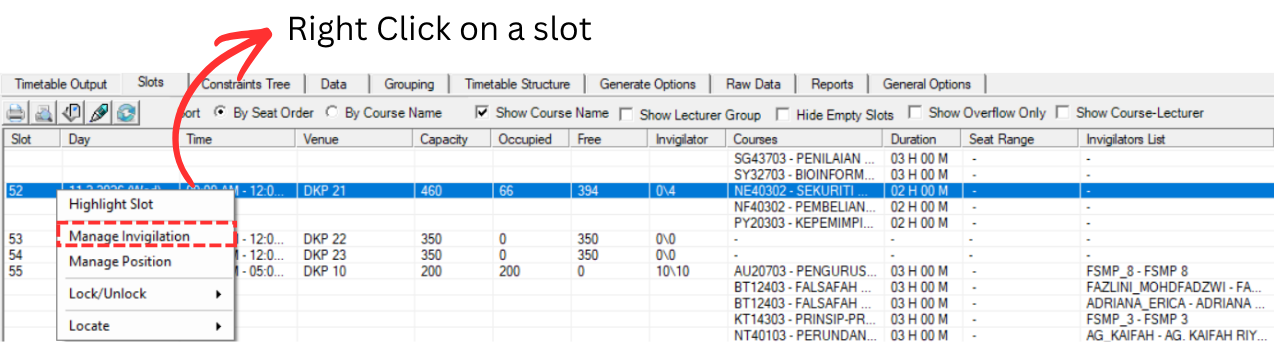
Step 1: Go to Slots tab, right click on a slot that you want to edit, and select Manage Invigilation. The Manage Invigilation window will appear.
Step 2: In the Manage Invigilation window, click on the invigilator you want to remove from the Current Invigilators list on the right side.
Step 3: Click the Move to the left button to move the invigilator back to the Available Invigilators (Unassigned Invigilator) list.
Step 4: Click Apply once done.
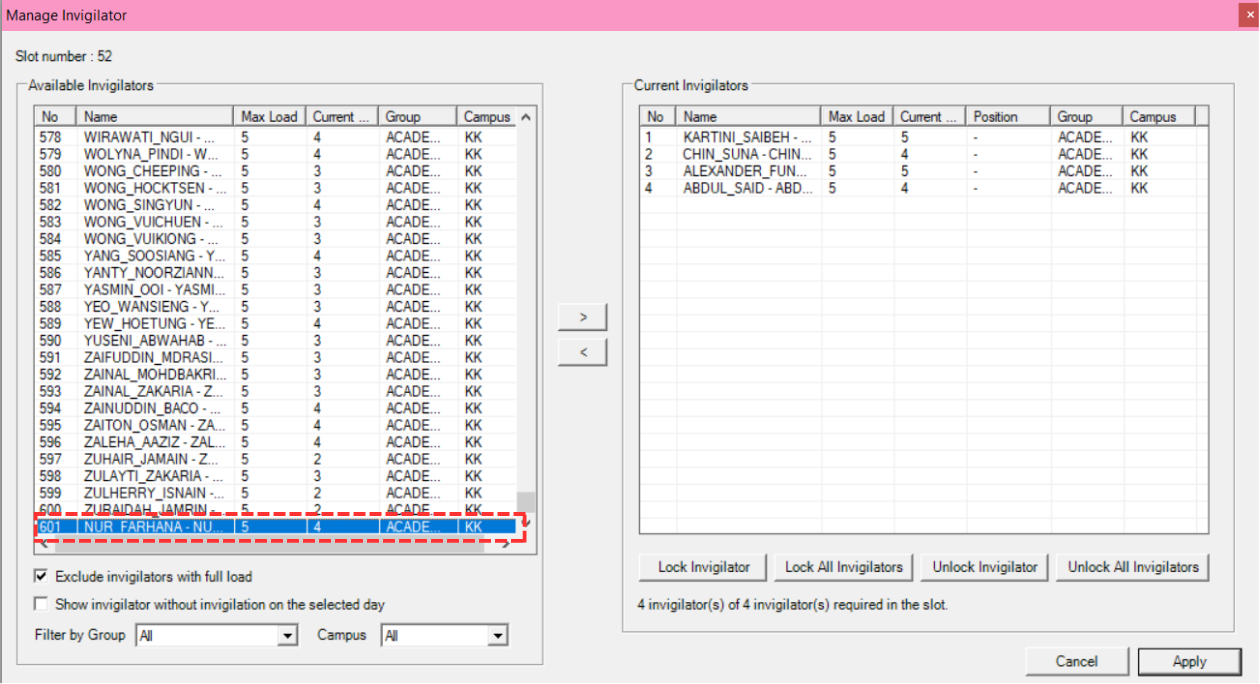
After moving the invigilator to the left, the removed invigilator will appear in the Available Invigilators list and will no longer be in the Current Invigilators list.
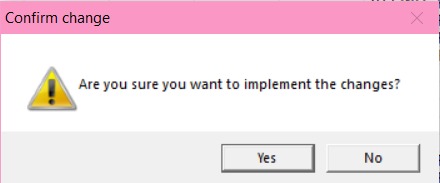
A confirmation popup will appear asking "Are you sure you want to implement the changes?". Click Yes to confirm the removal.
Once confirmed, the invigilator will be removed from the slot. You can verify this by checking the Invigilators List column at the Slots tab, which will show the updated list of invigilators for that slot.

Remove Invigilator at Invigilator Grouping
You can also remove invigilator assignments from the Invigilator Grouping view. This method allows you to remove assignments for a single invigilator, a group of invigilators, or all invigilators at once.
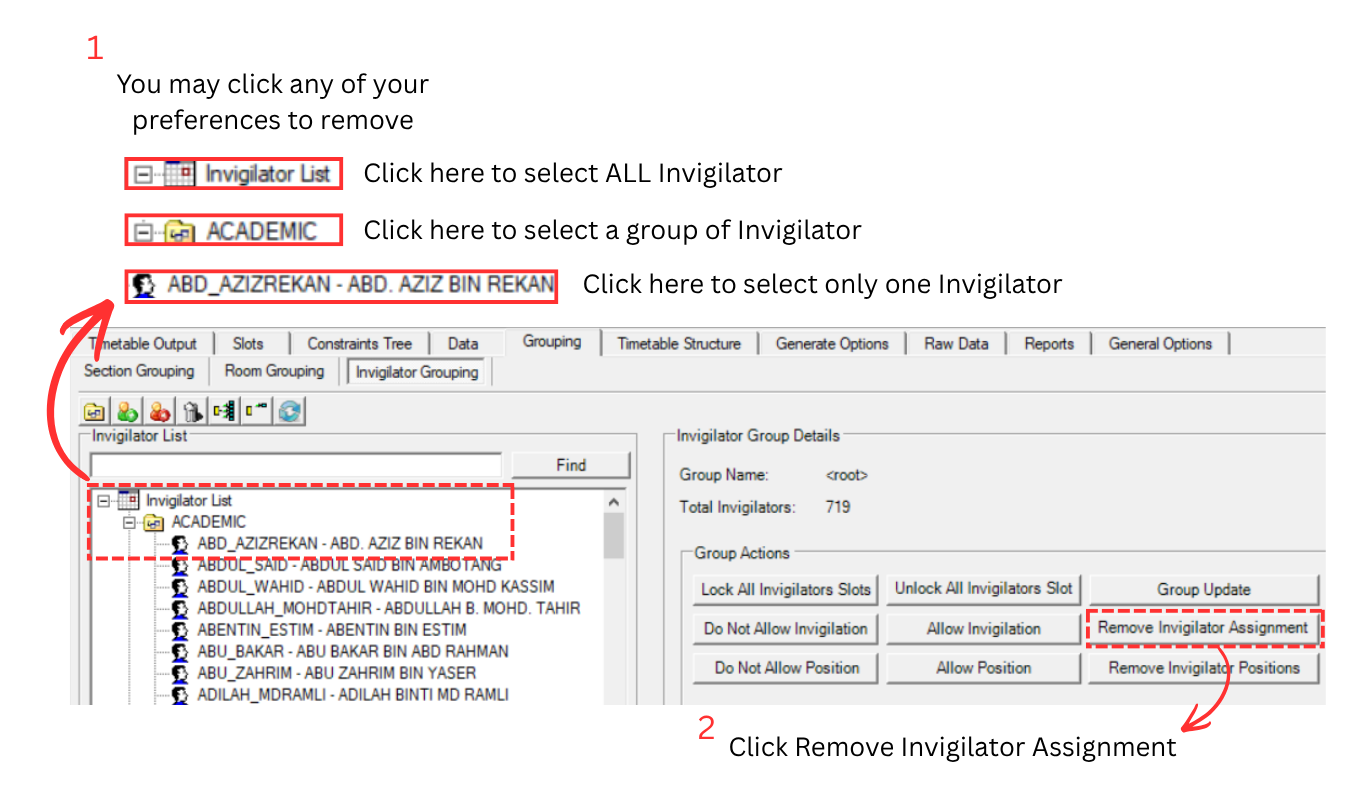
Step 1: Go to Grouping tab and select Invigilator Grouping.
Step 2: Select the invigilator(s) you want to remove:
- Click on All Invigilator List to select all invigilators
- Click on a group (e.g., Academic) to select a group of invigilators
- Click on an individual invigilator to select only one
Step 3: Click Remove Invigilator Assignment from the Group Actions on the right side to remove the invigilator assignment.
Remove Invigilators at Generate Options
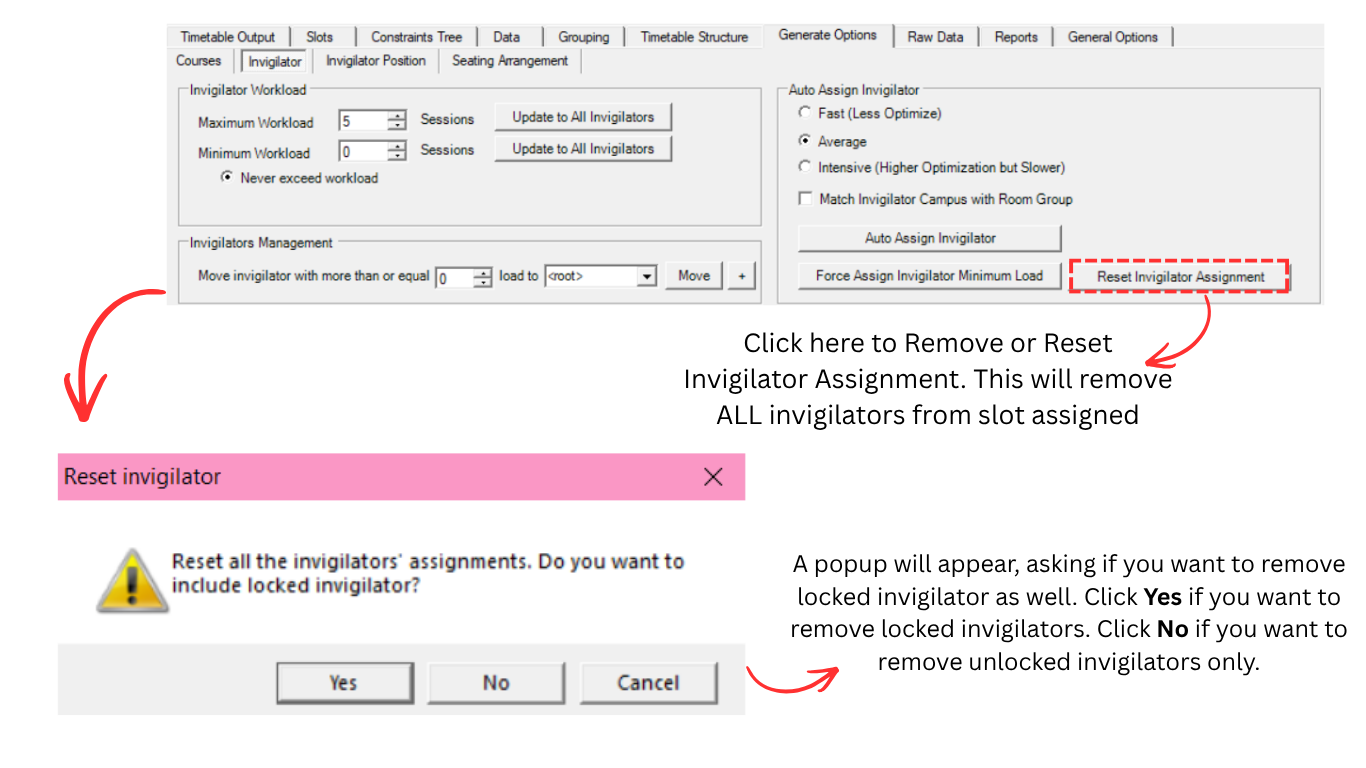
If you want to remove all invigilator assignments and start over, you can use the Reset Invigilator Assignment button at Generate Options.
Step 1: Go to Generate Options tab, click Invigilator, and click the Reset Invigilator Assignment button.
Step 2: A popup will appear asking "Reset all the invigilators' assignments. Do you want to include locked invigilator?". Choose accordingly:
- Click Yes if you want to remove all invigilator assignments including locked invigilators
- Click No if you want to remove only unlocked invigilator assignments
- Click Cancel to cancel the operation
Manually Allocate Invigilator into Slot
To manually insert an invigilator into a slot, you can use the Manage Invigilation window. This is useful when you want to add an invigilator into a slot with insufficient invigilators or when you need to assign a specific invigilator to a particular slot.
Step 1: Go to the Slots tab, right click on the slot you want to add an invigilator to, and select Manage Invigilation.
Step 2: In the Manage Invigilation window, select an invigilator from the Available Invigilators list on the left side.
Step 3: Click the Move to the right button to insert the selected invigilator into the Current Invigilators list for the slot.
Step 4: Click Apply once done.
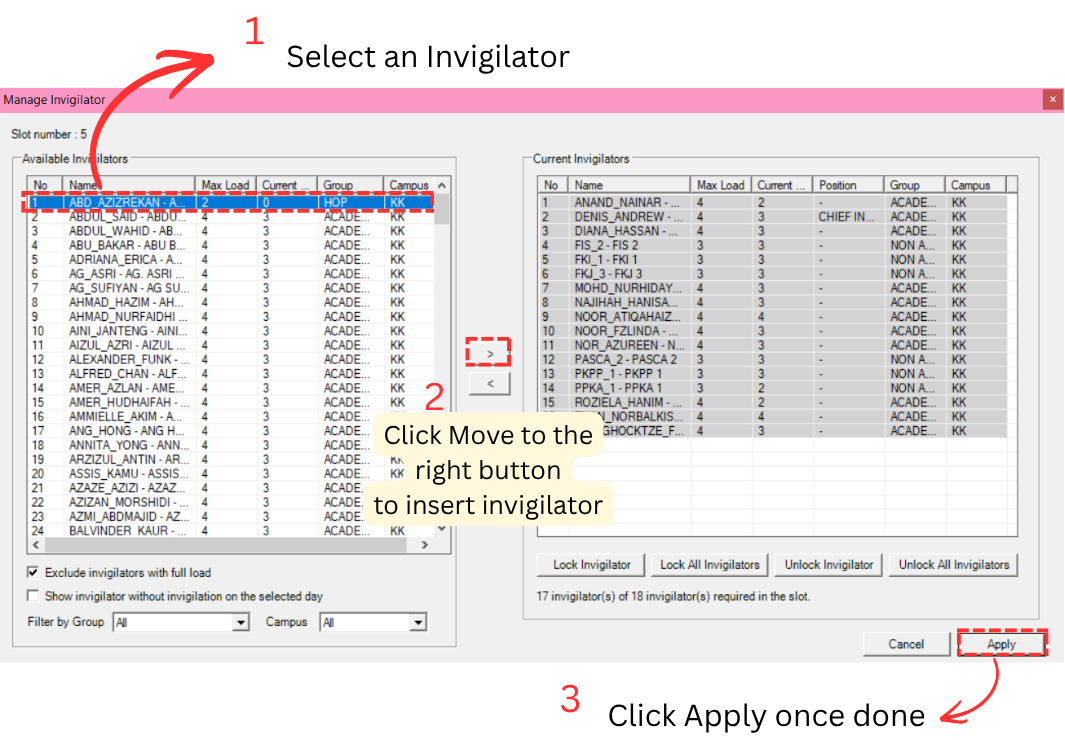
The Manage Invigilation window also provides additional options to help you find the right invigilator:
- Exclude invigilators with full load — Tick this to hide invigilators who have already reached their maximum workload.
- Show invigilator without invigilation on the selected day — Tick this to only show invigilators that are free on the selected day.
- Filter by Group and Campus — Use the dropdown filters to narrow down the list by invigilator group and campus.
On the right side of the window, you can also Lock Invigilator, Lock All Invigilators, Unlock Invigilator, or Unlock All Invigilators directly from the Manage Invigilation window. The status bar at the bottom shows the number of invigilators currently assigned versus the number required in the slot.
8.4 Generate Invigilator Positions
After invigilators have been assigned, you can generate their positions. Before generating, you need to set the position constraints at Generate Options.
8.4.1 Set Constraints at Generate Options
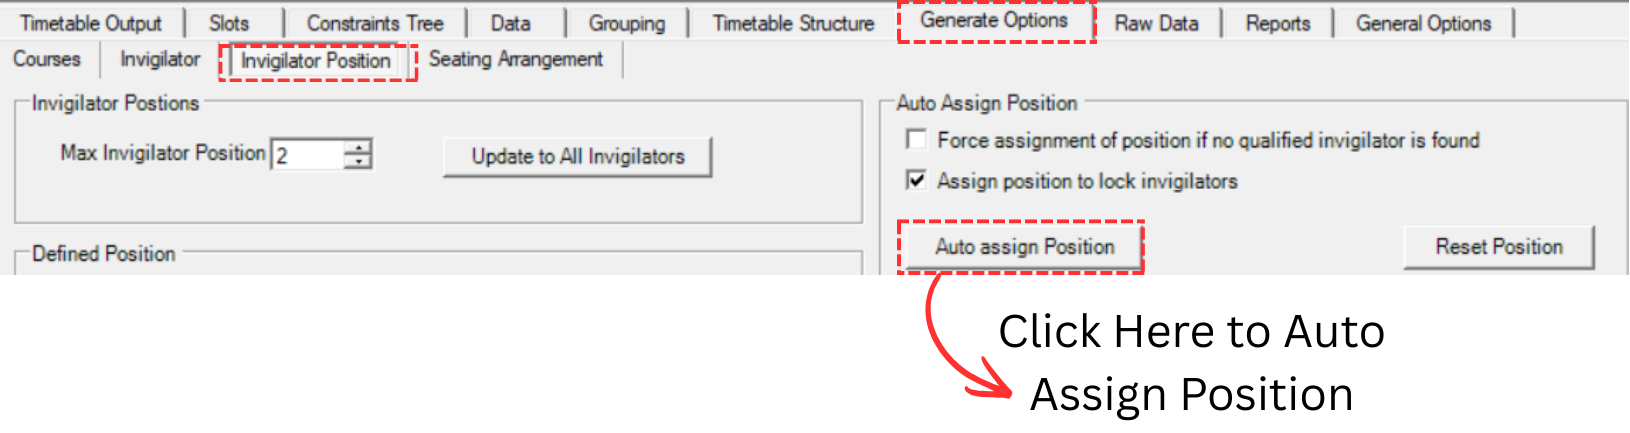
Step 1: Click the Generate Options tab and then click Invigilator Position to set the Invigilator Position constraints.

The Invigilator Position window has 3 areas that you can configure:
- Invigilator Positions — Set max position and update to all invigilators
- Defined Position — Define position names, assignment limits, and groups
- Auto Assign Position — Configure auto assign options and generate
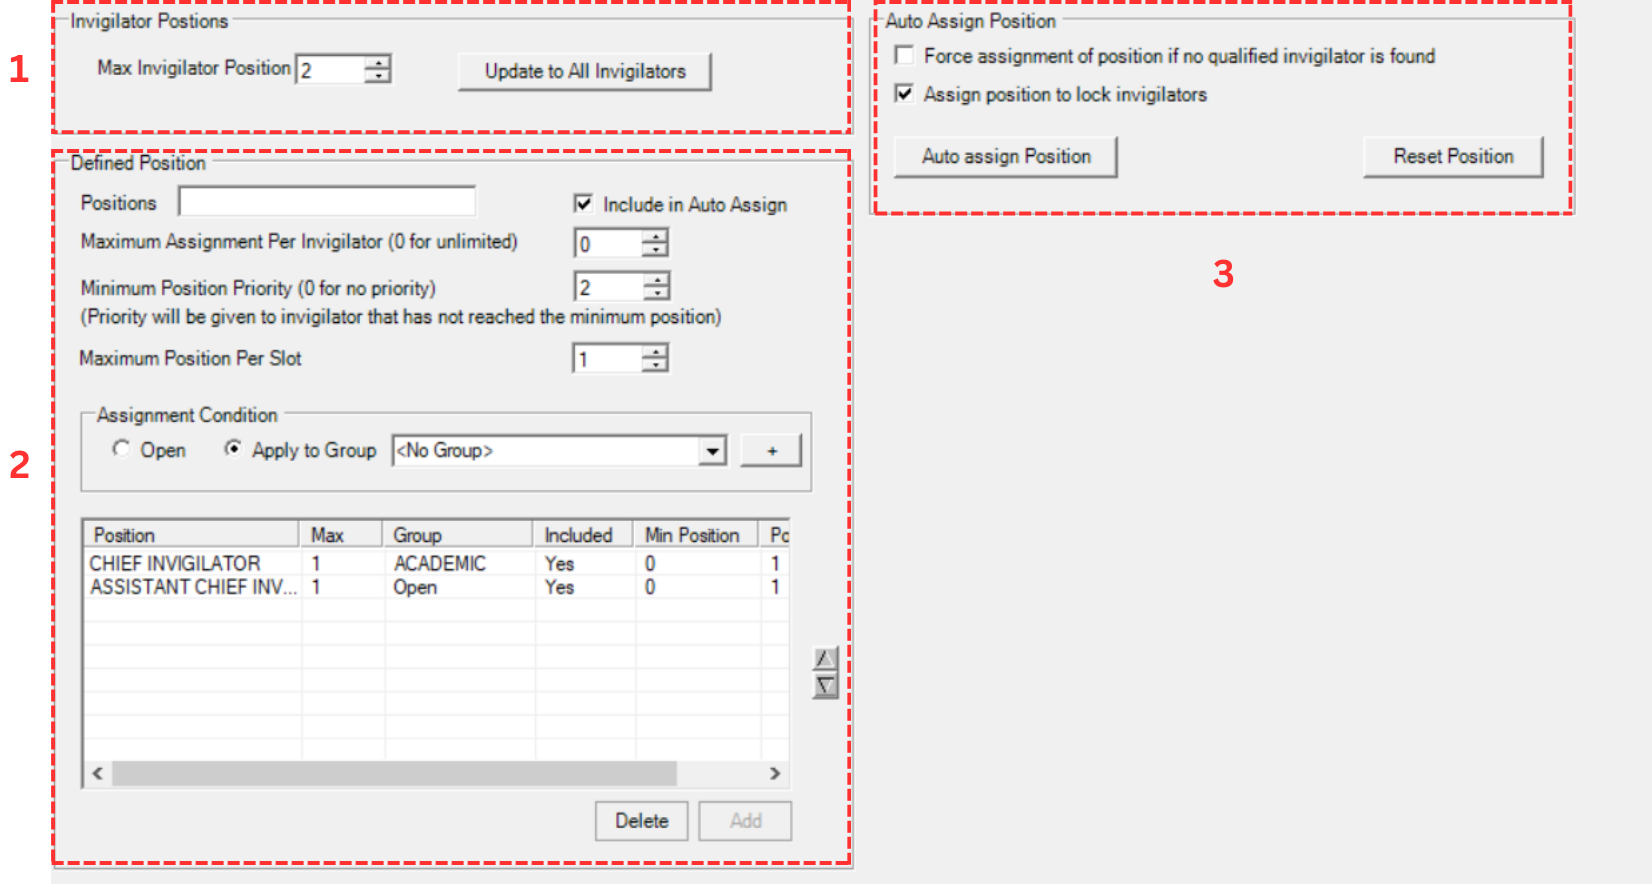
1. Invigilator Positions
This section allows you to set the maximum number of positions an invigilator can hold and apply it to all invigilators at once.
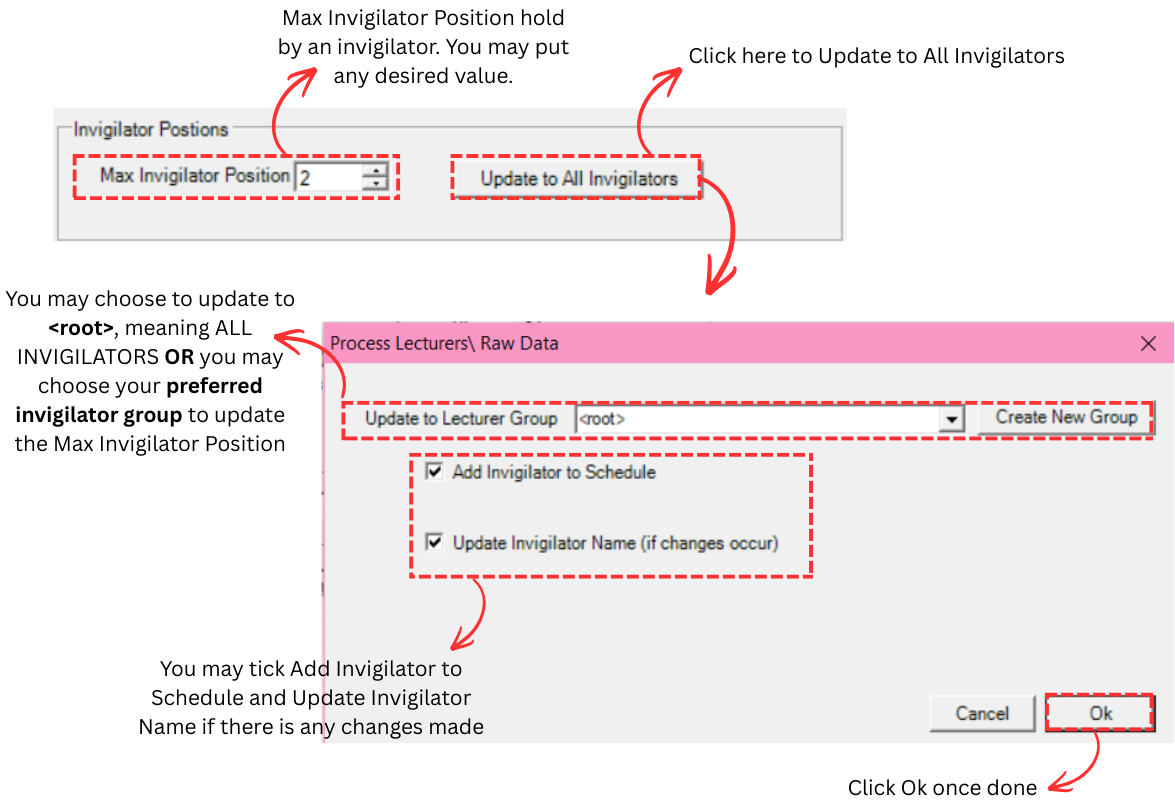
- Max Invigilator Position — Set the maximum number of positions an invigilator can hold. For example, enter 2 to allow each invigilator to hold up to 2 positions.
- Update to All Invigilators — Click this button to apply the Max Invigilator Position value. A Process Lecturers\Raw Data window will appear with the following options:
- Update to Lecturer Group — Choose which group to update. Select <root> to update ALL invigilators, or choose a specific invigilator group (e.g., Academic) to update only that group. You can also click Create New Group to create a new group.
- Add Invigilator to Schedule — Tick this checkbox to add the invigilator to the schedule if they are not already added.
- Update Invigilator Name (if changes occur) — Tick this checkbox to update the invigilator's name in the schedule if any name changes have been made in the raw data.
Click OK once done to apply the changes.
2. Defined Position
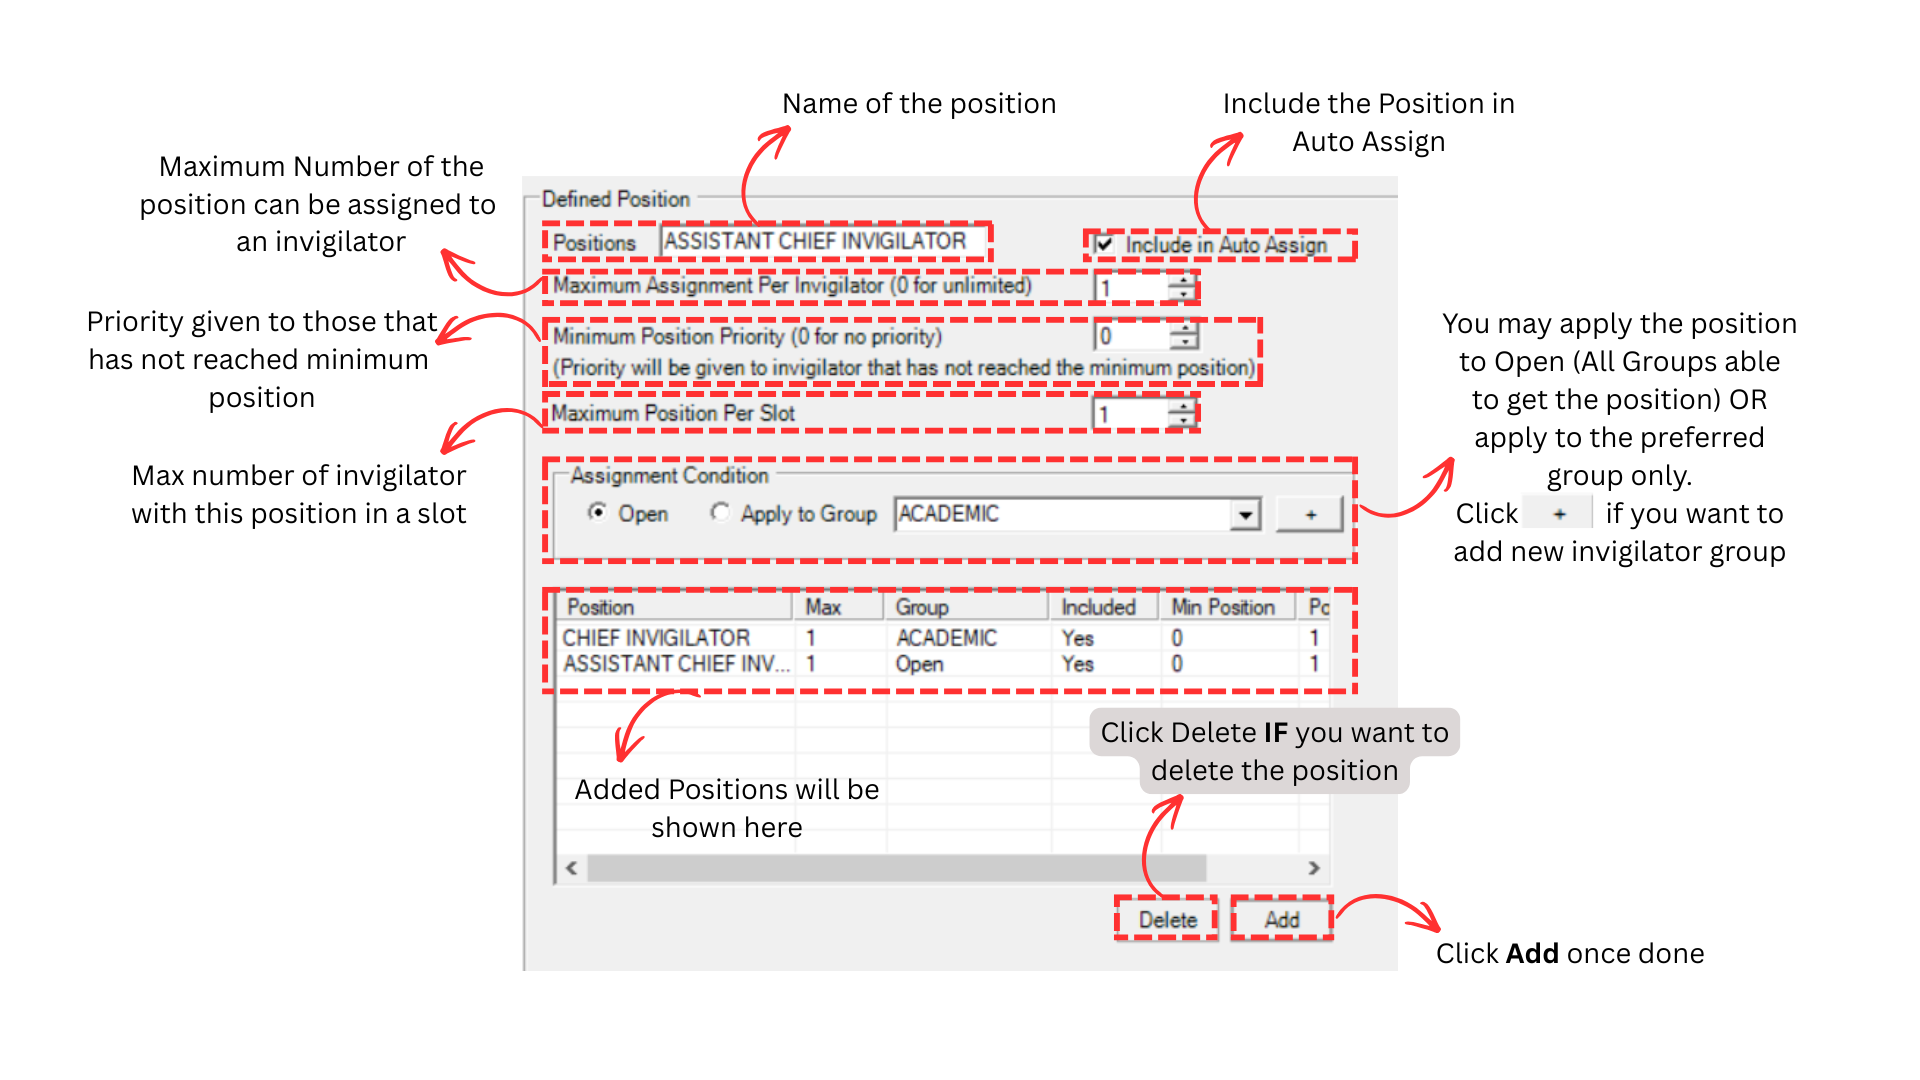
This section allows you to define position names, set their constraints, and assign them to specific invigilator groups. Fill in the fields below to create a position:
- Positions — Enter the name of the position (e.g., Chief Invigilator, Assistant Chief Invigilator).
- Include in Auto Assign — Tick this checkbox to include the position in the auto assign process.
- Maximum Assignment Per Invigilator (0 for unlimited) — The maximum number of times this position can be assigned to a single invigilator. Enter 0 for unlimited.
- Minimum Position Priority (0 for no priority) — Priority will be given to invigilators who have not reached the minimum position count. Enter 0 for no priority.
- Maximum Position Per Slot — The maximum number of invigilators that can hold this position in a single slot. For example, enter 1 to allow only one Chief Invigilator per slot.
Assignment Condition:
- Open — The position is open to all invigilators regardless of group.
- Apply to Group — Restrict the position to a specific invigilator group only (e.g., Academic). Click + to create a new group if needed.
Once you have filled in the fields, click Add to add the position. The added positions will appear in the table below showing their Position, Max, Group, Included, Min Position, and Position Per Slot values. To remove a position, select it from the table and click Delete.
3. Auto Assign Position
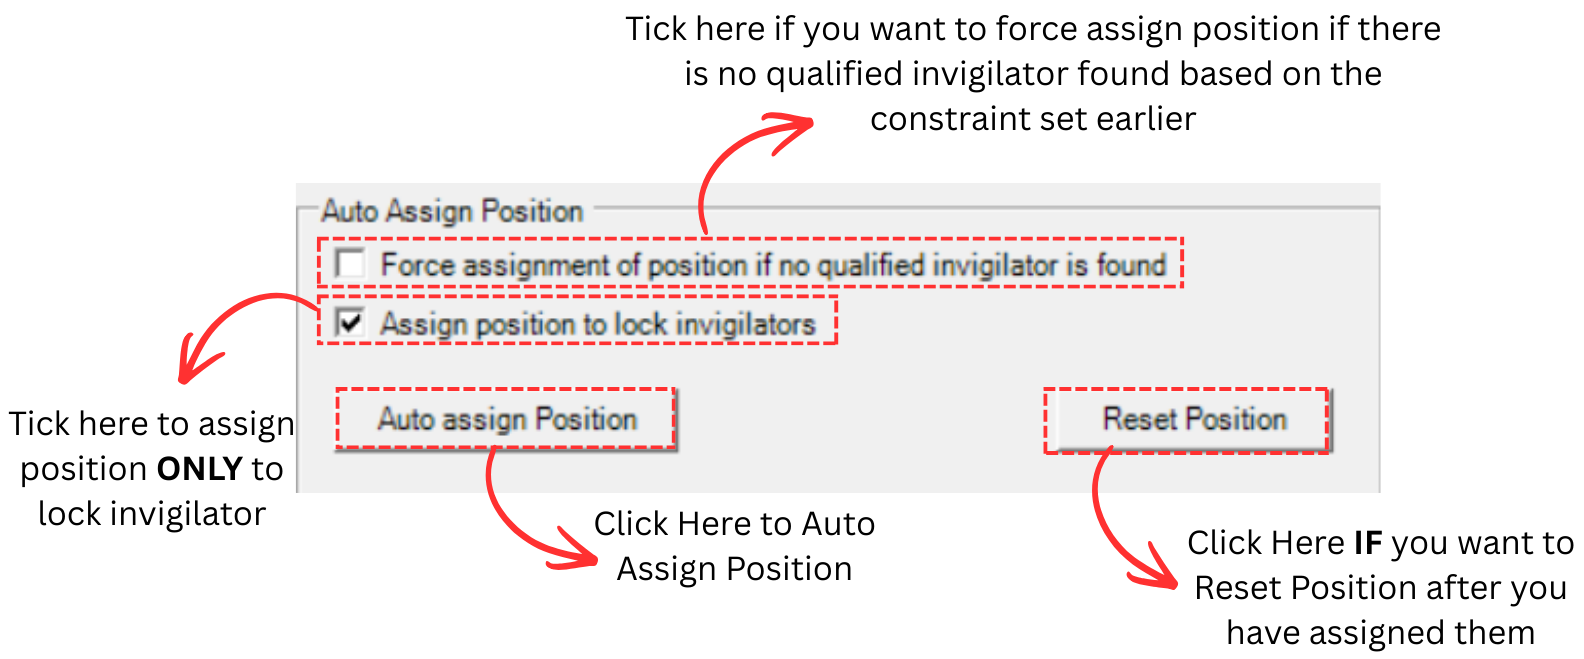
This section allows you to automatically assign positions to invigilators based on the constraints you have configured above.
- Force assignment of position if no qualified invigilator is found — Tick this checkbox to force the system to assign a position even if no qualified invigilator is available based on the constraints set earlier. This ensures all positions are filled.
- Assign position to lock invigilators — Tick this checkbox to assign positions only to invigilators that are already locked.
Action Buttons:
- Auto Assign Position — Click this button to automatically assign positions to all invigilators based on the constraints and options you have configured.
- Reset Position — Click this button to reset all position assignments if you want to start over after they have been assigned.
8.4.2 Assign Position
After setting all position constraints, you can now assign positions to invigilators. There are 3 simple steps to do so.
Step 1: To auto assign invigilator positions, click the Auto Assign Position button at Invigilator Position under the Generate Options tab.
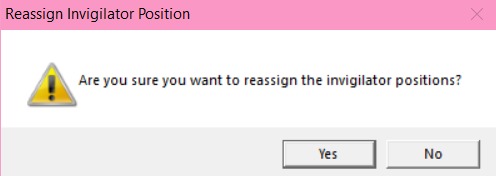
Step 2: A confirmation popup will appear asking "Are you sure you want to reassign the invigilator positions?". Click Yes to proceed.
Step 3: Once done, another popup will appear saying "Assign position completed". Click OK.

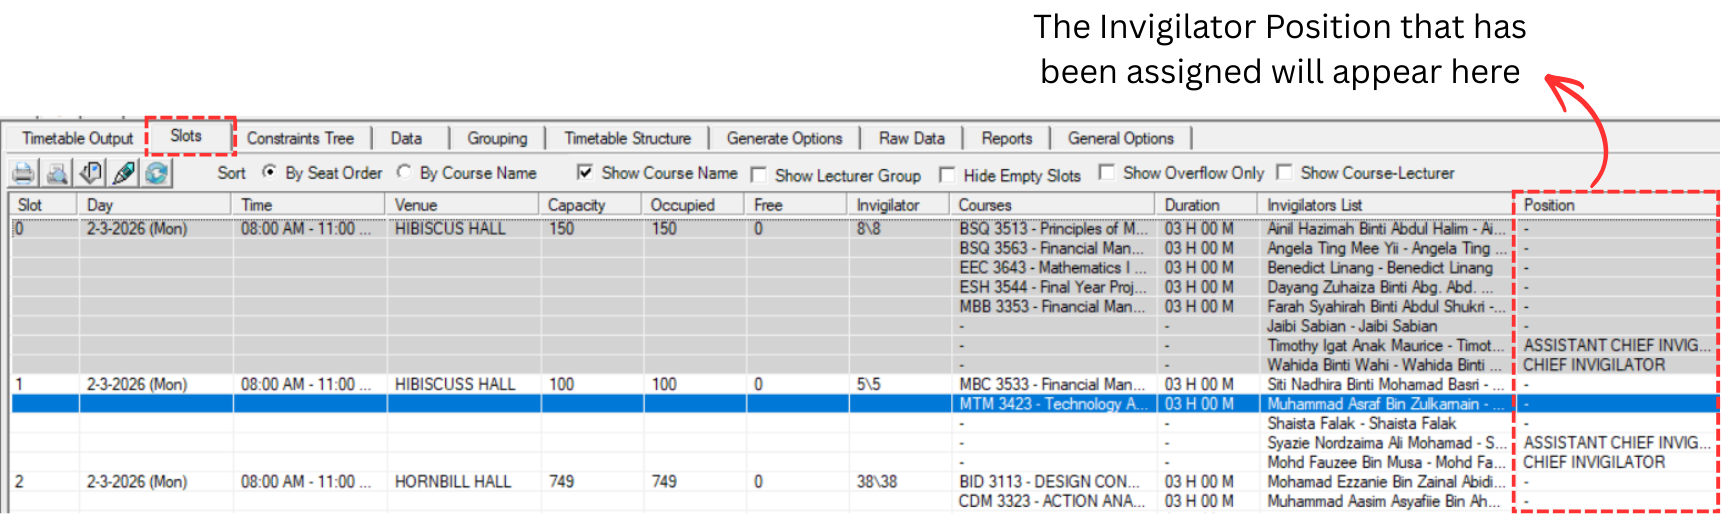
Once done, you can go to the Slots tab to view the assigned invigilator positions. The Position column will display the assigned positions (e.g., Chief Invigilator, Assistant Chief Invigilator) for each slot.
8.5 Analyze & Edit Positions
After assigning invigilator positions, review and verify the assignments before proceeding to seating arrangement.
8.5.1 Analysis
Slots
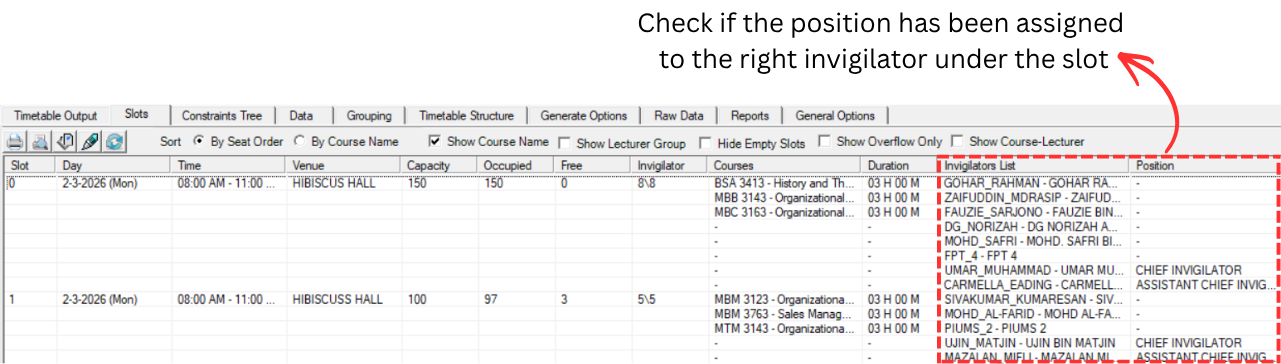
You may analyze the Invigilator Position to check if the position has been assigned to the right invigilator under the slot. Go to the Slots tab and check the Invigilators List and Position columns to verify the assignments.
To edit, you may refer to the 8.5.2 Editing Positions.
Invigilator List
To access Invigilator List, you need to go to Data and select Invigilators List.
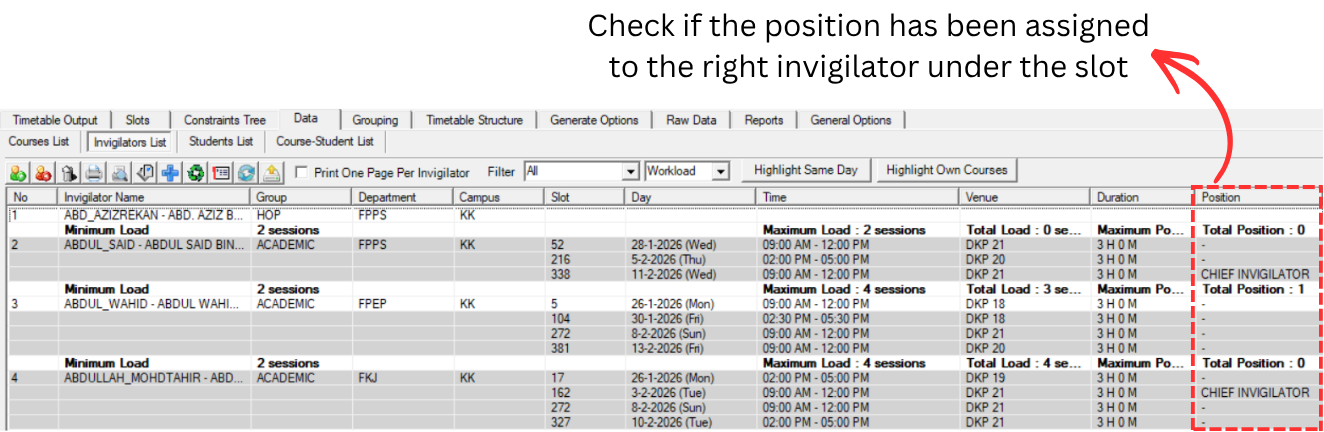
You may analyze the Invigilator List to check if the invigilator position has been assigned to the right invigilator under the slot. The Position column on the right side shows the assigned position (e.g., Chief Invigilator, Assistant Chief Invigilator) for each slot.
To Locate the invigilator, you may right click and select Locate. You may choose to Locate Invigilator at Invigilator Grouping or Locate Slot at Slot List.
To edit the invigilator position at slot, please use Locate Slot at Slot List.
To edit, you may refer to the 8.5.2 Editing Positions.
Lecturer Grouping
To access Invigilator Grouping, you need to go to Grouping and select Invigilators Grouping.
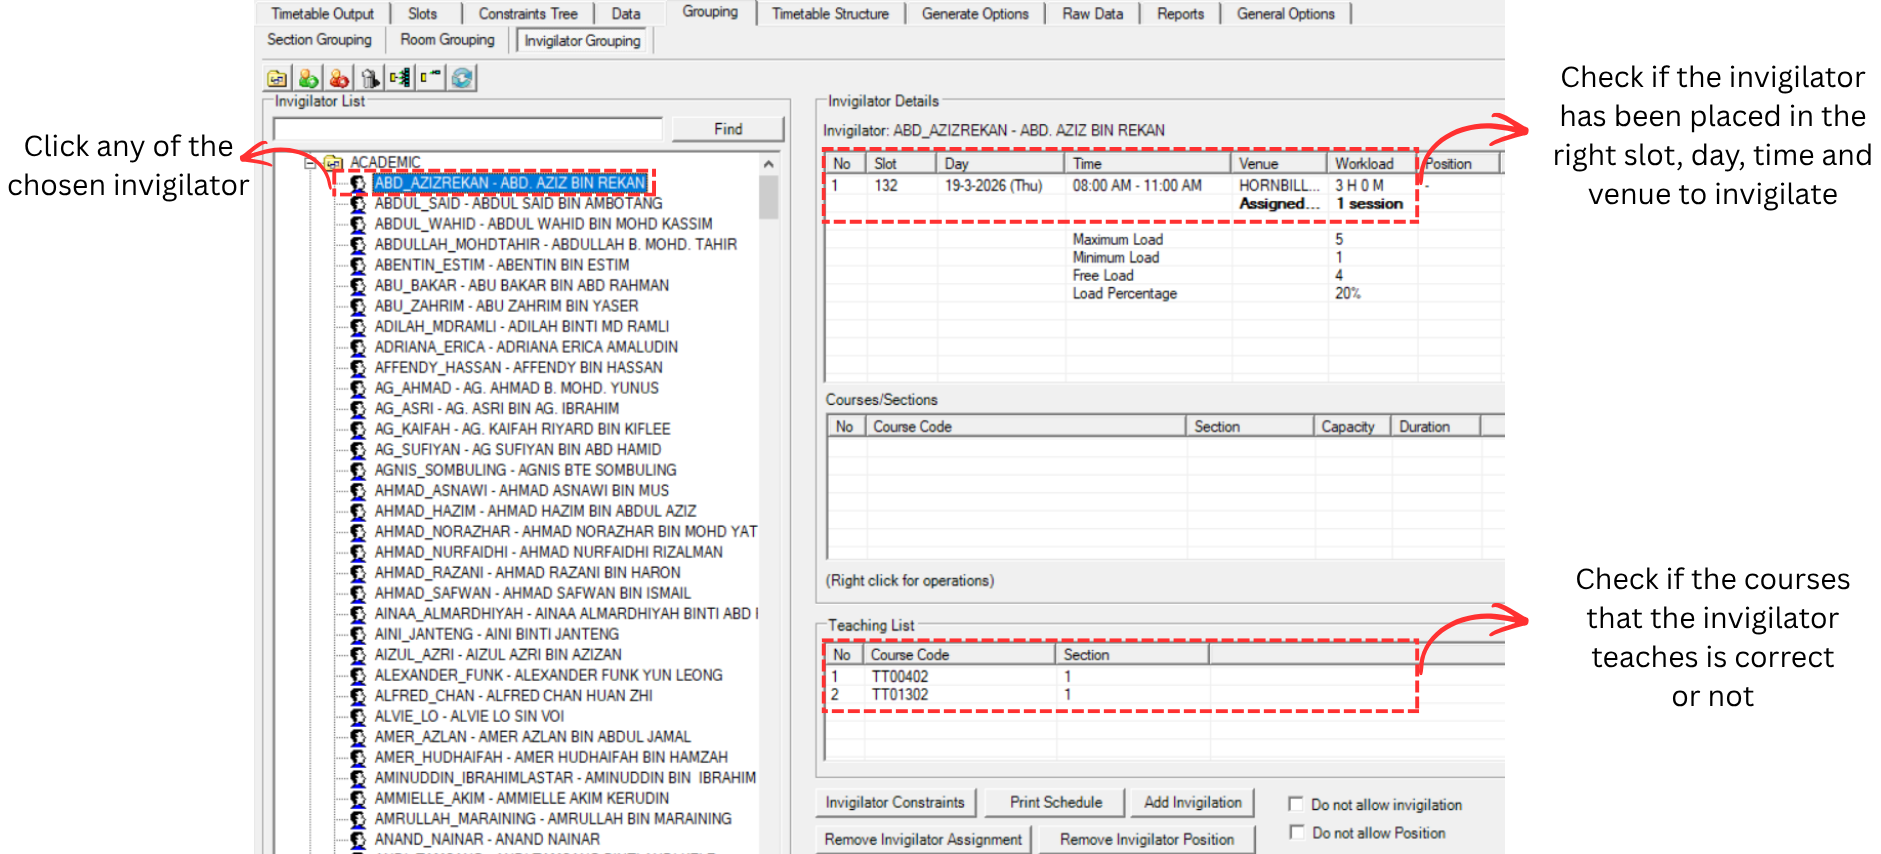
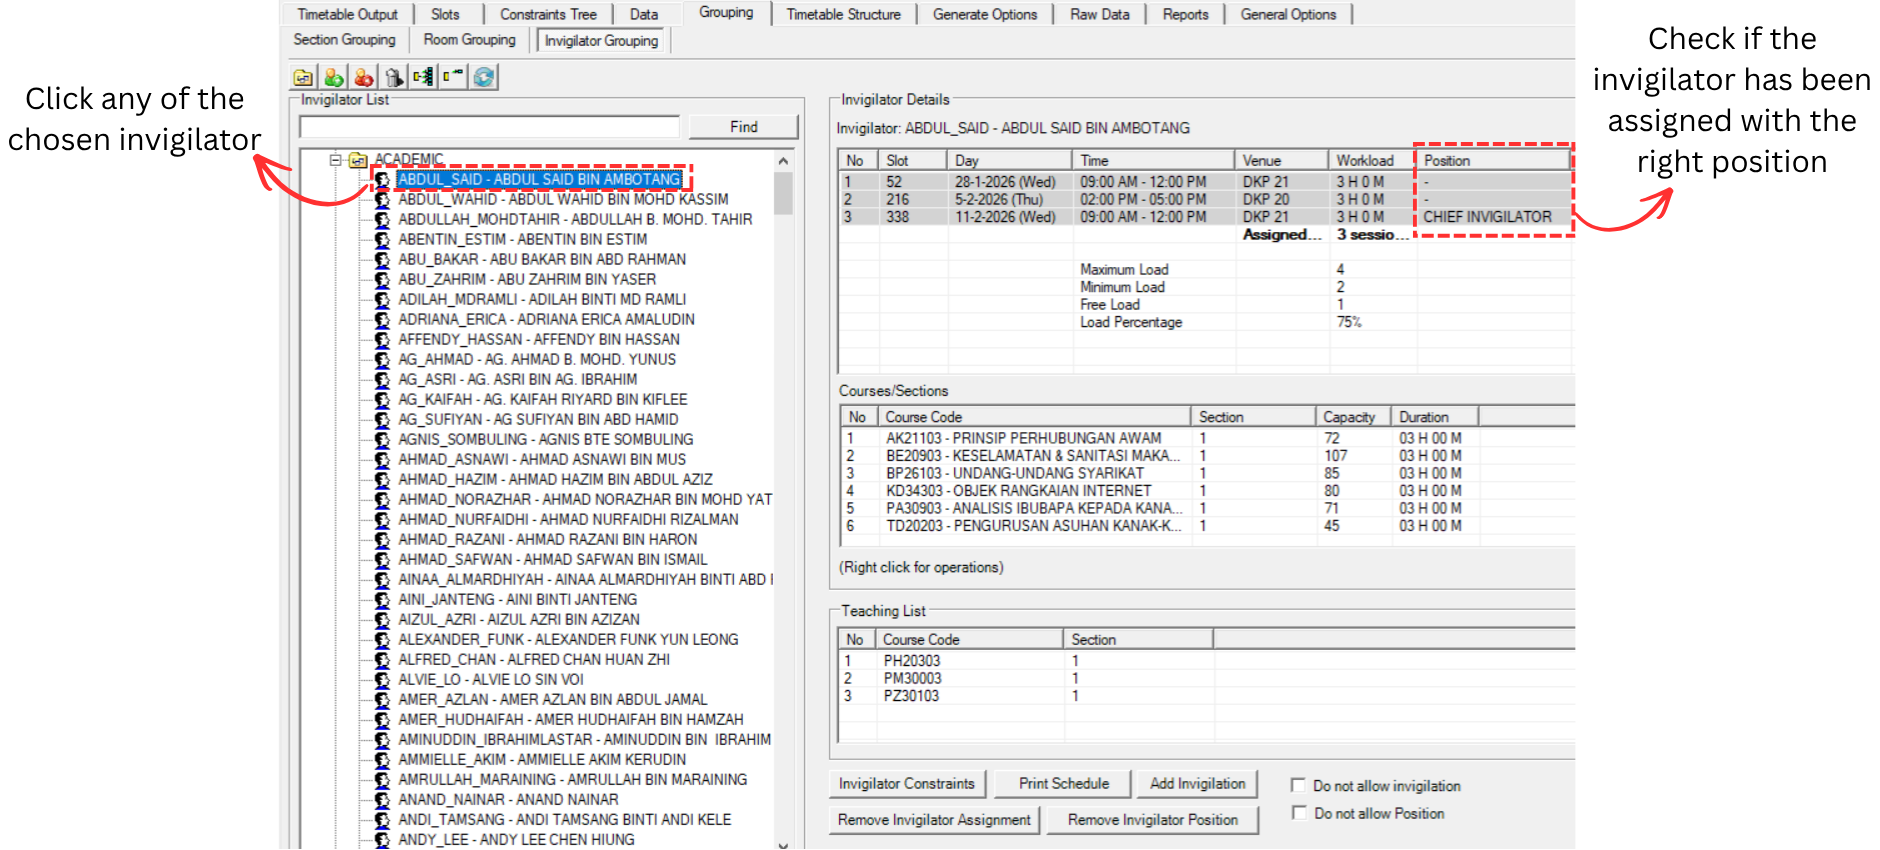
You may analyze the Invigilator Grouping to know if the invigilator position has been placed in the right slot. Click any of the chosen invigilator from the Invigilator List on the left side, and the Invigilator Details on the right side will show the assigned slots and their Position.
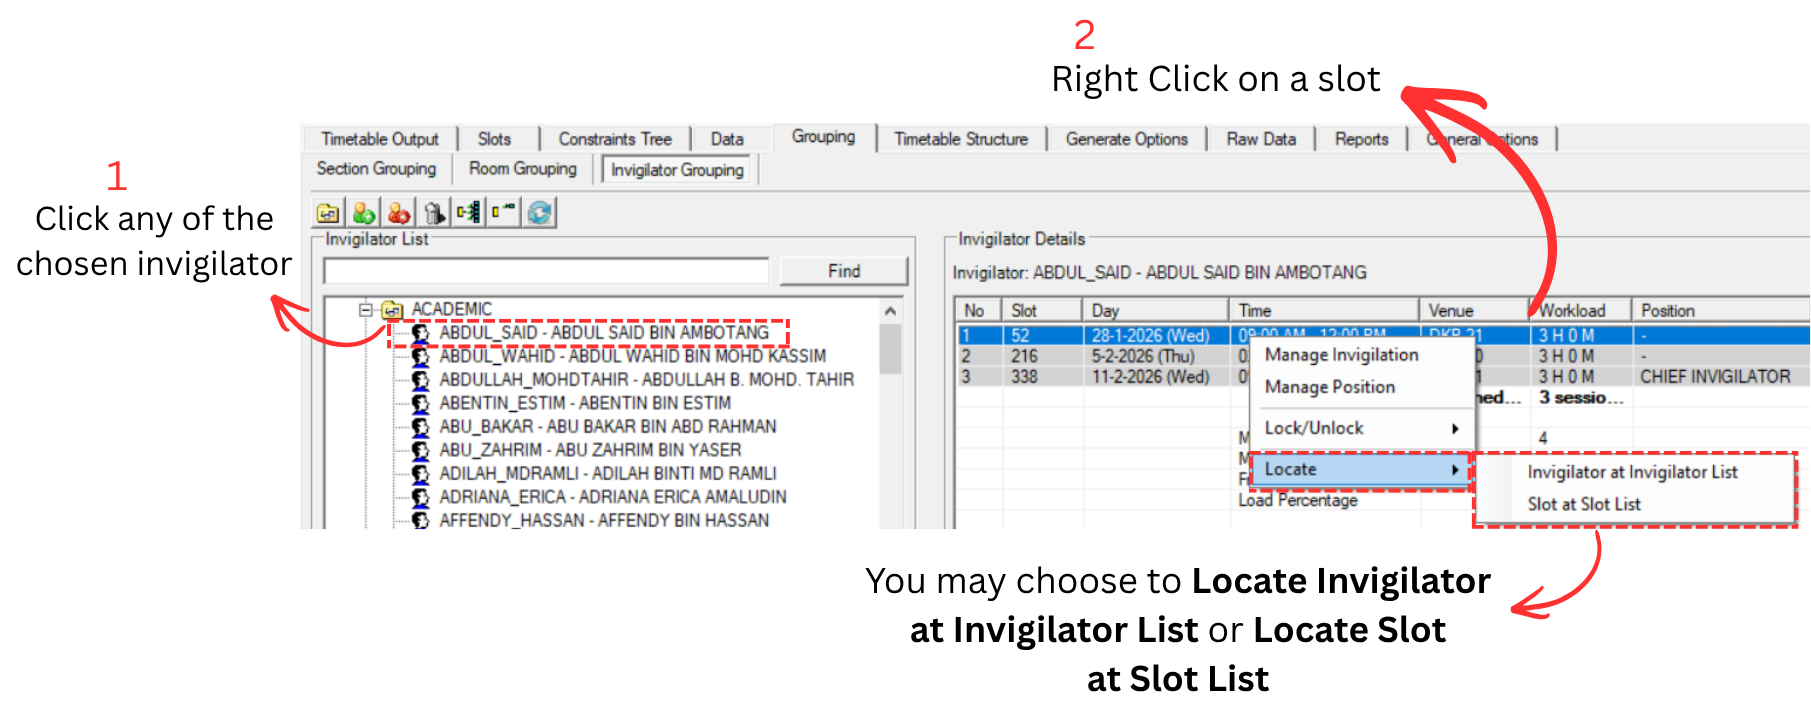
To Locate the invigilator, you may right click on a slot and select Locate. You may choose to Locate Invigilator at Invigilator List or Locate Slot at Slot List.
To edit the invigilator position at slot, please use Locate Slot at Slot List.
To edit, you may refer to the 8.5.2 Editing Positions.
8.5.2 Editing Positions
Highlight
There is only one thing you are able to highlight to edit Invigilator Position which is Highlight Incomplete Position.
To Highlight, go to Slot and Click Highlights Icons. ![]() Select Highlight Incomplete Position and click Ok.
Select Highlight Incomplete Position and click Ok.
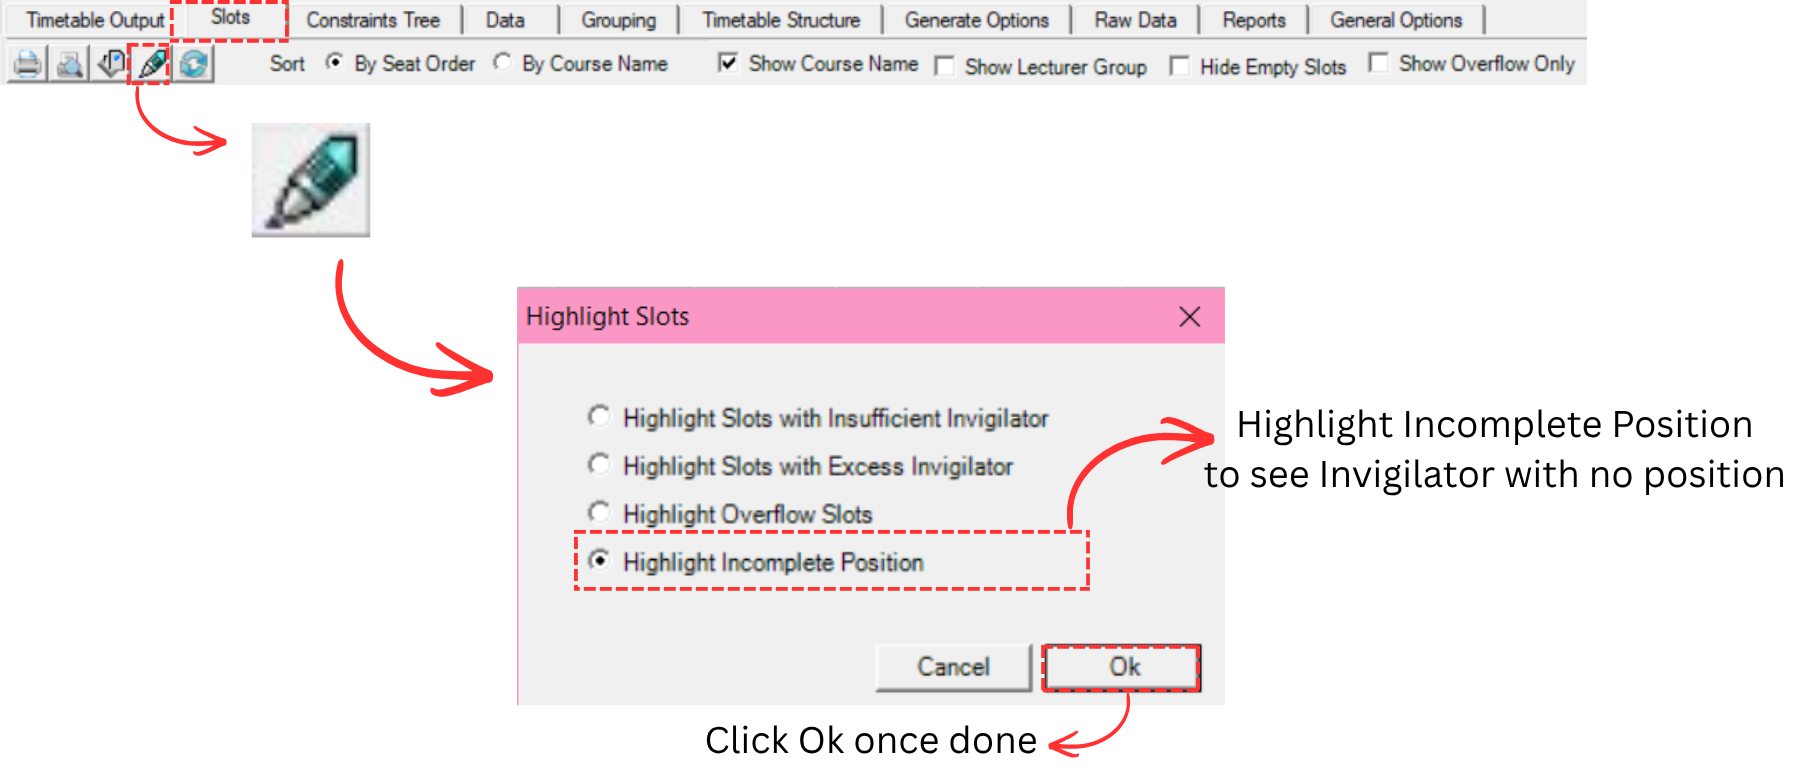
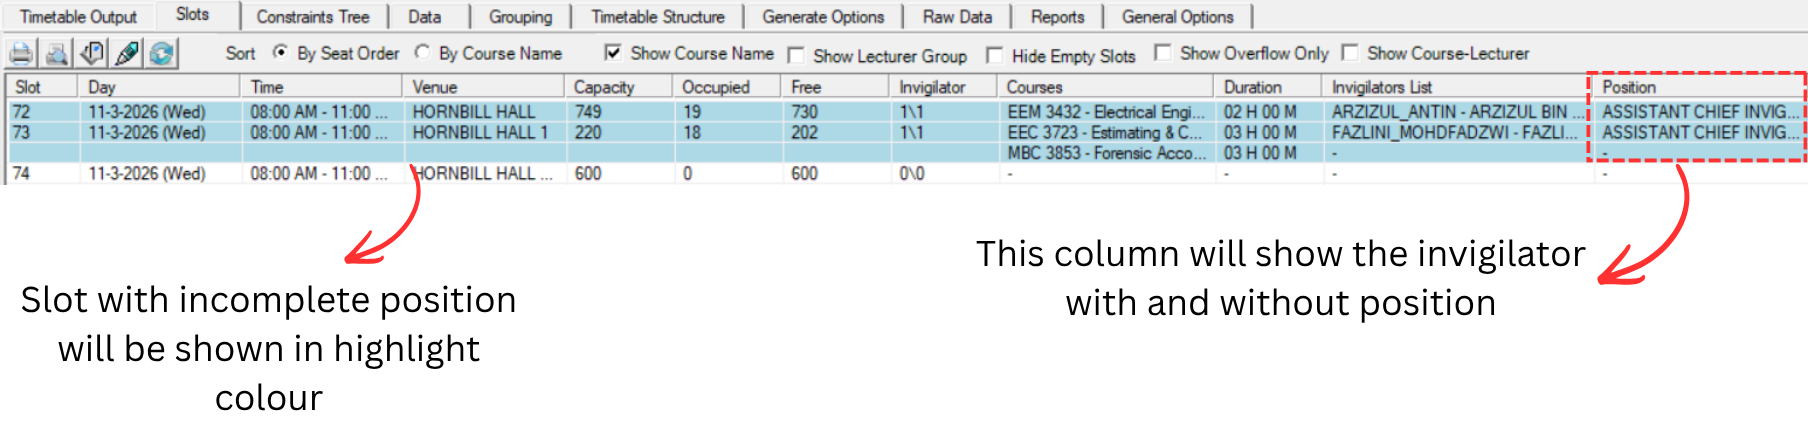
Highlight Incomplete Position
Once you clicked Ok, slots with incomplete position will be highlighted in colour. The Position column will show the invigilators with and without position assigned, allowing you to identify which invigilators still need a position.
Remove Position from Invigilator at Slot
There are a few places you can remove invigilator position from invigilator:
- Slots
- Invigilator Grouping
- Generate Options
Remove Invigilator Position at Slots
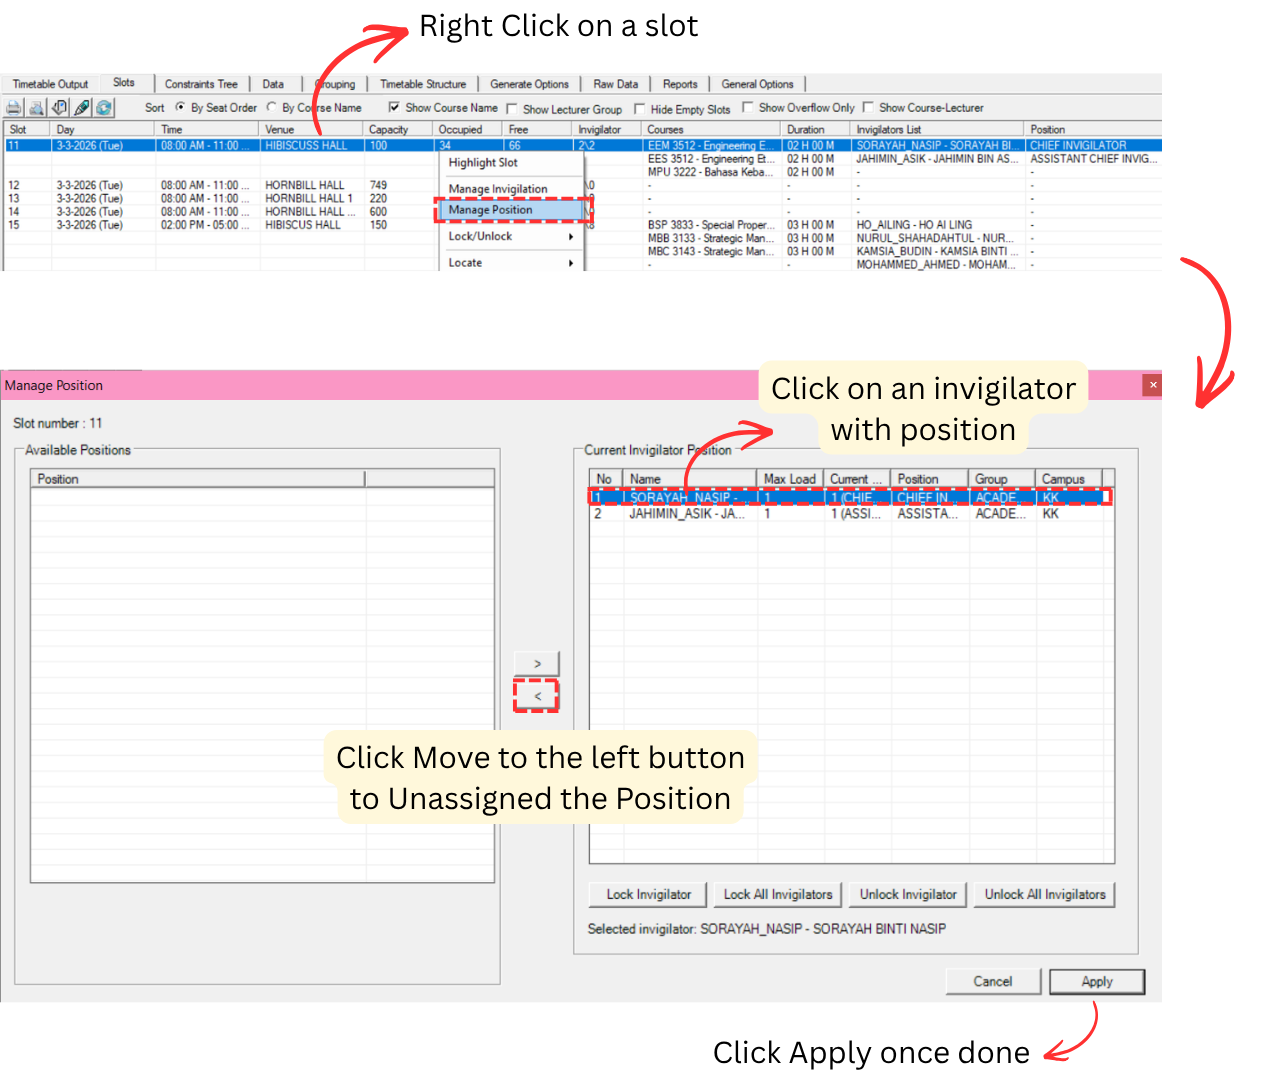
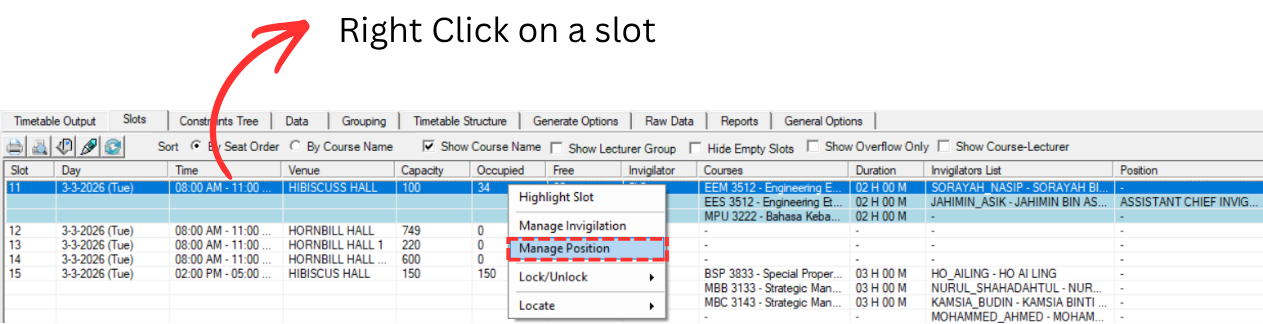
Step 1: Go to the Slots tab, right click on a slot, and select Manage Position. The Manage Position window will appear.
Step 2: In the Manage Position window, click on the invigilator with position from the Current Invigilator Position list on the right side.
Step 3: Click the Move to the left button to unassign the position. The position will move back to the Available Positions list.
Step 4: Click Apply once done.
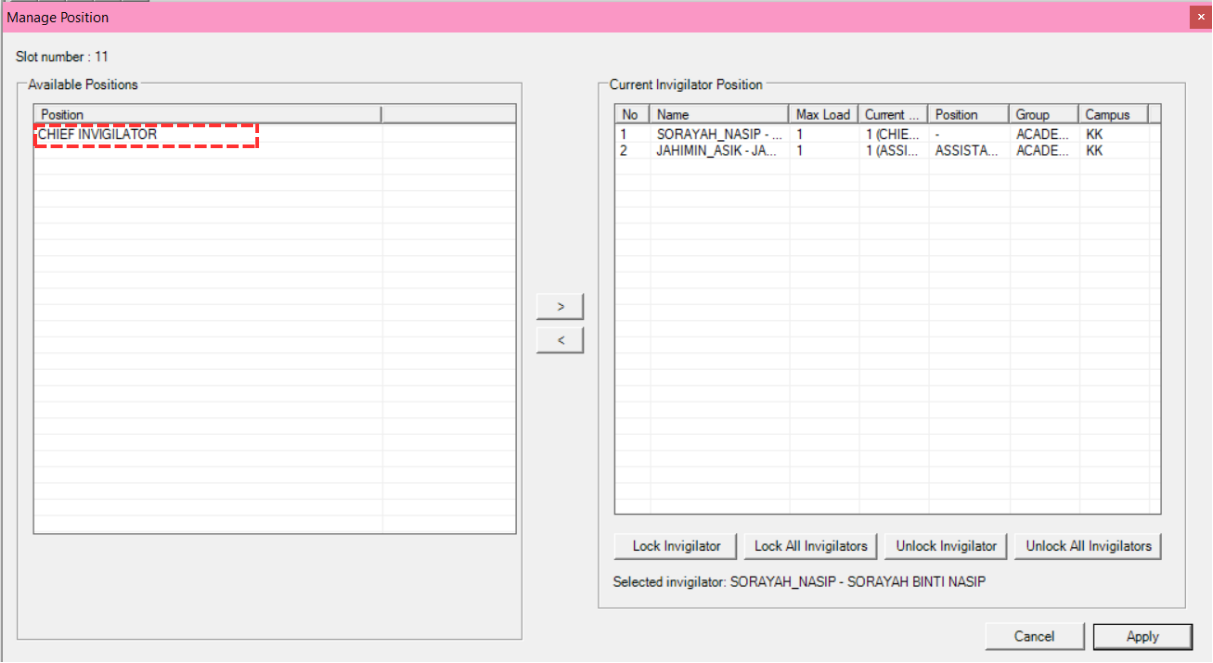
After moving the position to the left, the removed position will appear in the Available Positions list and the invigilator's position in the Current Invigilator Position will be cleared.
A confirmation popup will appear asking "Are you sure you want to implement the changes?". Click Yes to confirm the removal.
Once confirmed, the position will be removed from the invigilator. You can verify this by checking the Position column at the Slots tab, which will show the updated position assignments.

Remove Invigilator Position at Invigilator Grouping
You can also remove invigilator position from the Invigilator Grouping view. This method allows you to remove positions for a single invigilator, a group of invigilators, or all invigilators at once.
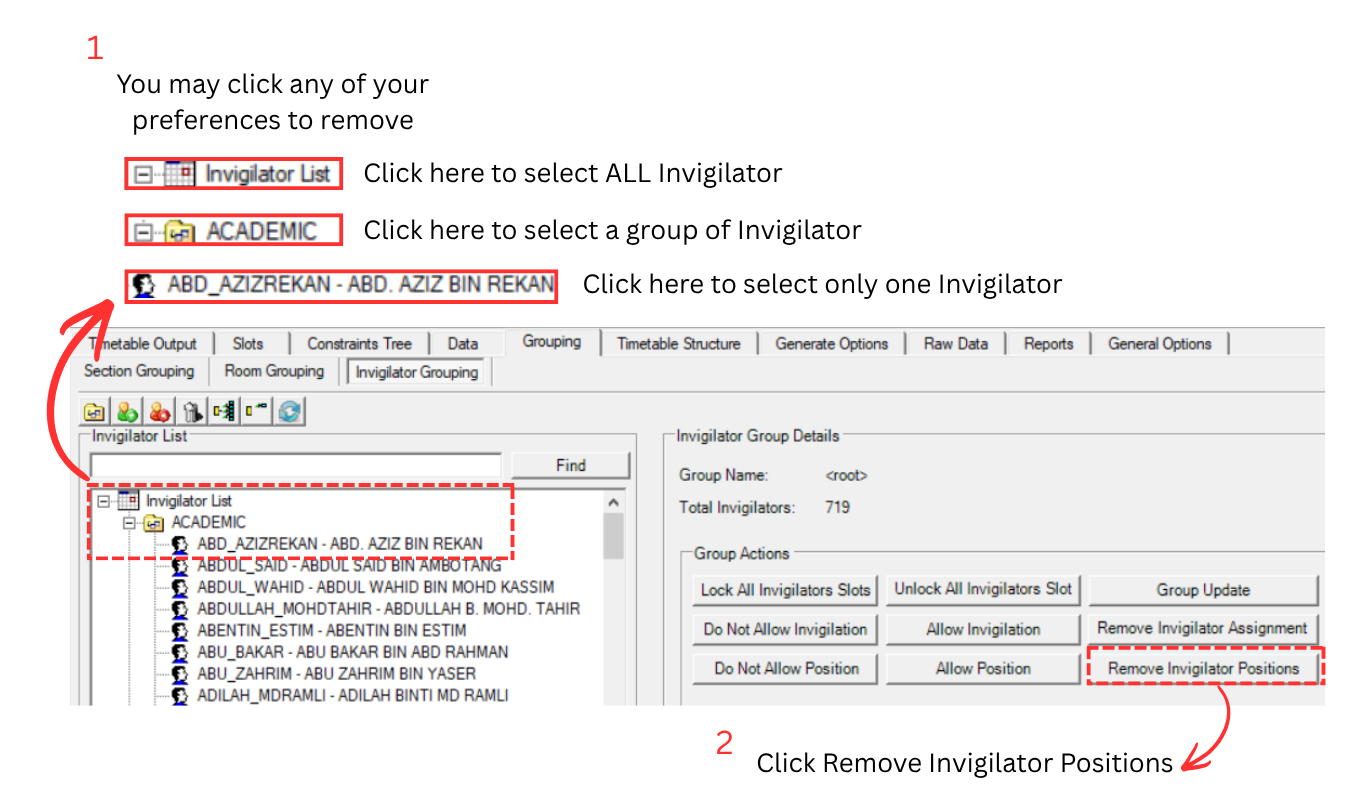
Step 1: Go to Grouping tab and select Invigilator Grouping.
Step 2: Select the invigilator(s) you want to remove position from:
- Click on All Invigilator List to select all invigilators
- Click on a group (e.g., Academic) to select a group of invigilators
- Click on an individual invigilator to select only one
Step 3: Click Remove Invigilator Positions from the Group Actions on the right side to remove the position assignment.
Remove Invigilators Position at Generate Options
If you want to remove all invigilator position assignments and start over, you can use the Reset Position button at Generate Options.
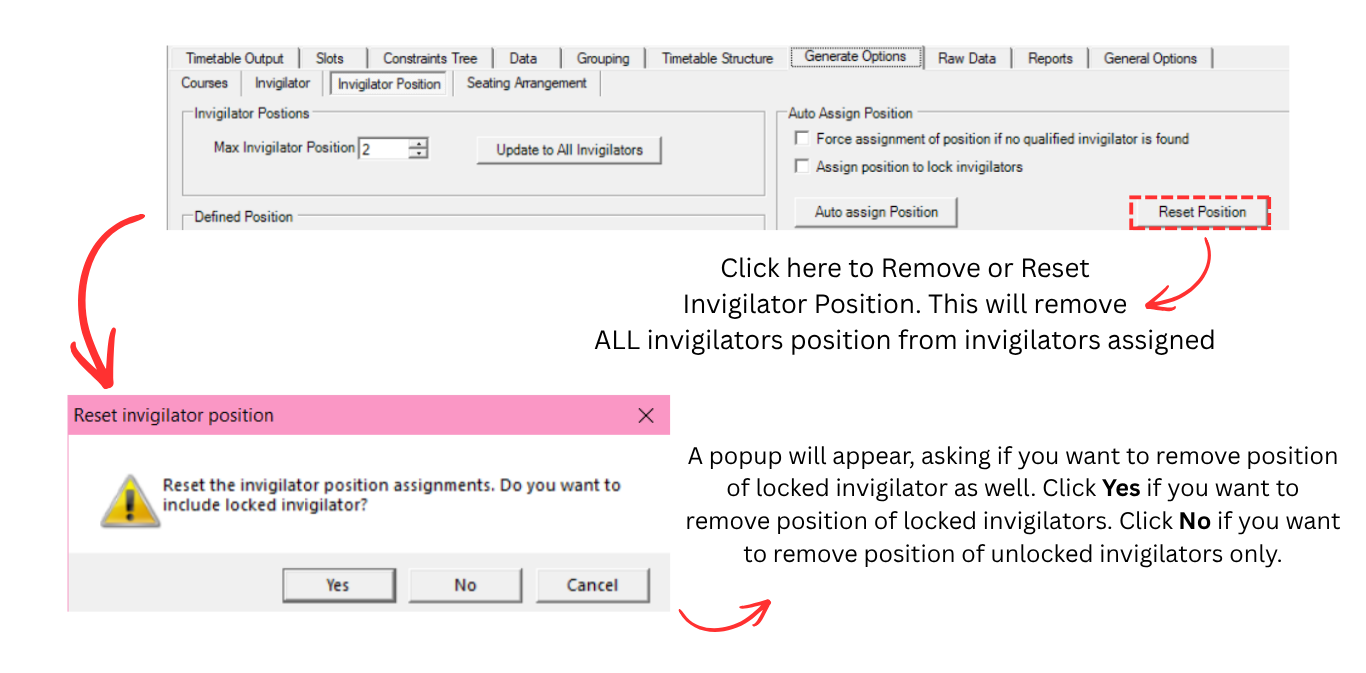
Step 1: Go to Generate Options tab, click Invigilator Position, and click the Reset Position button.
Step 2: A popup will appear asking "Reset the invigilator position assignments. Do you want to include locked invigilator?". Choose accordingly:
- Click Yes if you want to remove position of all invigilators including locked invigilators
- Click No if you want to remove position of unlocked invigilators only
- Click Cancel to cancel the operation
Manually Add Position to Invigilator at Slot
To manually insert Invigilator Position into invigilator, you can use the Manage Position window. This is useful when you want to add a position into a slot with incomplete invigilator position.
Step 1: Go to the Slots tab, right click on the slot you want to add a position to, and select Manage Position.
Step 2: In the Manage Position window, select a position from the Available Positions list on the left side (e.g., Chief Invigilator).
Step 3: Click on your preferred invigilator from the Current Invigilator Position list on the right side to assign the position to.
Step 4: Click the Move to the right button to move the position to the chosen invigilator.
Step 5: Click Apply once done.
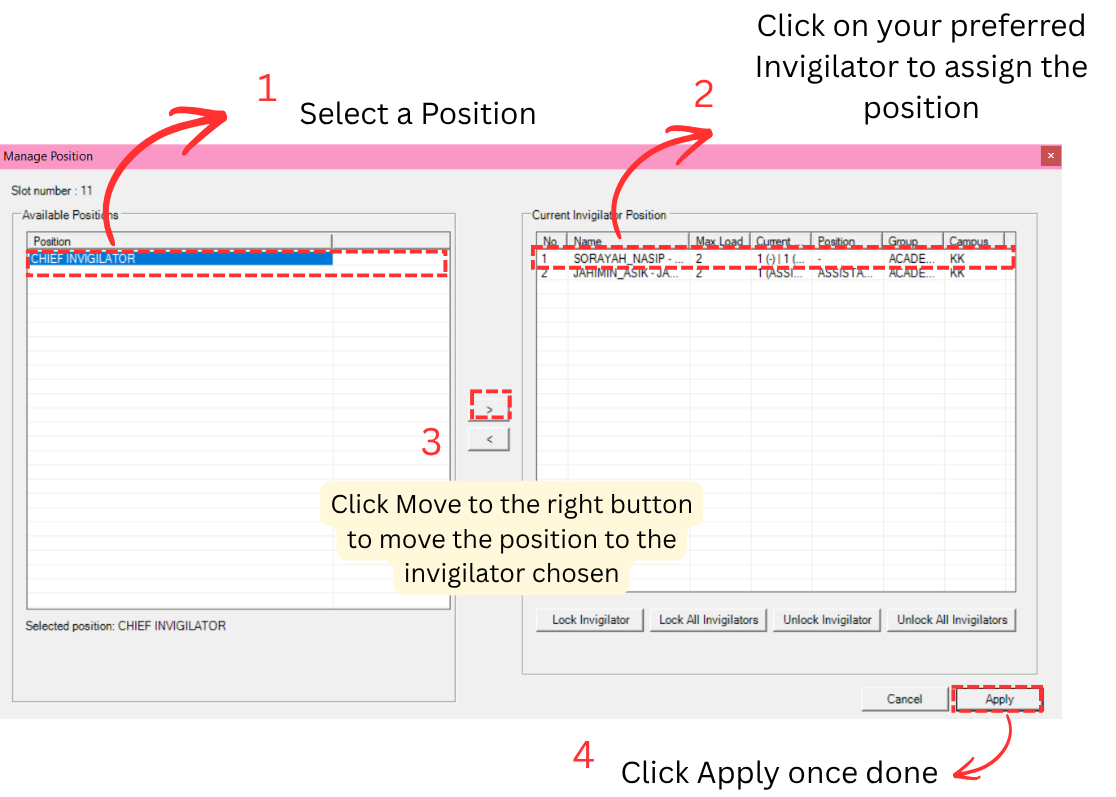
You are also able to Lock Invigilator, Lock All Invigilators, Unlock Invigilator, or Unlock All Invigilators directly from the Manage Position window.
8.6 Generate Seating Arrangement
After invigilator positions have been assigned, you can generate the seating arrangement. Before generating, you need to set the seating constraints at Generate Options.
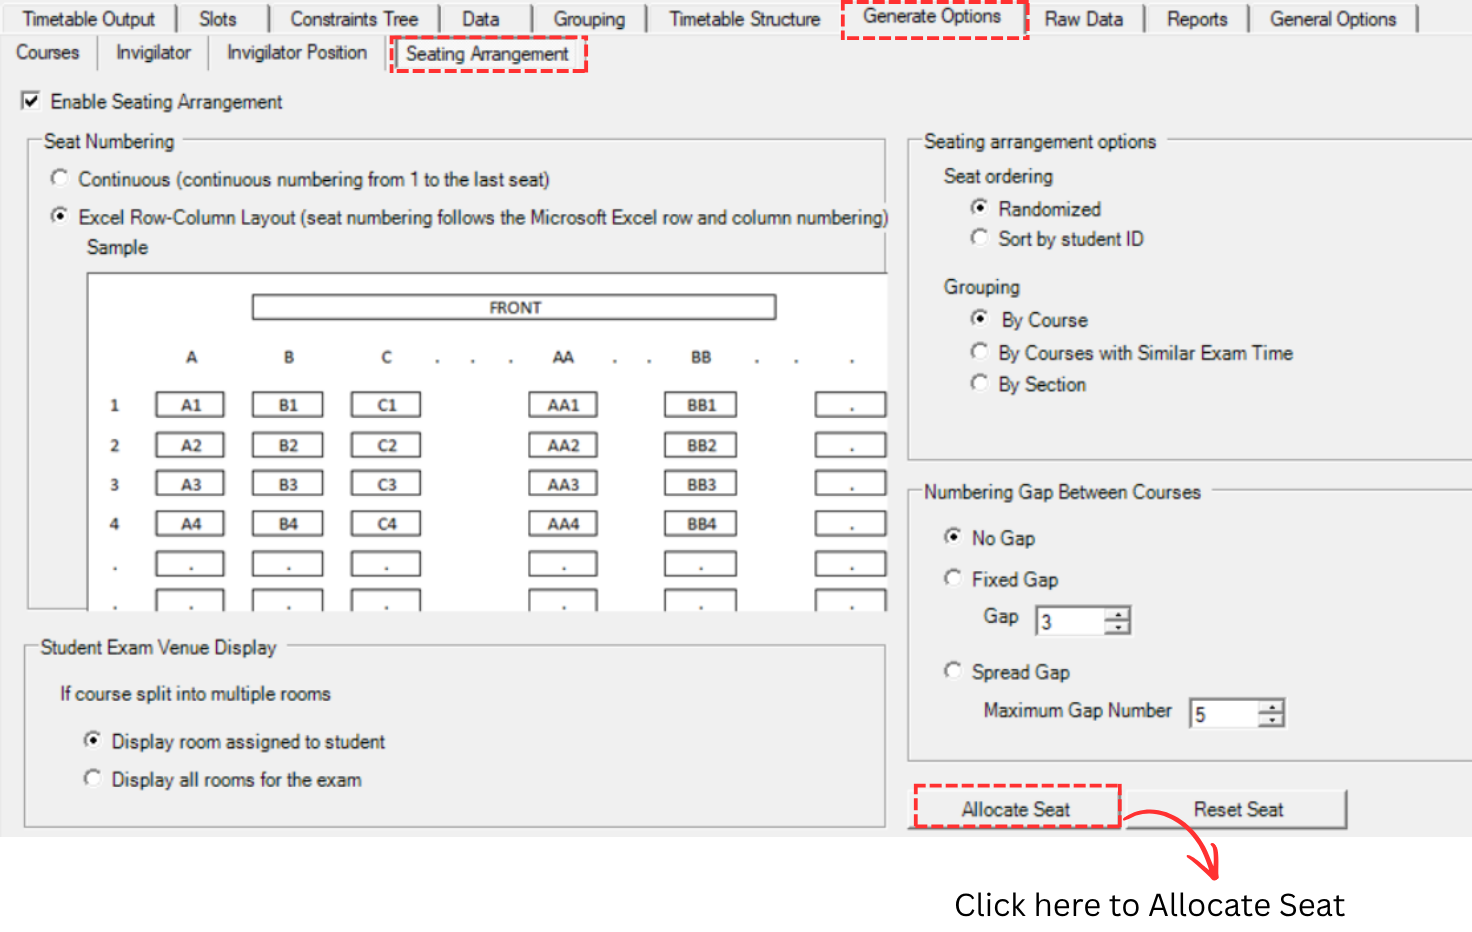
8.6.1 Set Constraint at Generate Option
Click Generate Option tab and then click Seating Arrangement to set the Seating Arrangement Constraint.

The Seating Arrangement window has 5 areas that you can configure. Make sure to tick Enable Seating Arrangement at the top to enable the seating arrangement feature.
- Seat Numbering — Choose how seats are numbered
- Student Exam Venue Display — Configure how rooms are displayed to students
- Seating Arrangement Options — Set seat ordering and grouping preferences
- Numbering Gap Between Courses — Set the gap between courses in seat numbering
- Allocate and Reset Seat — Allocate or reset seat assignments
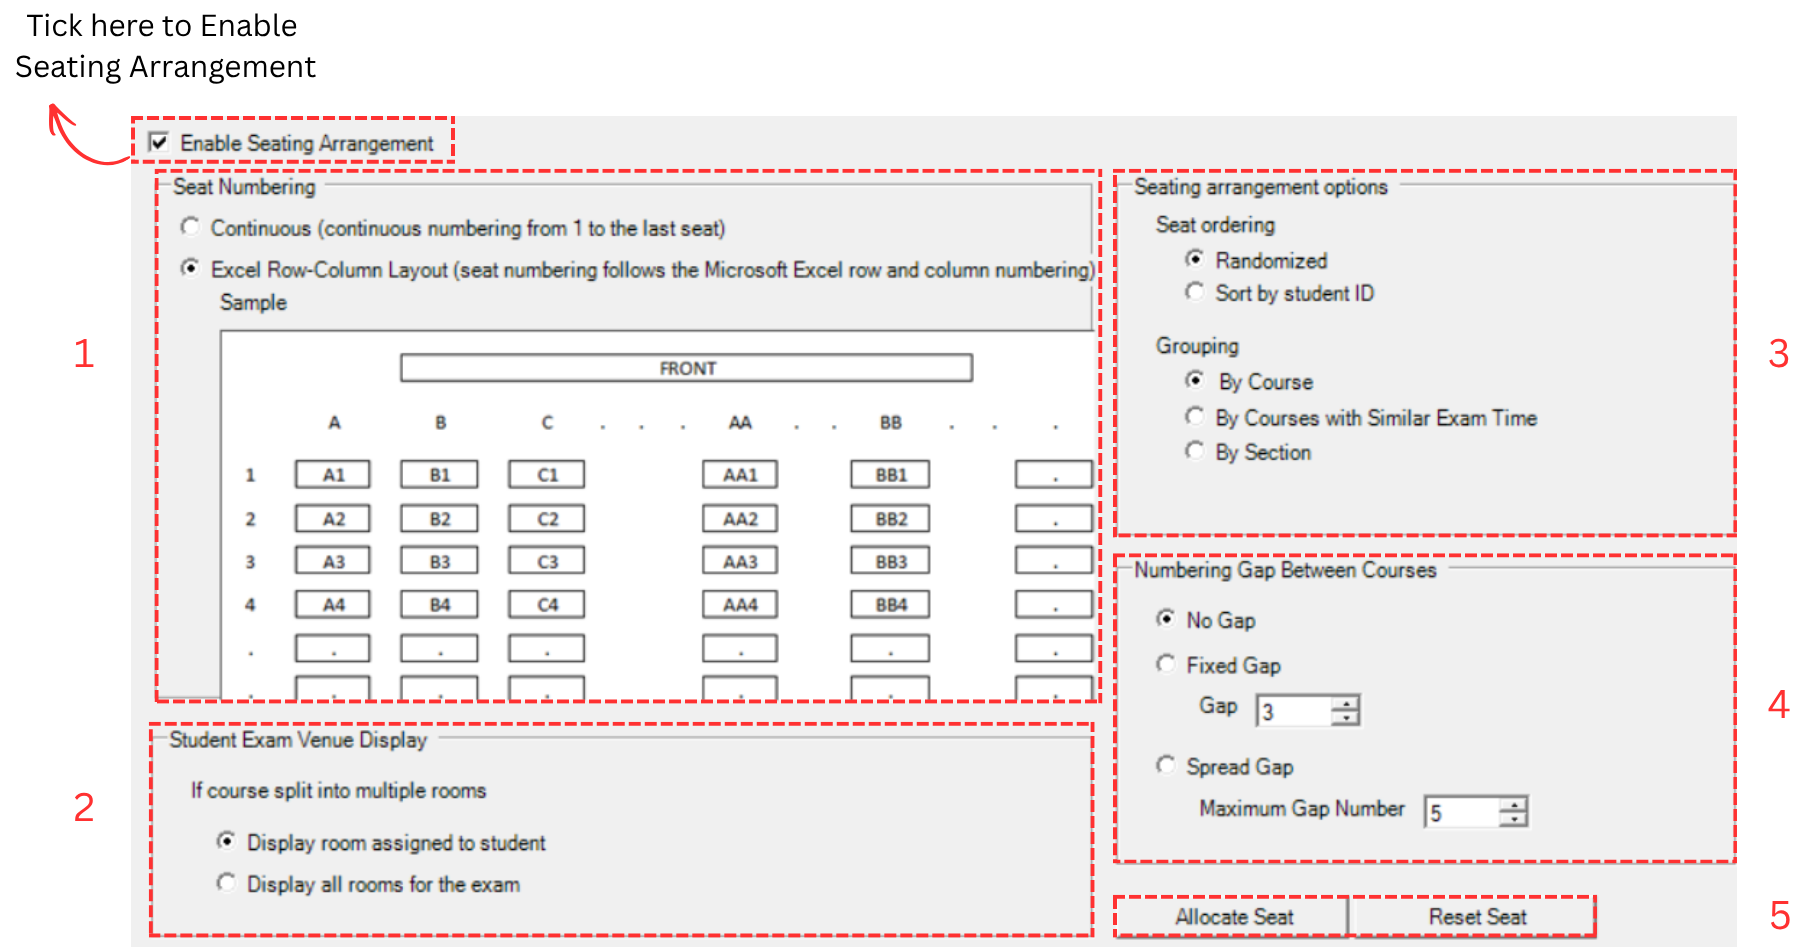
1. Seat Numbering
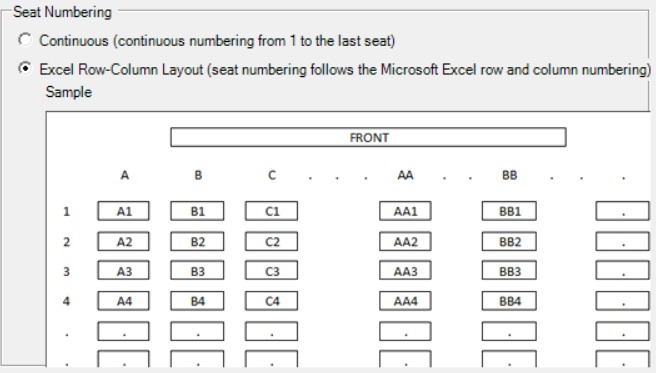
- Continuous — Continuous numbering from 1 to the last seat. For example, the seat numbering would be: 1, 2, 3, ..., 90.
- Excel Row-Column Layout — The numbering will be based on the layout of Excel Row-Column. Please refer to the sample picture given. For example, seats are labeled as A1, A2, B1, B2, etc.
2. Student Exam Venue Display

If the courses split into multiple rooms due to the capacity, you may choose to display room assigned to student or display all rooms for the exam. This can be seen at Slot and Course-Student List.
- Display room assigned to student — Only show the room that the student is assigned to.
- Display all rooms for the exam — Show all rooms used for the exam to the student.
3. Seating Arrangement Options
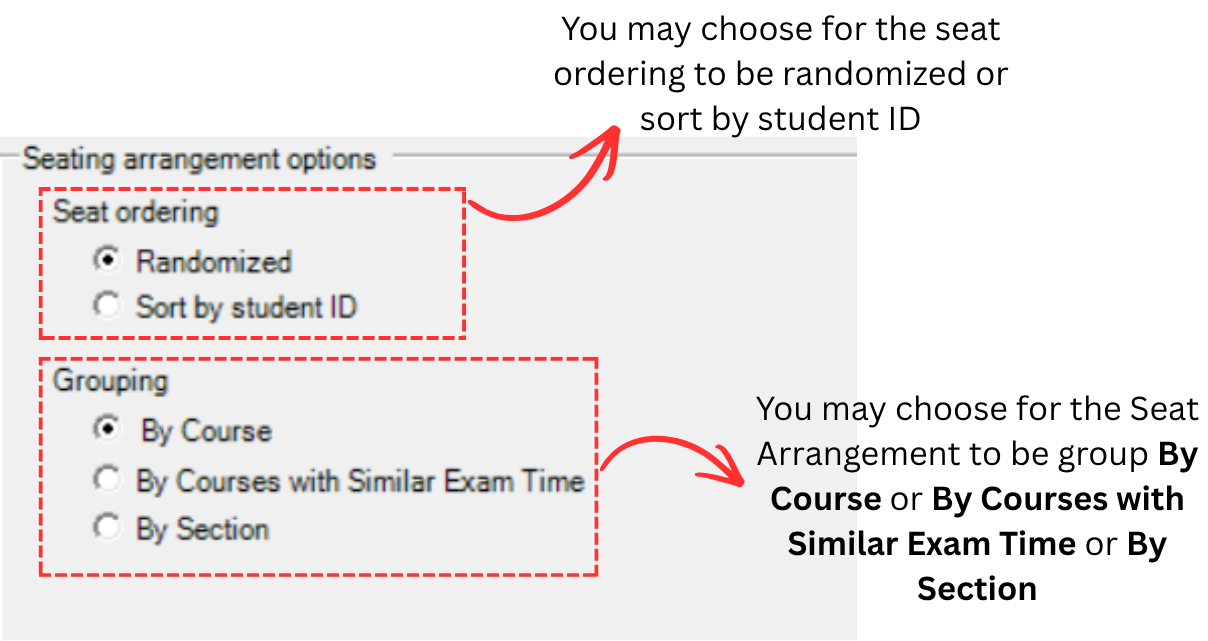
Seat Ordering:
You may choose for the seat ordering to be randomized or sorted by student ID.
- Randomized — Seats will be assigned randomly to students.
- Sort by student ID — Seats will be assigned based on the student ID order.
Grouping:
You may choose for the Seating Arrangement to be grouped by one of the following options:
- By Course — Students will be grouped by their course.
- By Courses with Similar Exam Time — Students will be grouped by courses that share the same exam time.
- By Section — Students will be grouped by their section.
4. Numbering Gap Between Courses

- No Gap — No numbering gap between courses. Seats will be numbered continuously across all courses.
- Fixed Gap — Set a fixed numbering gap between courses. Enter the gap value (e.g., 3 means there will be a gap of 3 seat numbers between each course).
- Spread Gap — Set a spread numbering gap between courses. There will be a random number of gap between courses but the maximum gap will not exceed the value entered. For example, if the Maximum Gap Number is 5, the gap between courses will be randomly between 1 and 5.
5. Allocate and Reset Seat

- Allocate Seat — Assign seat to the student based on the constraints you have configured above.
- Reset Seat — Reset or remove seat assignments after they have been assigned. Use this if you want to start over.
8.6.2 Allocate Seat
To Allocate Seat, click Allocate Seat button at Seating Arrangement under Generate Options tab.
A popup will appear saying "Seat allocation for student completed". Click OK.

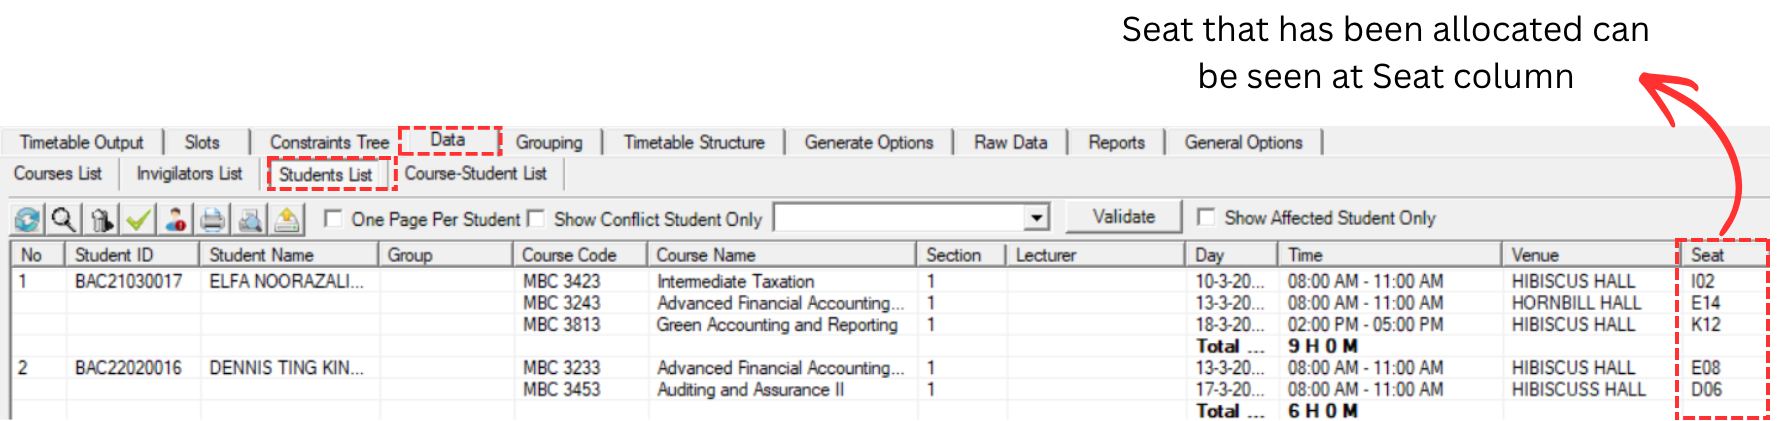
Once done, you can go to Data and select Student List to view the seat assignments. The seat that has been allocated can be seen in the Seat column.
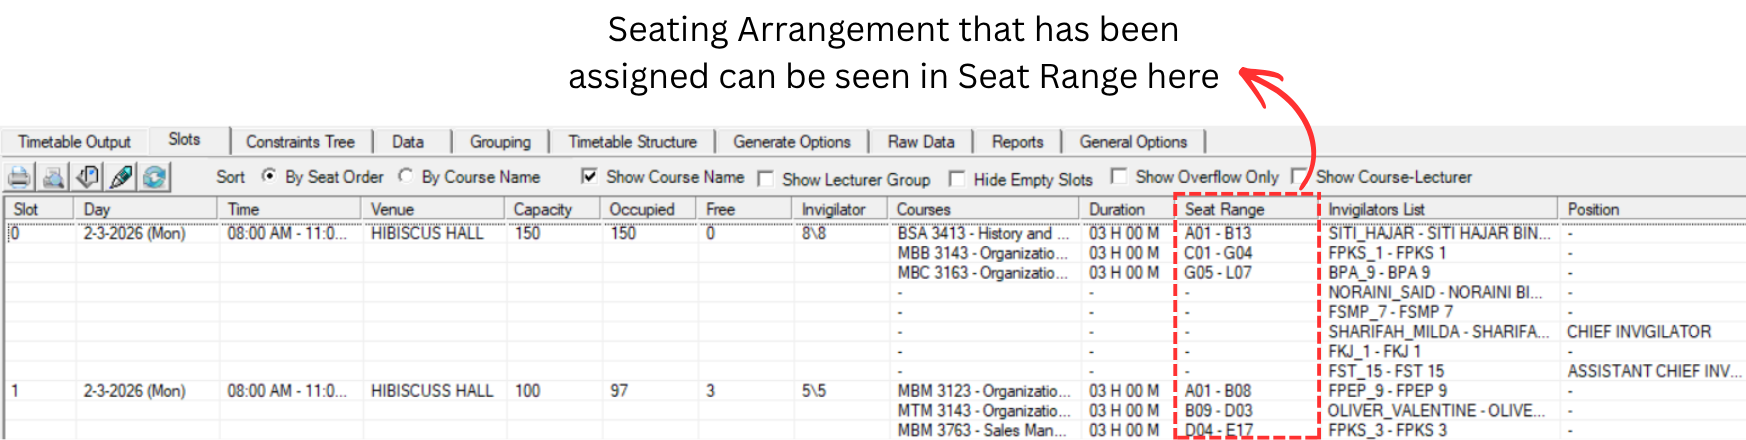
You can also go to Slots to view the Seat Range. The seating arrangement that has been assigned can be seen in the Seat Range column.
8.7 Analyze & Edit Seating
After generating the seating arrangement, review and verify the results before finalizing and locking the schedule.
8.7.1 Analysis
Slots
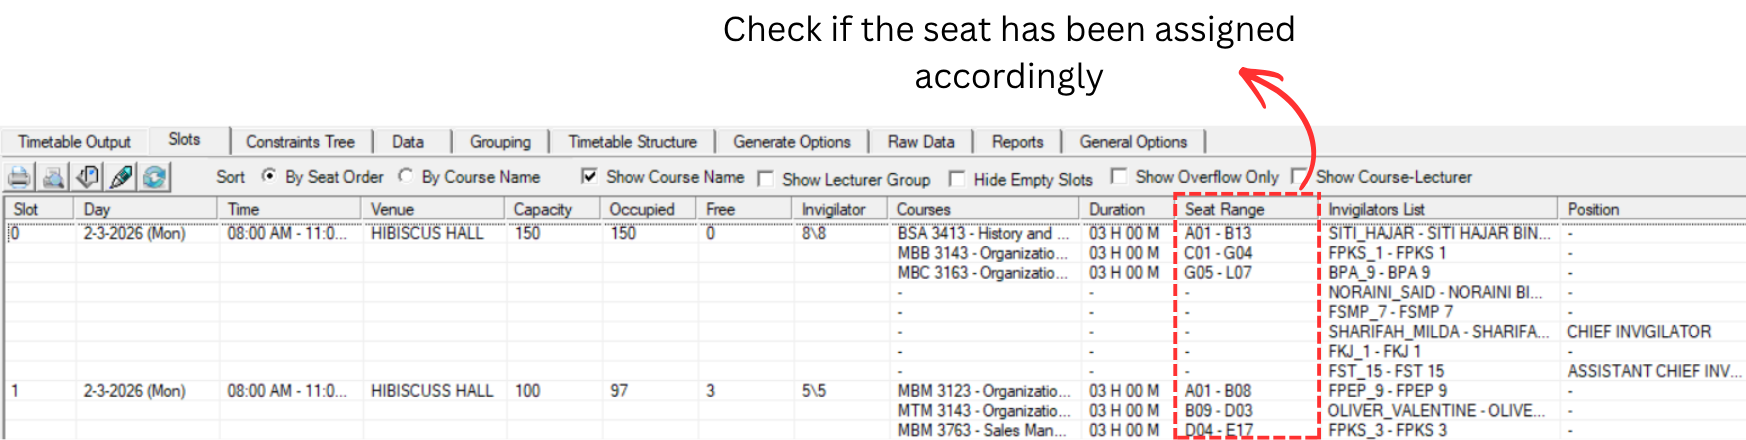
You may analyze the Slot to know if the seating number has been distributed accordingly. Go to the Slots tab and check the Seat Range column to verify the seat assignments.
To edit, you can locate the seat to Course-Student List. Right click on a slot and select Locate, then choose Slot at Course-Student List.
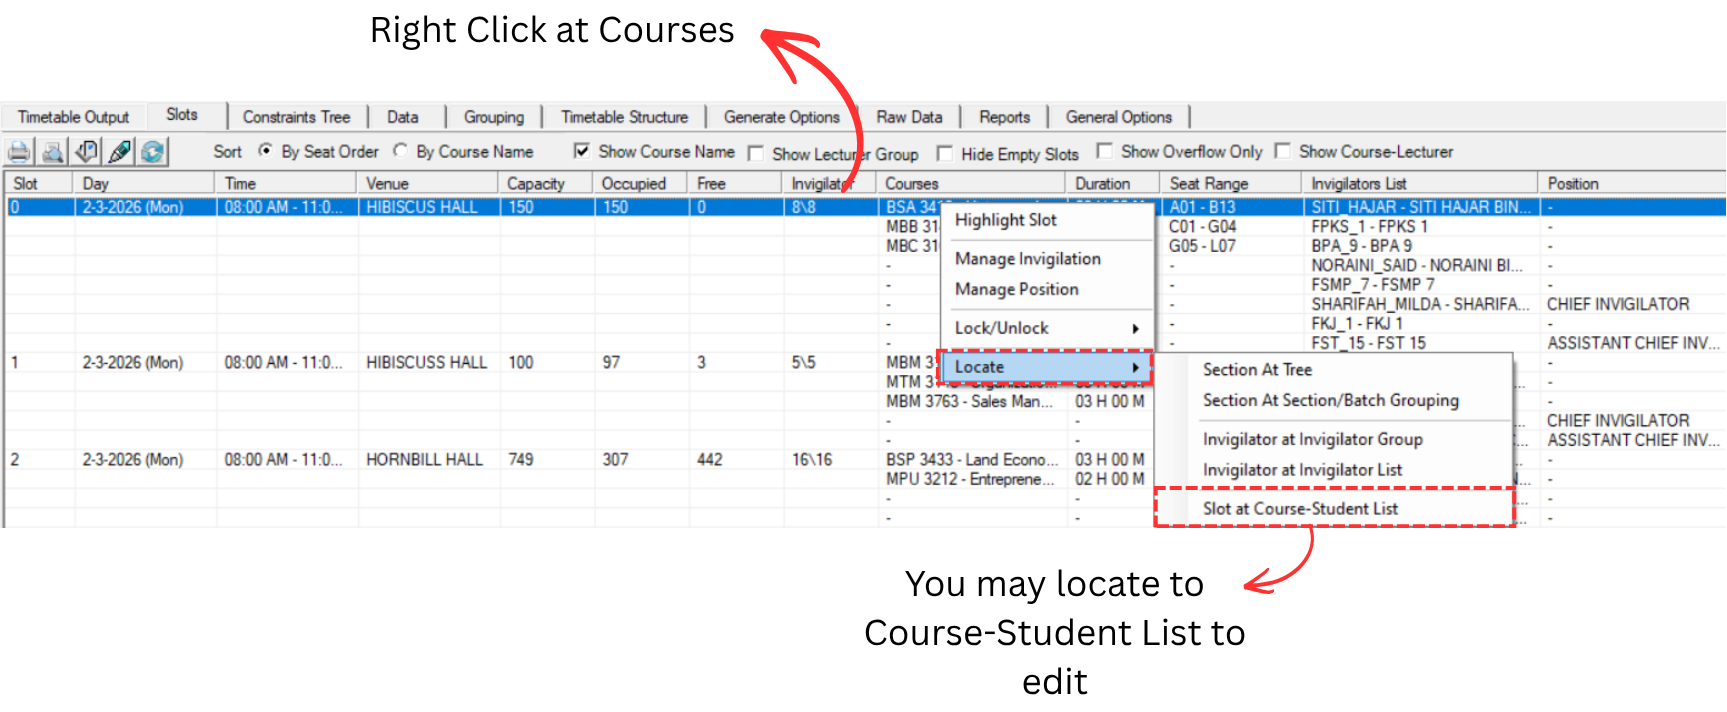
After locating, the Course-Student List will appear showing all students who take the course in the selected slot. You can view and verify each student's seat assignment from here.
To edit, you may refer to the 8.7.2 Editing Seating.
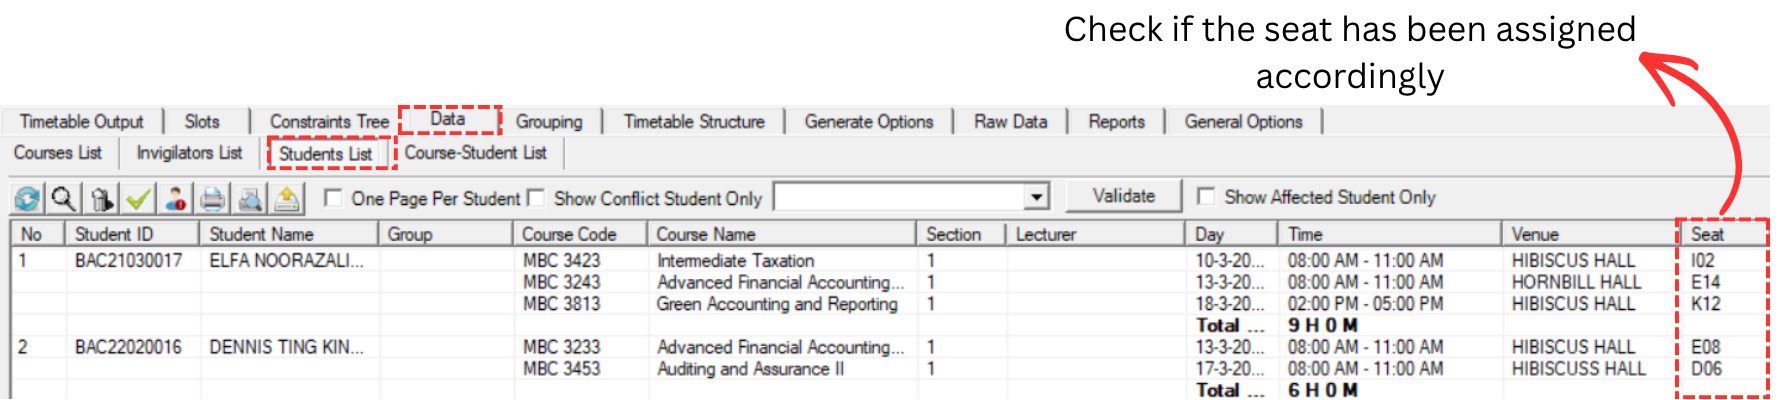
Student List
You may analyze the Student List to know if the seating number has been distributed accordingly. Go to Data and select Students List. Check the Seat column to verify the seat assignments.
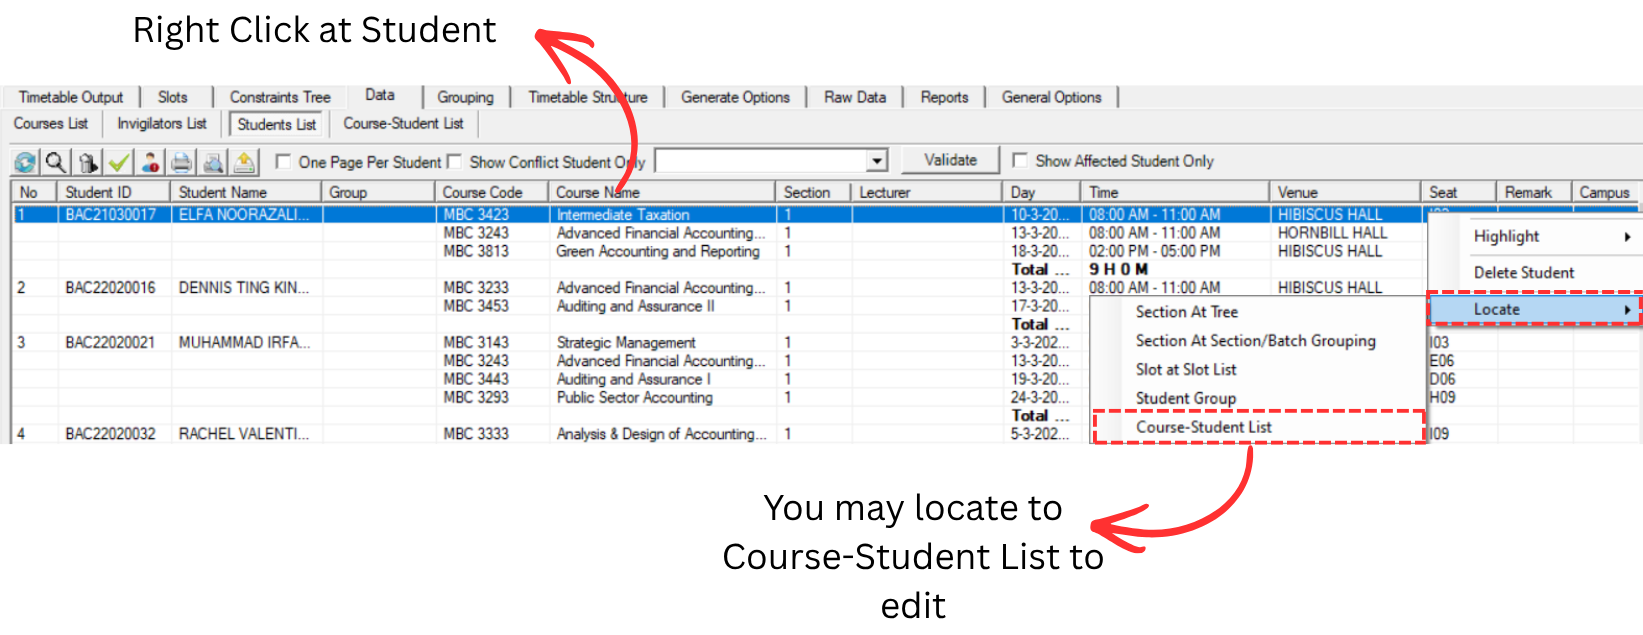
To edit, you can locate the seat to Course-Student List. Right click on a student and select Locate, then choose Course-Student List.
To edit, you may refer to the 8.7.2 Editing Seating.
Course-Student List
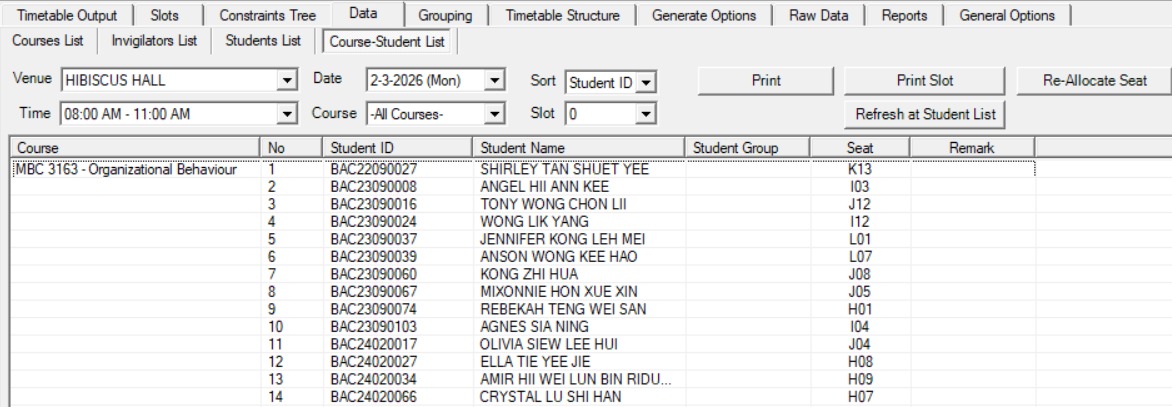
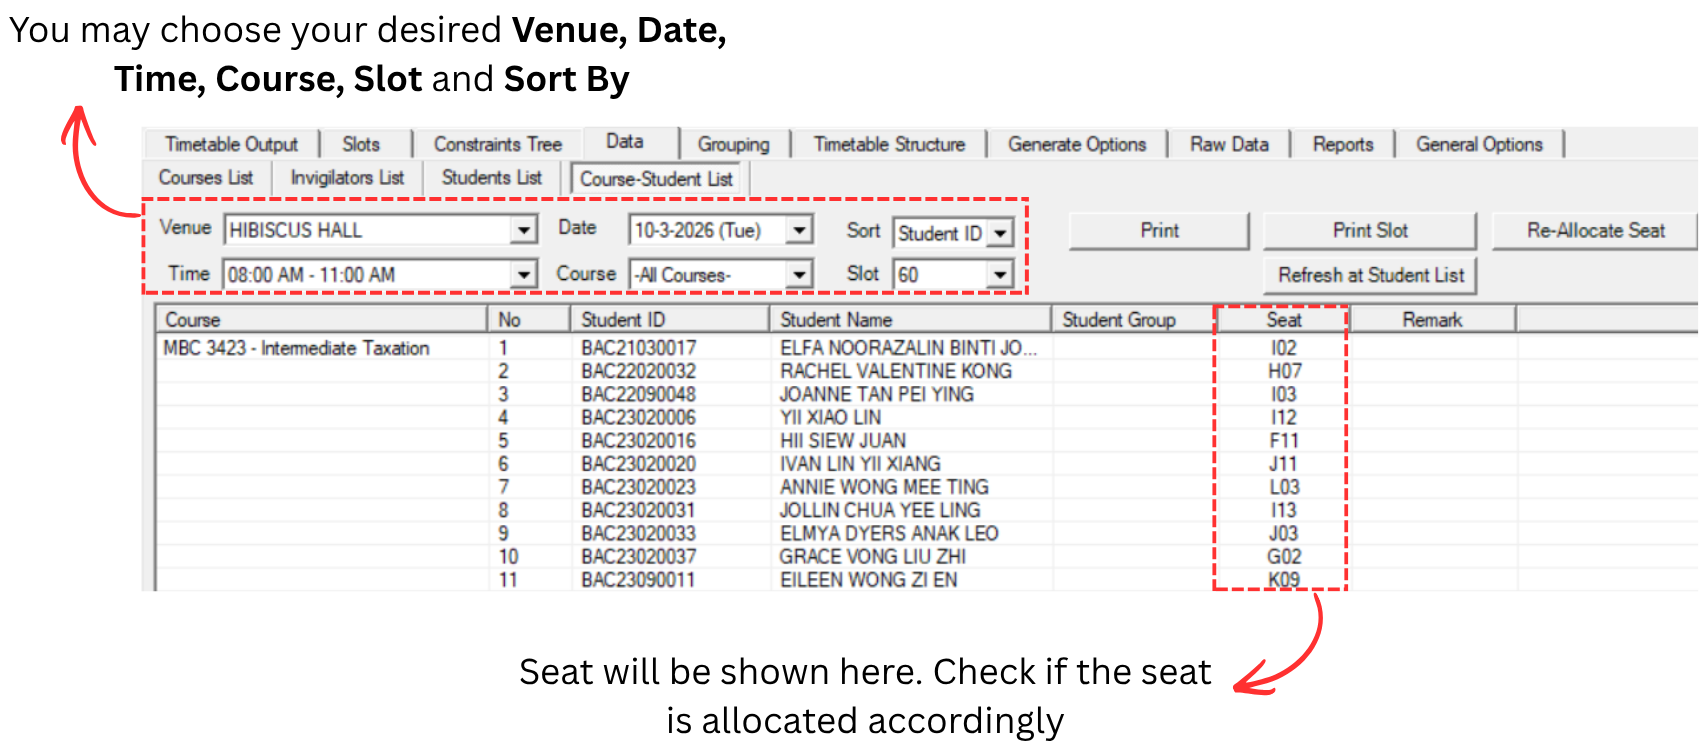
You may analyze the Course-Student List to know if the seating number has been distributed accordingly. Go to Data and select Course-Student List.
You may choose your desired Venue, Date, Time, Course, Slot and Sort By to filter the list. The Seat column will show the seat that has been allocated to each student. Check if the seat is allocated accordingly.
To edit, you may refer to the 8.7.2 Editing Seating.
8.7.2 Editing Seating
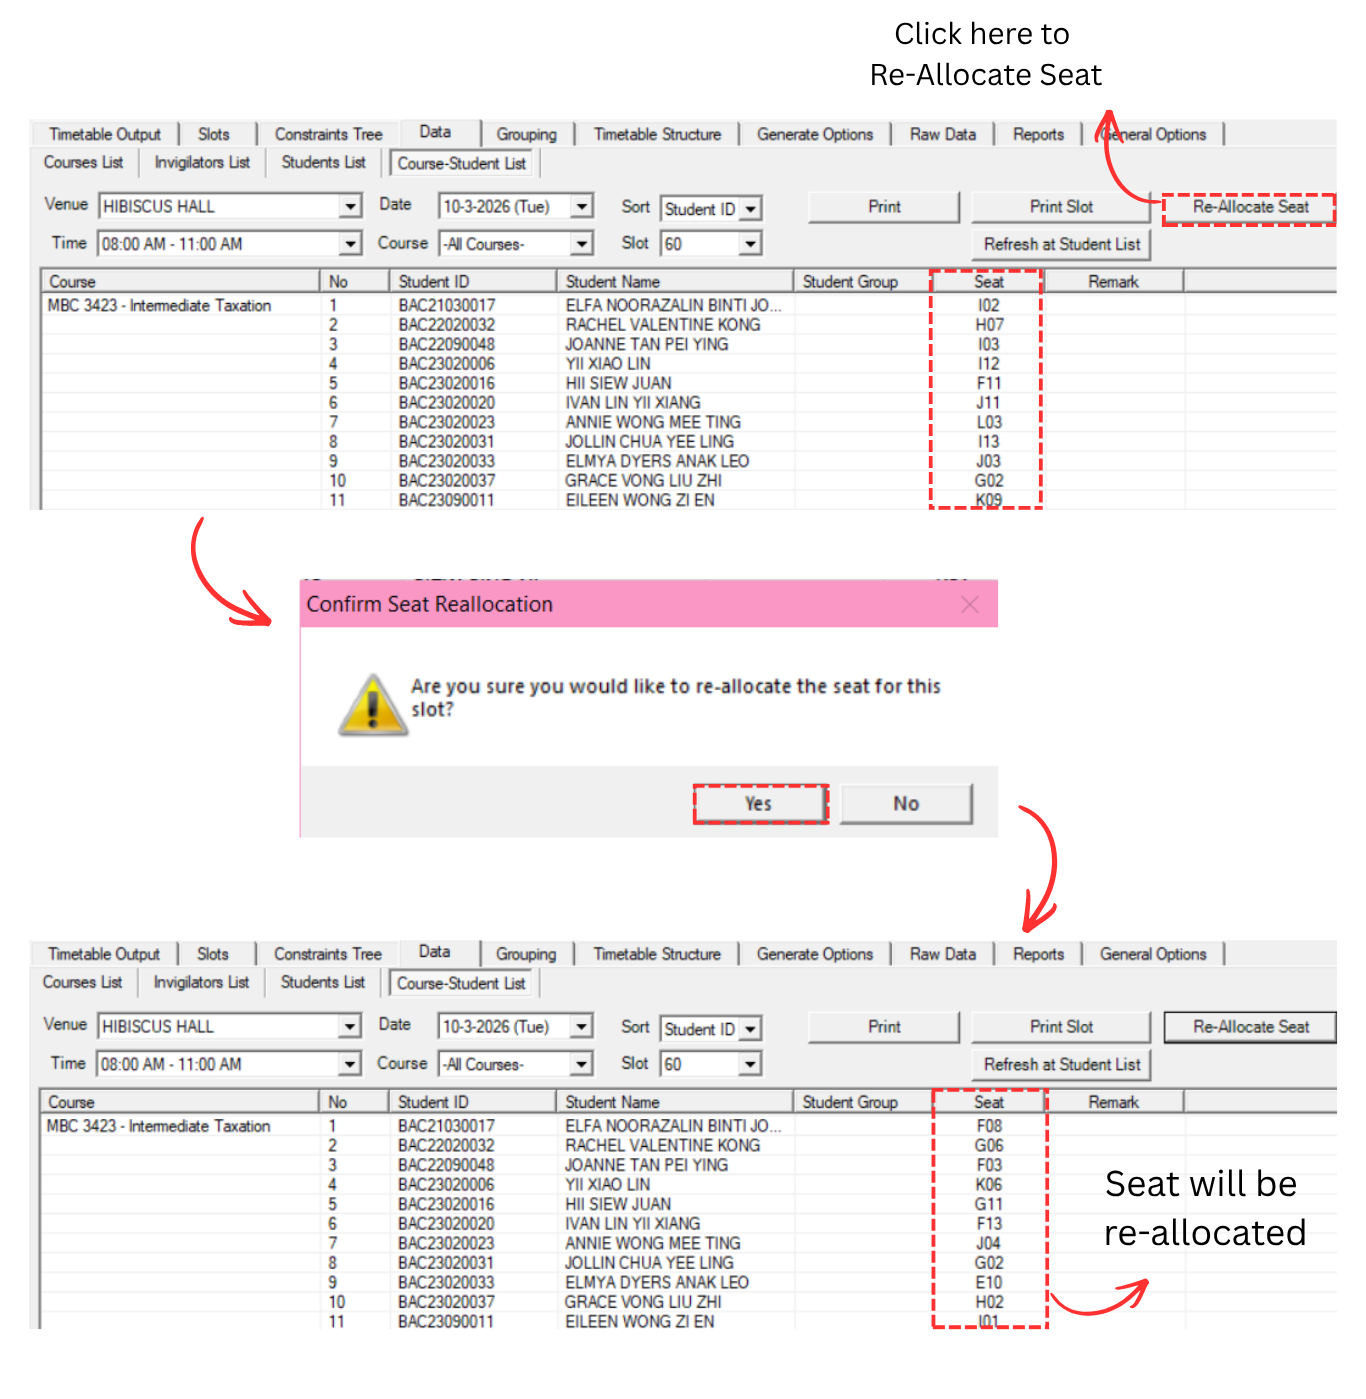
Re-Allocate Seat
You may Re-Allocate Seat of a slot by going to the Course-Student List under the Data tab.
Step 1: Go to Data and select Course-Student List. Select your desired Venue, Date, Time, Course, Slot and Sort By.
Step 2: Click the Re-Allocate Seat button on the top right corner.
Step 3: A confirmation popup will appear asking "Are you sure you would like to re-allocate the seat for this slot?". Click Yes to proceed.
Once confirmed, the seats will be re-allocated and the Seat column will be updated with the new seat assignments.
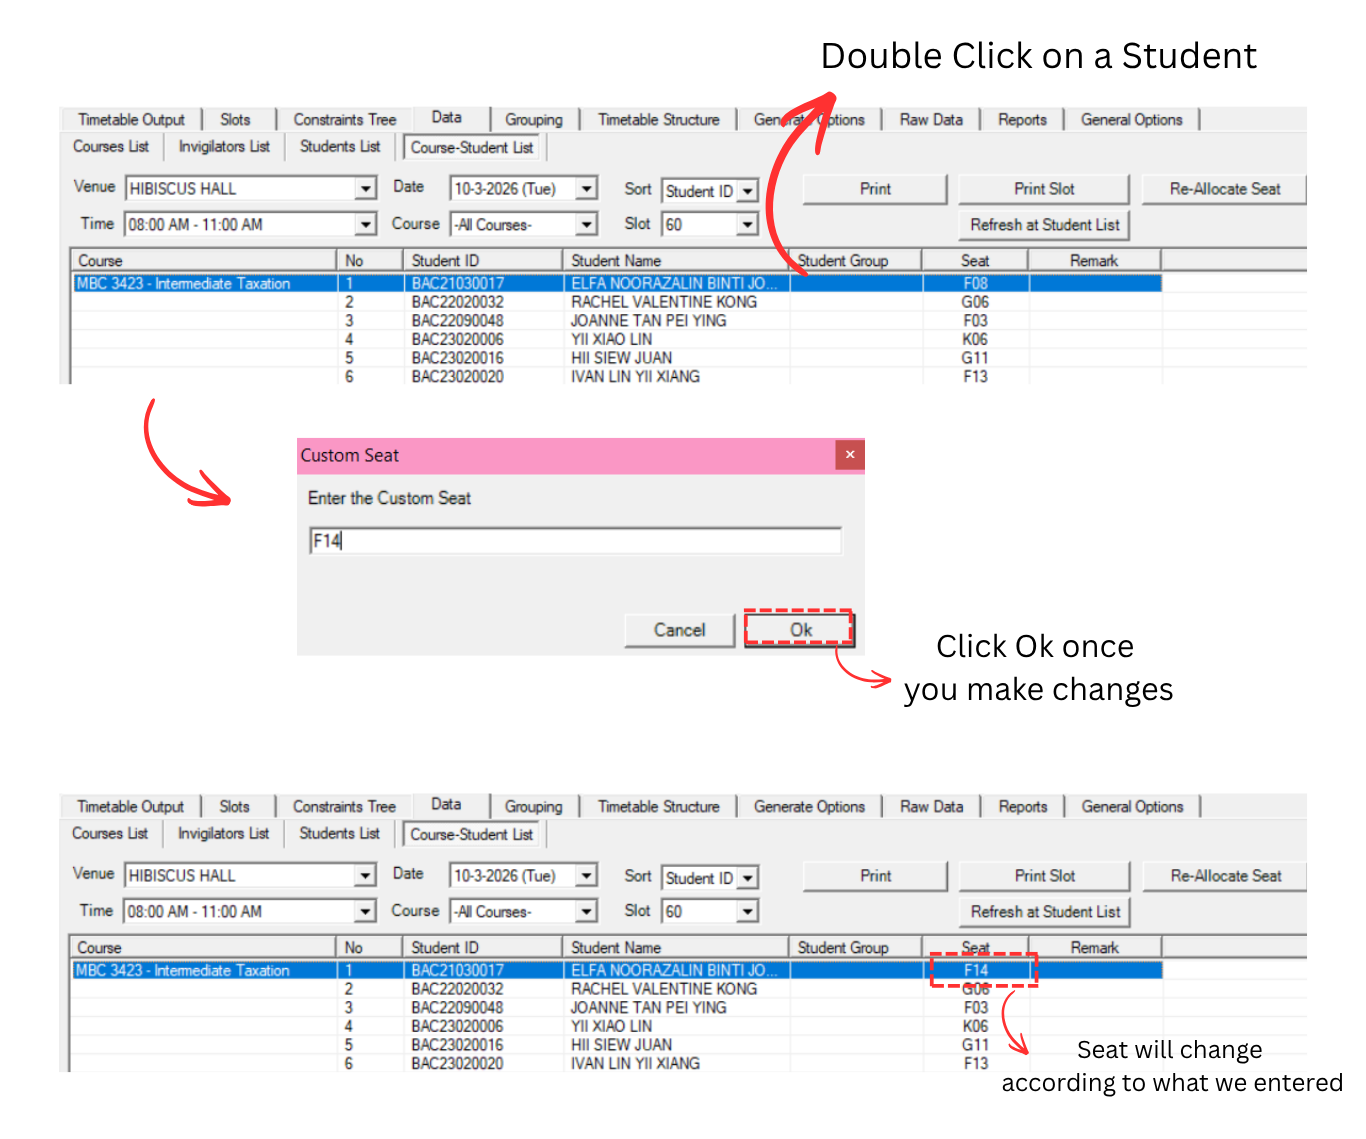
Custom Seat
To do the custom seat, you can easily double click the seat on a student and edit them.
Step 1: Go to Data and select Course-Student List. Select your desired Venue, Date, Time, Course, Slot and Sort By.
Step 2: Double click on the student you want to change the seat for. A Custom Seat window will appear.
Step 3: Enter the custom seat number in the field (e.g., D14) and click Ok.
Once confirmed, the seat will change according to what you entered in the Seat column.