Generate Schedule
Generate the exam timetable for courses, invigilators, positions, and seating arrangement.
7.1 Overview
After applying constraints in the previous chapter, you can now generate the exam schedule. The generation process follows a specific order:
- Exclude and Include — Control which sections and slots are available for generation.
- Generate Courses — Generate the exam course timetable.
- Analyze & Edit Courses — Review and adjust the generated course timetable.
7.2 Exclude and Include
The Exclude and Include functions allow you to control which sections (course groups) and time slots (timetable positions) are available during timetable generation. The recommended workflow is:
- Exclude all sections — Temporarily exclude all course sections from generation.
- Include preferred sections — Add back only the largest or most important sections to generate first.
- Exclude all slots — Temporarily exclude all time slots from the timetable.
- Include preferred slots — Add back only the first week's slots to fill them with important exams first.
7.2.1 Exclude All Section
This function allows you to exclude all sections at once from the timetable generation. Once excluded, none of them will be scheduled. You can then use the Include function to add back only the sections you need.
Alternative 1: Exclude at Constraint Tree
You can exclude all sections from the Constraint Tree. There are 3 simple steps to do so.
Step 1: Go to Constraints Tree.
Step 2: Right click on the first folder of All Courses.
Step 3: Click Exclude Section to exclude all sections under Constraints Tree.

Alternative 2: Exclude at Timetable Menu
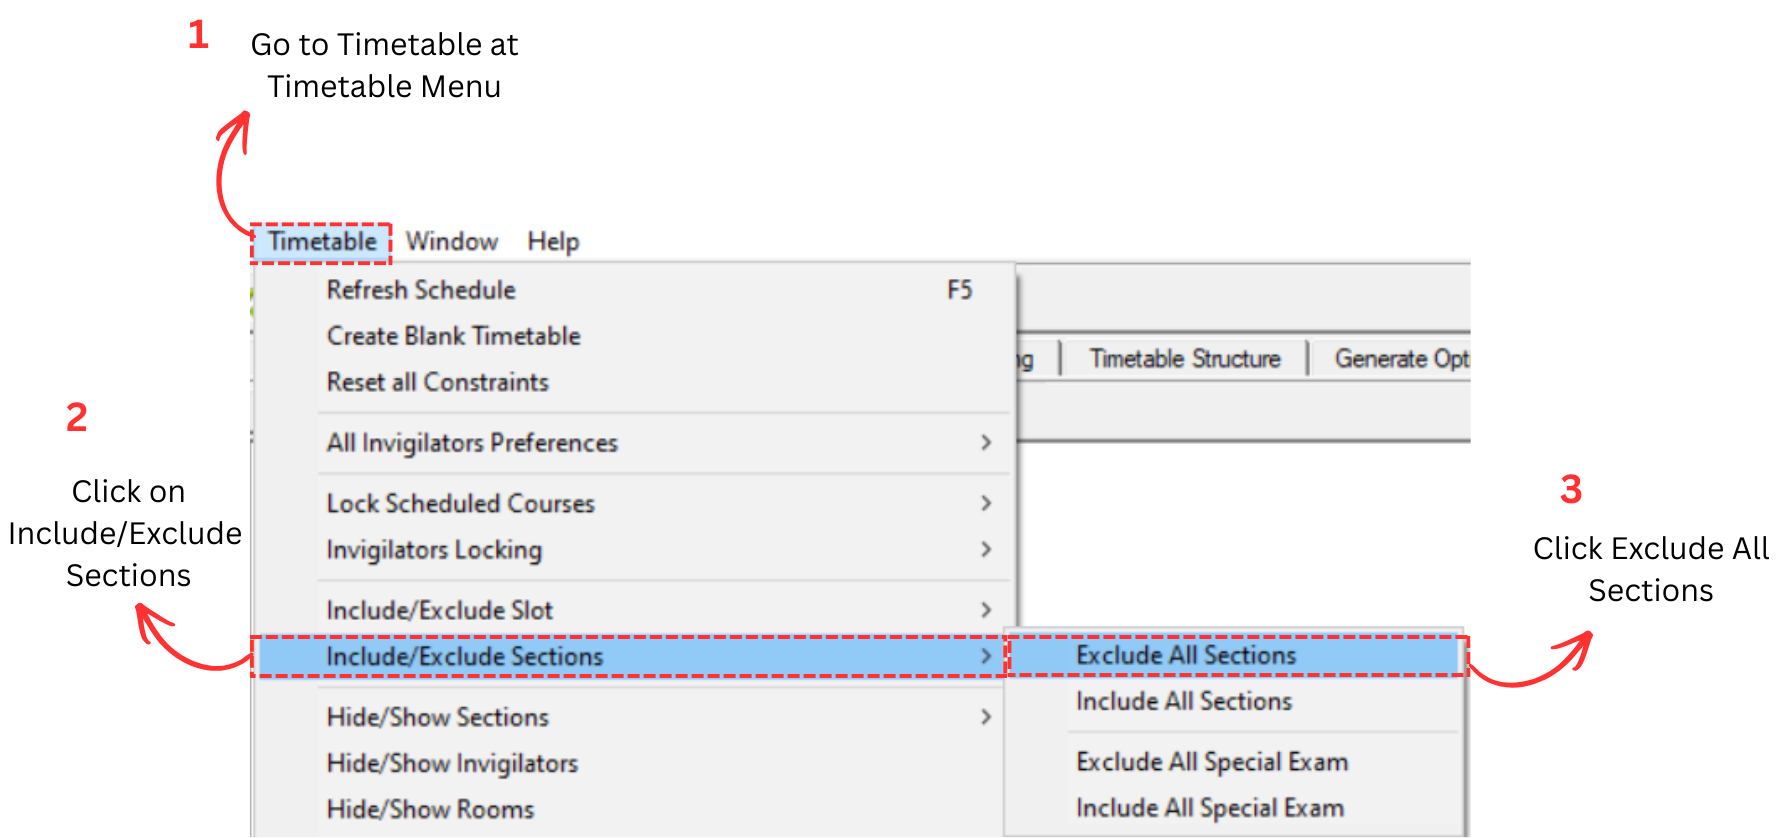
You can exclude all sections from the Timetable menu. There are 3 simple steps to do so.
Step 1: Go to Timetable menu.
Step 2: Click on Include/Exclude Sections.
Step 3: Click Exclude All Sections.
7.2.2 Include First Week Sections
After excluding all sections, the first step is to include only the sections you want to generate first. Since we have organized the courses into a FIRST WEEK folder in the Constraints Tree (see Section 6.2), we can now include those sections to be generated first.
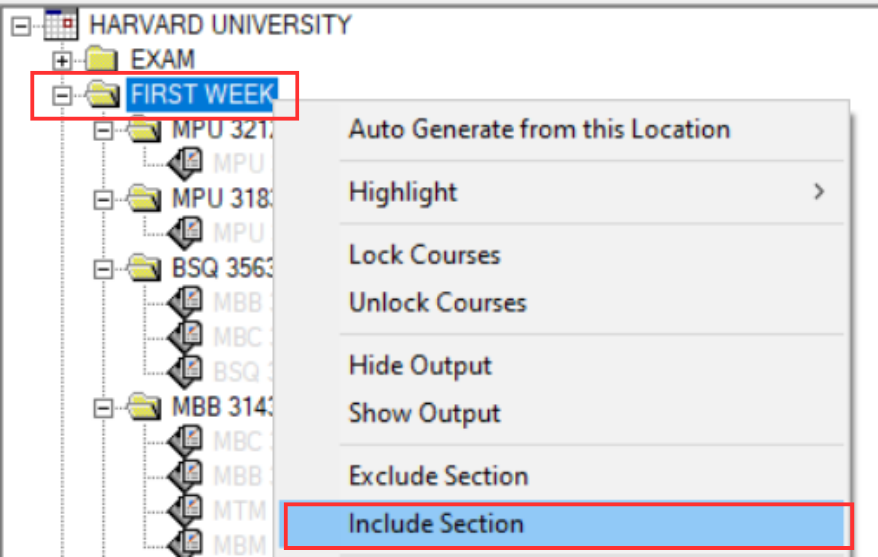
Step 1: Go to the Constraints Tree and locate the FIRST WEEK folder.
Step 2: Right-click on the FIRST WEEK folder and select Include Section. This will include all sections inside the FIRST WEEK folder for generation.
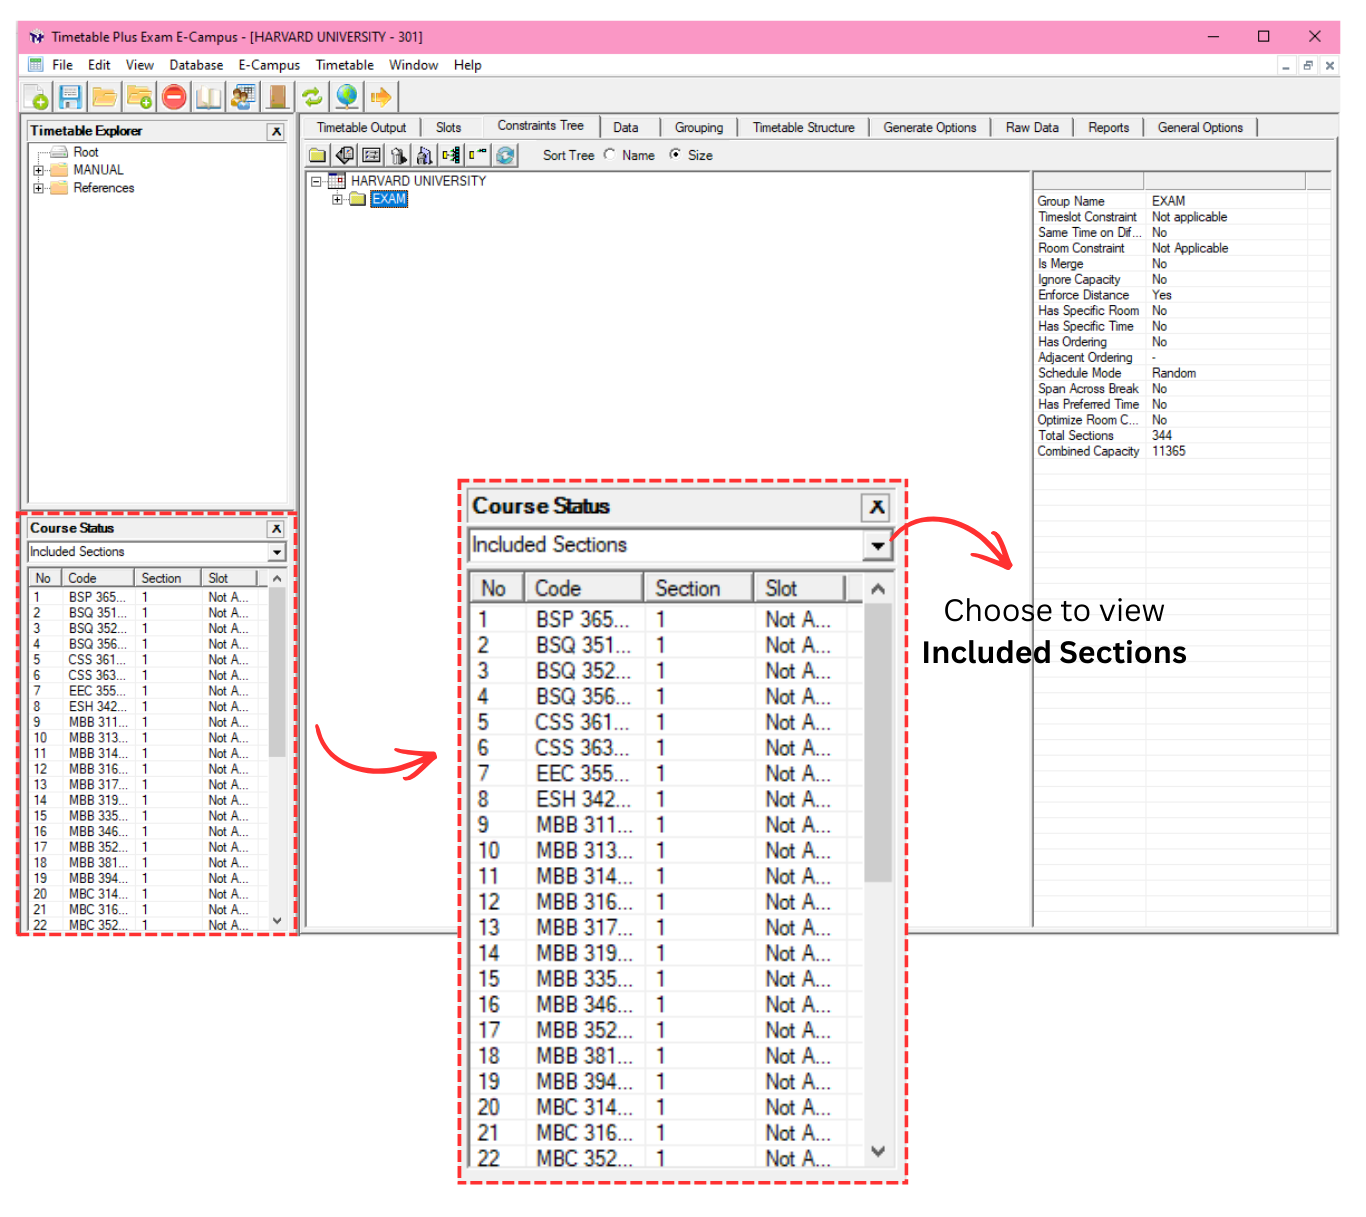
Step 3: Verify the included sections by checking the Course Status panel. Choose to view Included Sections from the dropdown to confirm that only the first week courses are included.

7.2.3 Include Section at Custom Section Actions
You may also include sections using Custom Section Actions, which allows you to filter and include sections based on specific criteria such as class size. There are 4 simple steps to include section at Custom Section Actions.
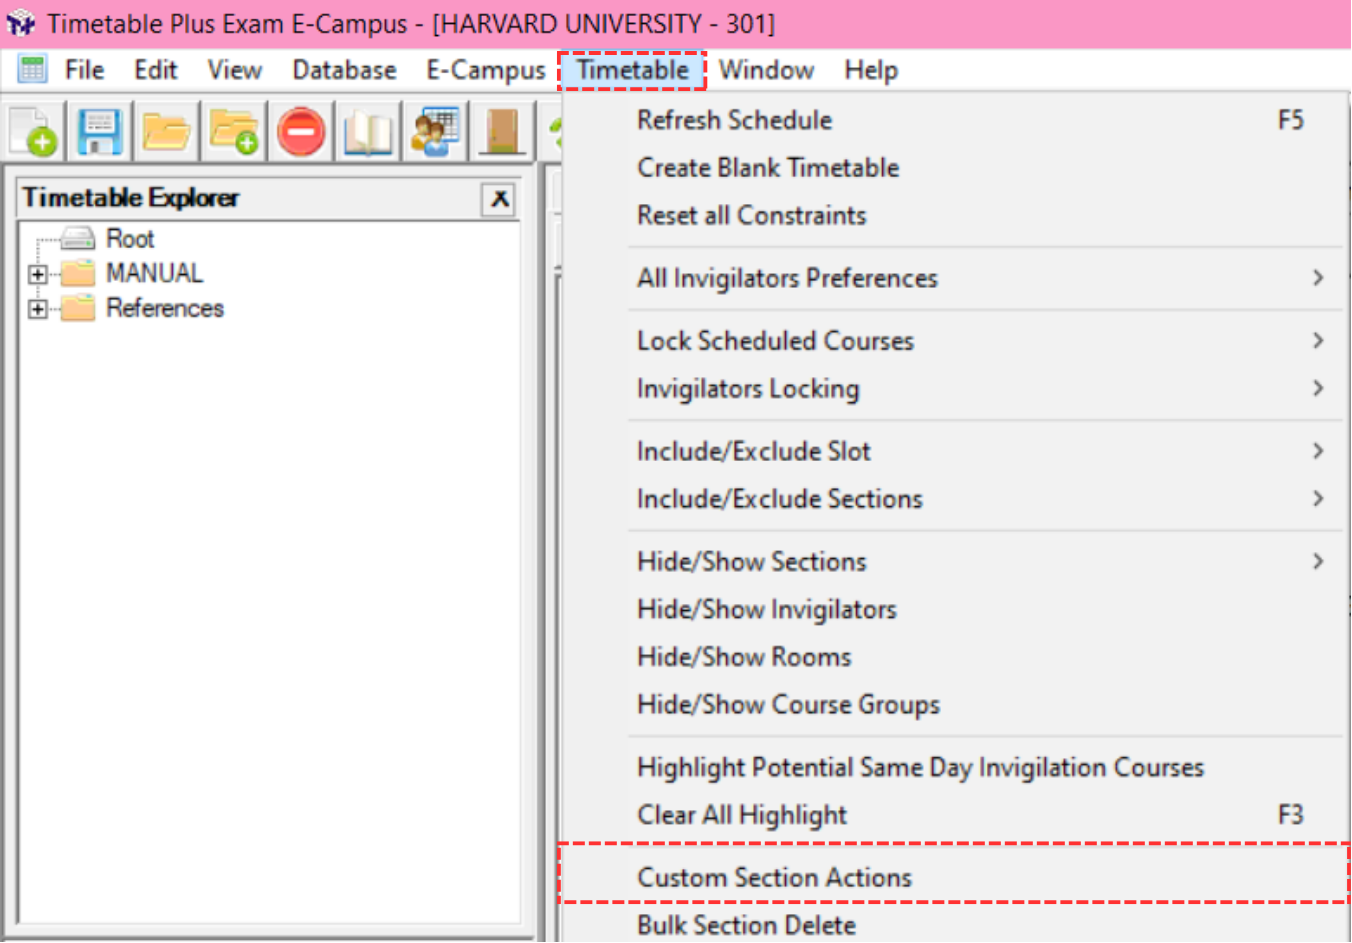
Step 1: Go to Timetable menu and select Custom Section Action.
Step 2: Custom Section Actions window will appear. Fill in the details as follows:
- Tick Include/Exclude box and then tick Include on the right side. This tells the system to include back only the sections that match your criteria, instead of including everything at once.
- Under Criteria, tick Class Size and Combine all section of a course. This allows you to filter sections based on the total number of students. For example, if the largest combined capacity is 172, you can set Class Size more than 100 but lesser than 200 to include the largest courses first.
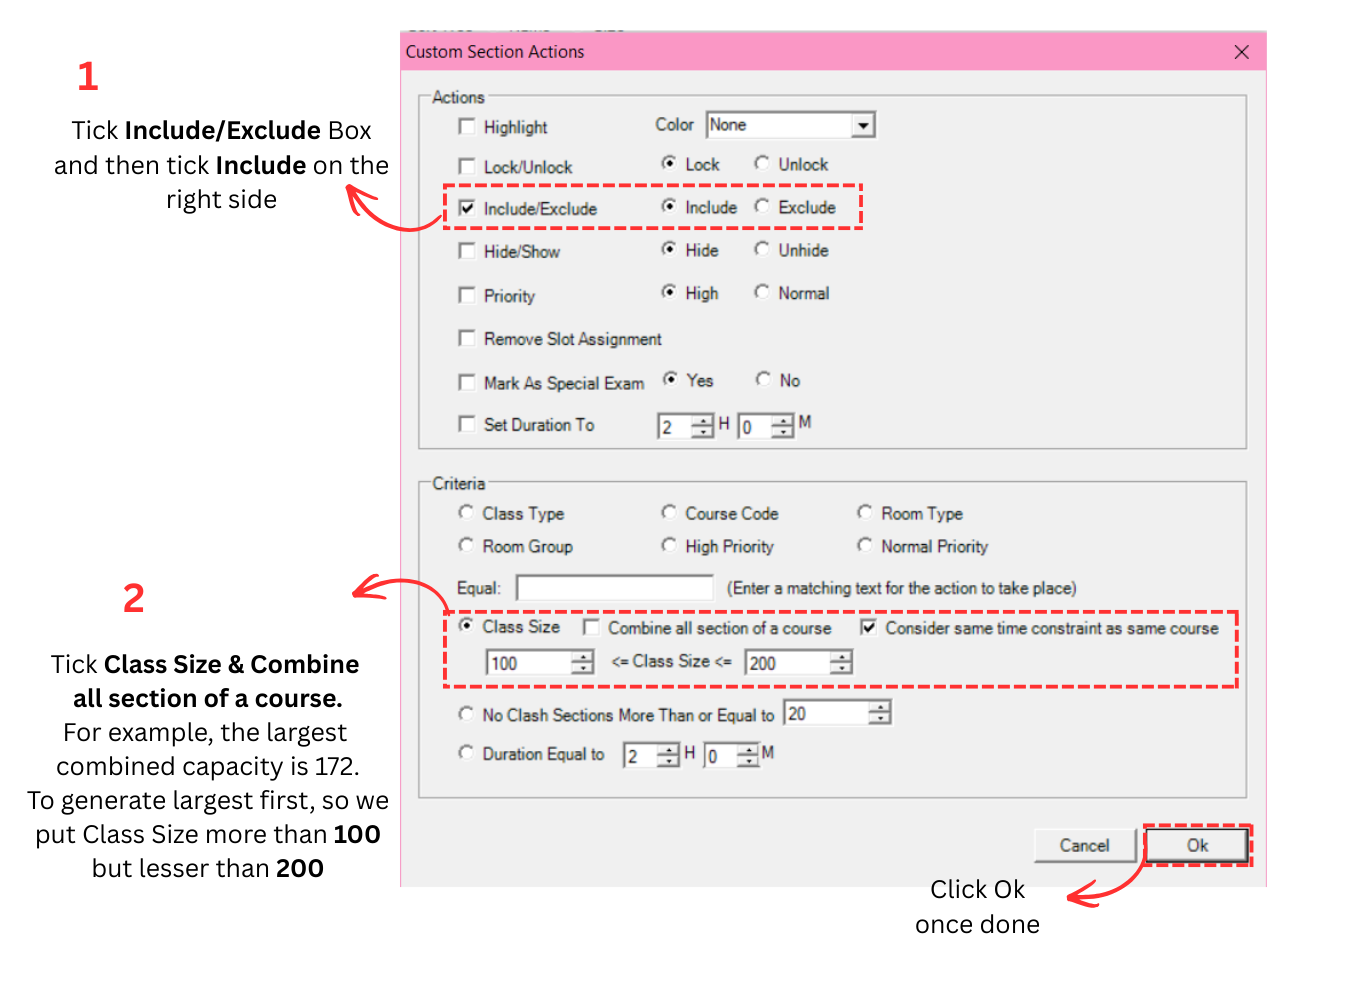
Step 3: Click Ok once done.
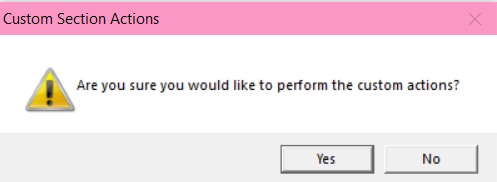
Step 4: A confirmation popup will appear. Click Yes.
Once you have included the preferred sections, you may view the Included Sections at Course Status. Choose to view Included Sections from the dropdown.
7.2.4 Exclude All Slots
To Exclude All Slots, there are 3 simple steps to do so.
Step 1: Go to Timetable Output.
Step 2: Right click anywhere in Timetable Output and select Exclude Slot.
Step 3: Click Exclude All. This will exclude all the slots in the Timetable Output.

As you can see, the excluded slots will be shown in black.

In Timetable Output, you may also be able to exclude other things such as:
- Exclude in the Slot: Exclude only a single slot.
- Exclude all in the Room: Exclude all the slots in the room chosen.
- Exclude all in the Time Slot: Exclude all slots in the time slot chosen.
- Exclude all in the Day: Exclude all slots in the day chosen.
7.2.5 Include Preferred Slot
You may include your preferred slot to generate course. For example, you want to generate preferred courses into the first week of examination. There are 4 simple steps to do so.
Step 1: Go to Timetable Output.
Step 2: Choose the preferred day to include. For example, we choose Monday.
Step 3: Right click anywhere in Timetable Output and select Include Slot.
Step 4: Click Include all in the Day. This will include all the slots in the selected day.
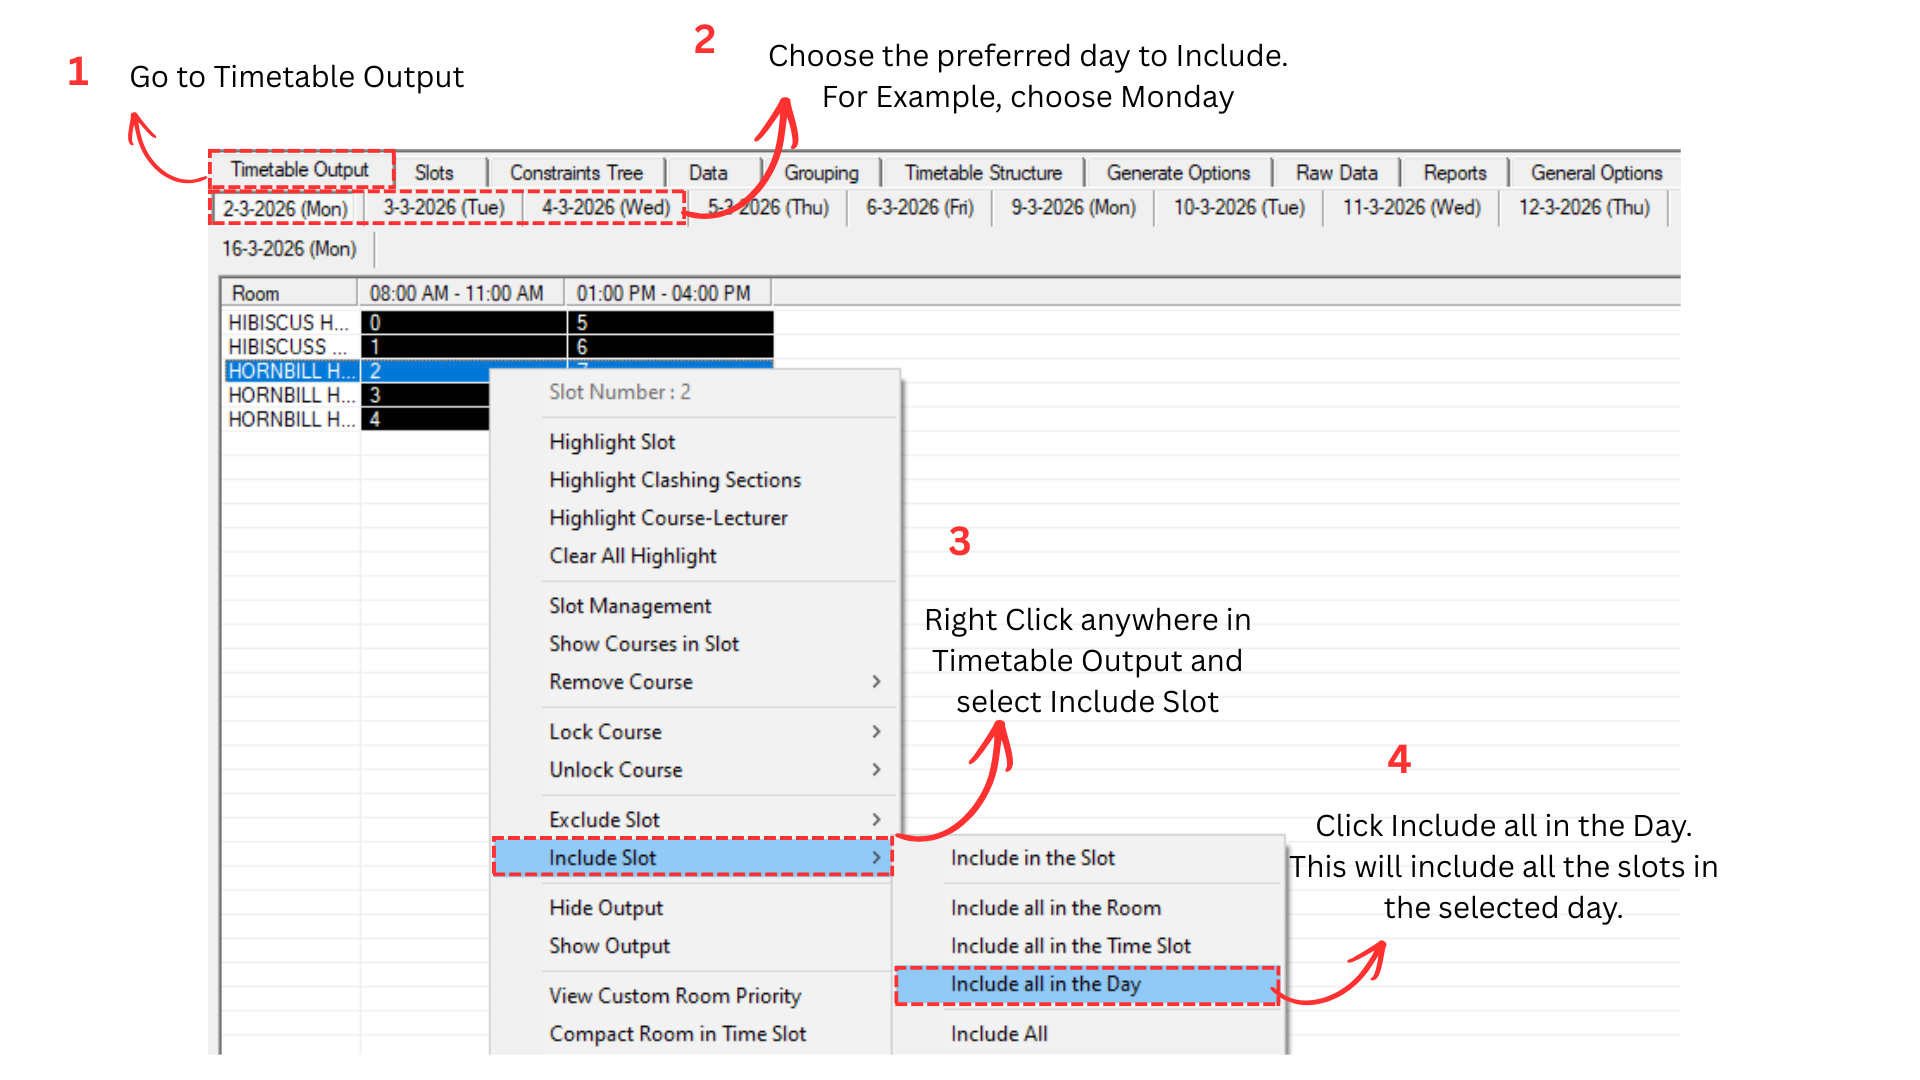
You may do the same steps on the next preferred days. It is recommended to include the first week first so that the first week will be filled with important or big examinations first.
7.3 Generate Courses
Once all constraints and generate options have been set, you can generate the course timetable. There are two ways to generate courses.
7.3.1 Generate Included Courses
This will only generate courses that have been included during the Exclude and Include step. Excluded courses will not be generated. Make sure all your constraints and generate options have been properly configured before proceeding.
There are two ways to start the generation.
Alternative 1: Click on Generate Schedule Icon
Step 1: Look for the Generate Schedule icon
![]() on the toolbar and click on it.
on the toolbar and click on it.

Alternative 2: From Timetable Menu
Step 1: Go to Timetable menu and select Generate Timetable.
Generate Schedule Window
After clicking either option, the Generate Schedule window will appear. You need to configure two settings before generating.
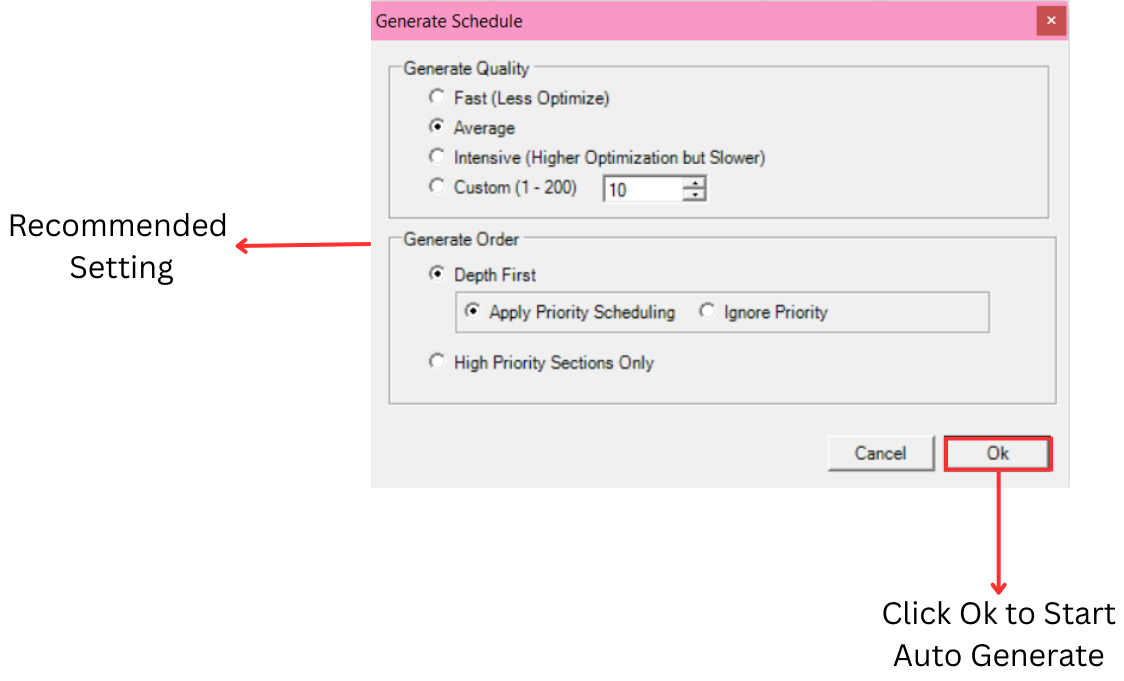
Generate Quality:
This controls how thoroughly the system optimizes the schedule. Higher quality takes more time but produces a better result.
- Fast (Less Optimize) — Generates the schedule quickly with less optimization. Good for quick testing to check if your constraints work correctly before running a full generation.
- Average (Recommended) — A balanced option that provides good optimization within a reasonable time. This is the recommended setting for most cases.
- Intensive (Higher Optimization but Slower) — Spends significantly more time to produce a highly optimized schedule. Use this for the final generation when you want the best possible result. This may take considerably longer depending on the number of courses and constraints.
- Custom — Allows you to set a custom optimization level from 1 to 200. A higher number means more optimization but takes longer to generate.
Generate Order:
This controls how sections are prioritized during the generation process.
- Depth First (Apply Priority Scheduling) — Generates sections based on the priority order you have set in the constraints. Sections with higher priority will be scheduled first.
- Depth First (Ignore Priority) — Generates sections in depth-first order but ignores any priority settings. All sections are treated equally.
- High Priority Sections Only — Only generates sections that have been marked as high priority in the Constraints Tree. Other sections will be skipped. This is useful when you want to regenerate only specific important sections without affecting the rest of the schedule.
Step 2: Select your preferred Generate Quality and Generate Order, then click OK to start the auto generation.
Same Day Ratio
After the generation is complete, a Same Day Ratio popup will appear. This shows the ratio and percentage of students who have exams on the same day.
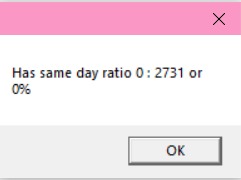
The same day ratio indicates how many students have more than one exam scheduled on the same day. A lower percentage is better. For example, 133 : 1950 or 7% means 133 out of 1950 students have at least two exams on the same day.
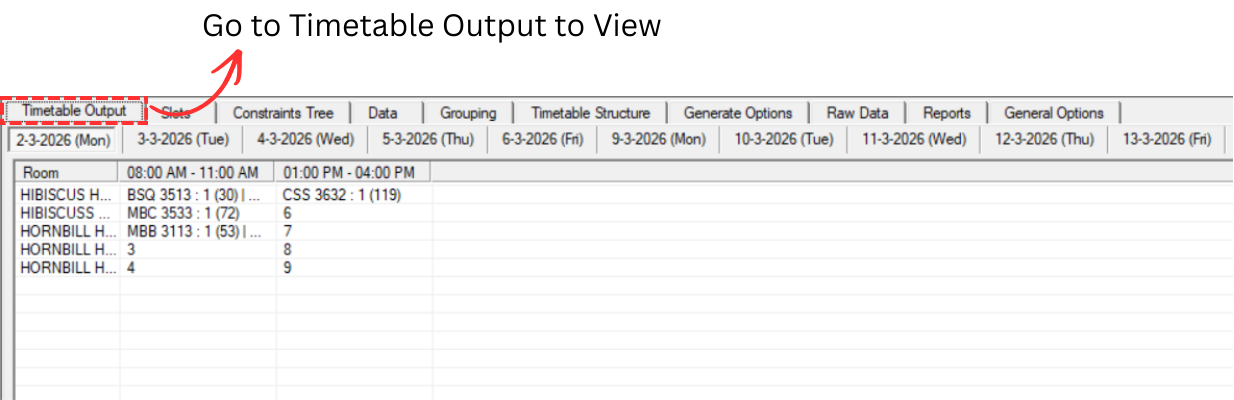
View Generated Courses at Timetable Output
Step 3: After the generation is complete, you can view the generated courses at the Timetable Output panel. This shows all the courses that have been scheduled into their assigned time slots and rooms.
Lock Courses
Step 4: After reviewing the generated timetable, you should lock the courses to prevent them from being moved or changed when generating the remaining courses. To lock, right click on the timetable and select Lock Course → Lock all in Timetable.
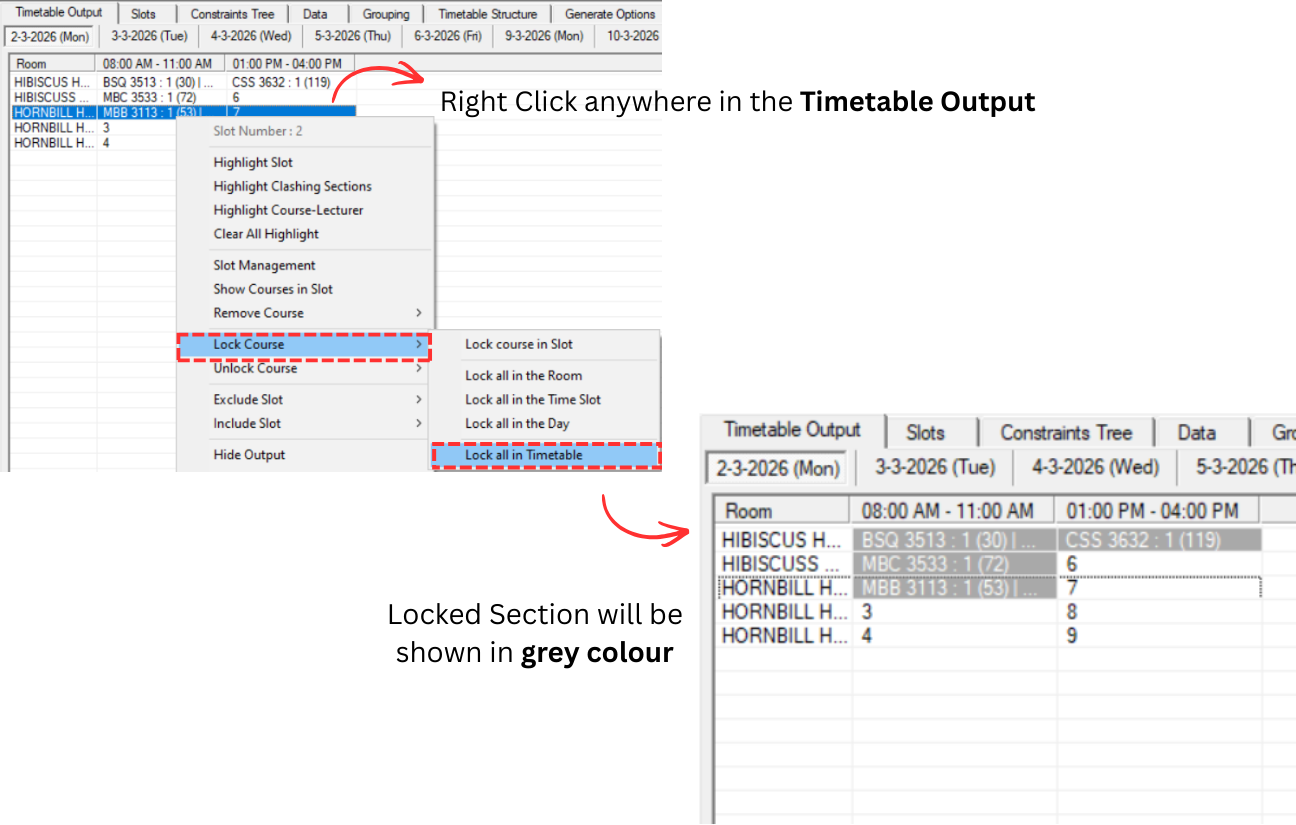
Locked sections are shown in grey colour on the timetable. This indicates that these sections are fixed and will not be affected by subsequent generation.
7.3.2 Generate All Courses
Now you may generate all other courses into the Timetable Output. This includes the courses that were previously excluded. There are 3 simple steps to do so.
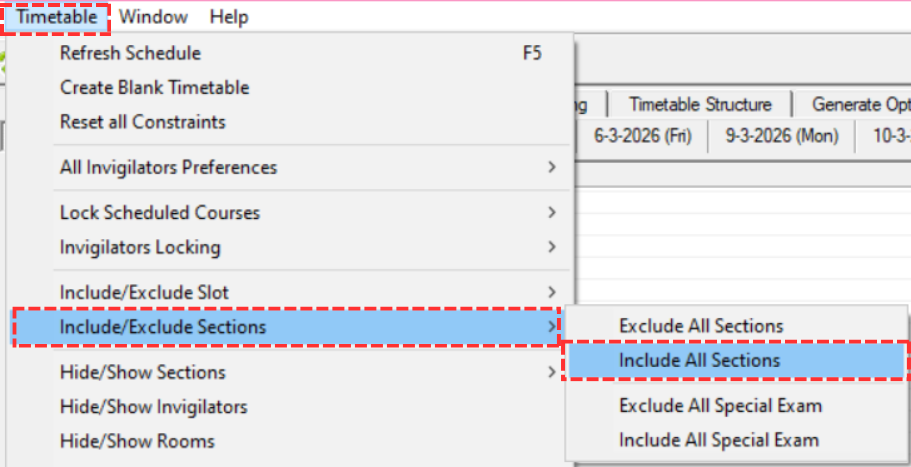
Step 1: You need to Include All Sections first. Go to Timetable menu → Include/Exclude Sections → Include All Sections. This will include all previously excluded sections so they can be generated.
Step 2: Once you are done with Include All Sections, you might want to include more slots after that. You may include the second week's slot now. Refer to Include Preferred Slot (Section 7.2.4) for how to include additional slots.
Step 3: You may now generate the schedule as usual. Refer to Generate Included Courses above for the generation steps.
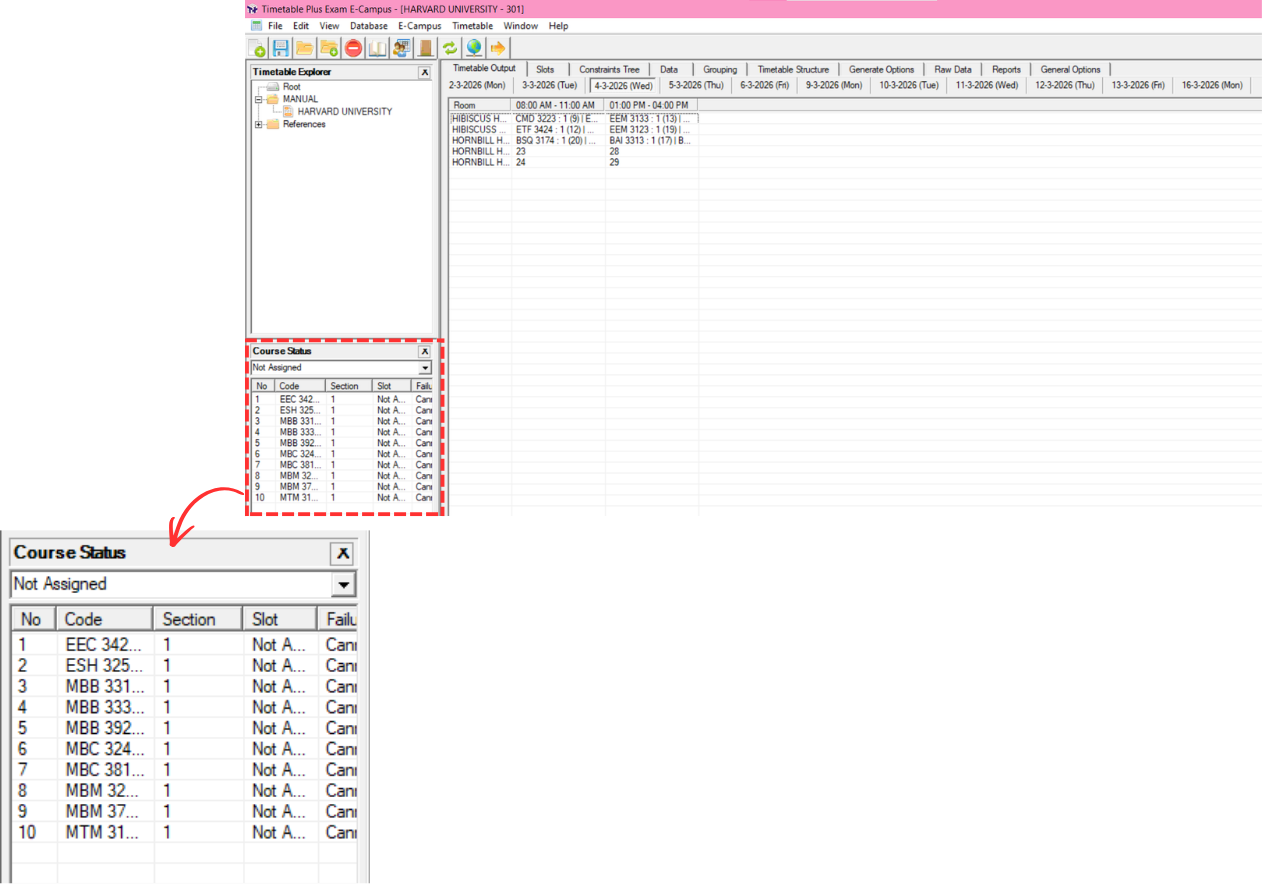
Once the schedule is generated, you might encounter some sections not being assigned into any slot. This can happen when there are not enough available time slots or rooms to accommodate all sections.
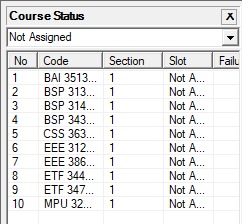
To check which sections are not assigned, look at the Course Status panel. Select Not Assigned from the dropdown to view the list of unassigned sections.
Optional Steps to Resolve Unassigned Sections
There are 2 optional steps you may do to ensure all sections are slotted in.
Optional Step 1: You may now include the slot day by day and keep on generating the schedule until all sections are slotted in. This means you gradually open up more time slots and regenerate each time until every section has a place.
Optional Step 2: If you have already included all slots in the Timetable Output and some sections are still not assigned, you may change the Clashing Section value to -1 at Course's Generate Option. Setting it to -1 means the system will allow clashing — students may have more than one exam scheduled on the same day.
7.4 Analyze & Edit Courses
After generating courses, review and verify the results before proceeding to invigilator assignment. You can analyze the generated timetable and make manual adjustments if needed.
7.4.1 Analysis
Review the generated course timetable at the following locations:
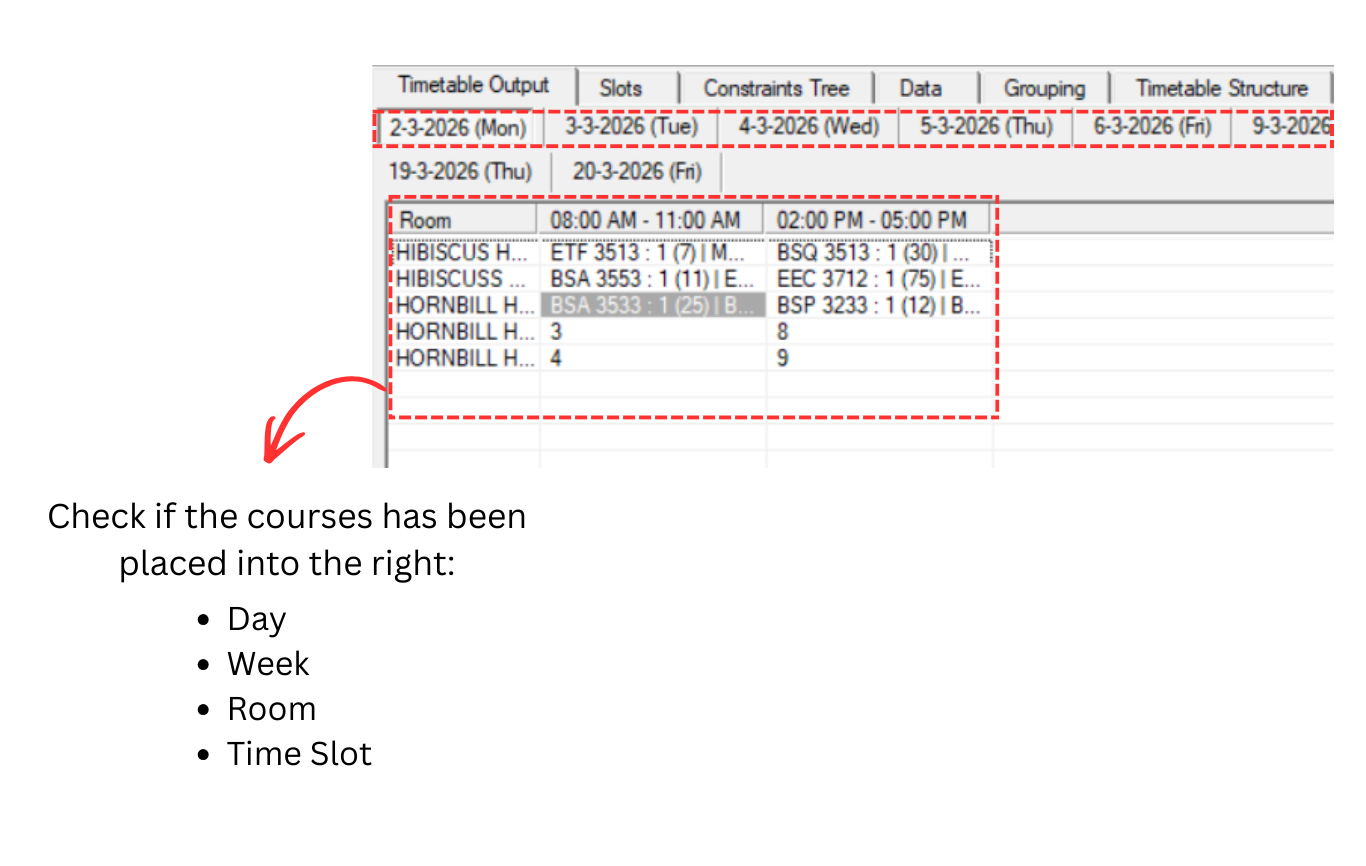
Timetable Output
You may analyze the timetable output to check if the exam courses have been placed into the right slot. Verify that the courses have been placed into the correct:
- Day
- Week
- Room
- Time Slot
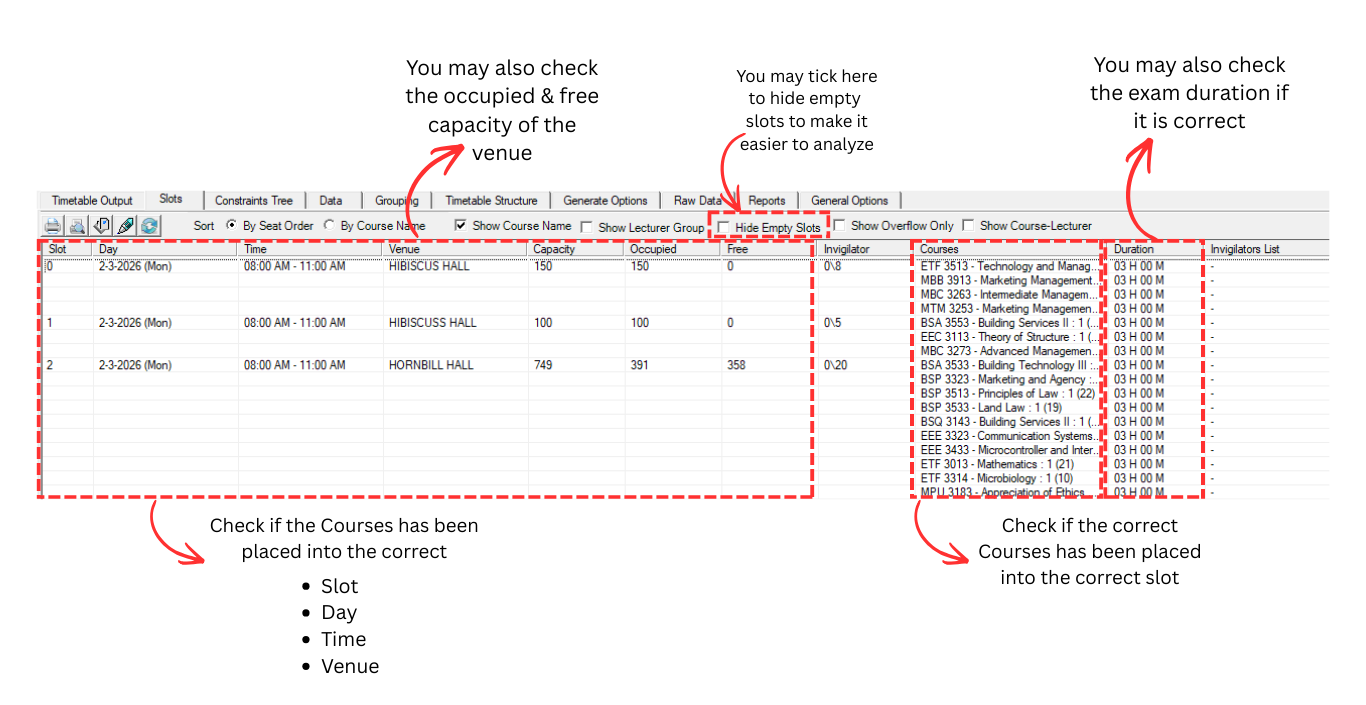
Slot
You may also analyze the generated courses by clicking on each Slot. This allows you to verify the details of each slot, including:
- Courses assigned to the slot
- Day and Time
- Venue
- Occupied and Free Capacity
- Exam Duration
You can also hide empty slots to focus only on slots that have courses assigned to them.
From the Slot panel, you can access Print Preview and Design Print List to customize and print the slot details.
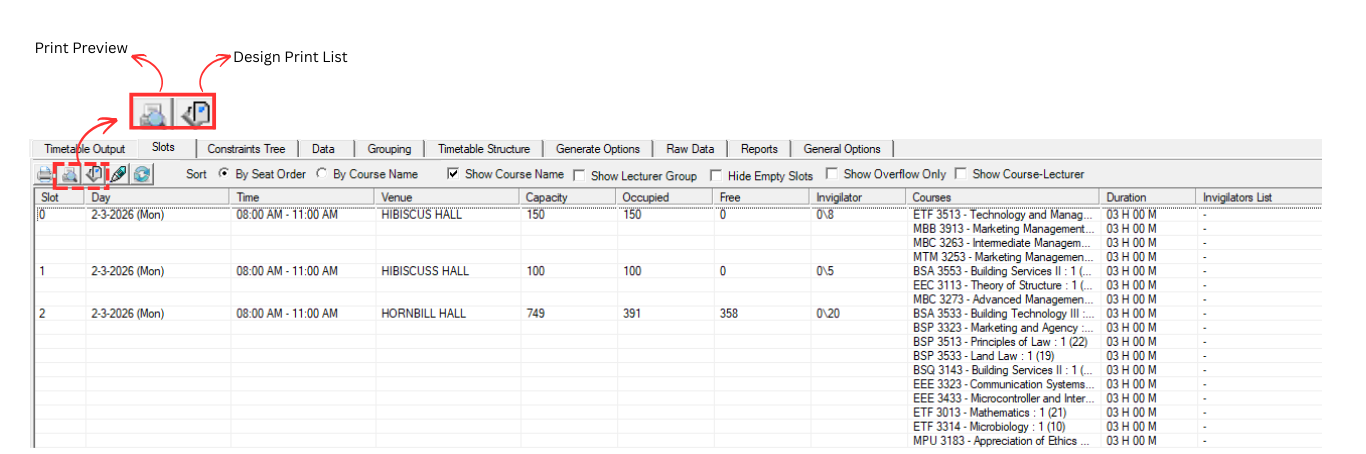
To design, click on Design Print List icon ![]() . Refer to the diagram below for the explanation.
. Refer to the diagram below for the explanation.
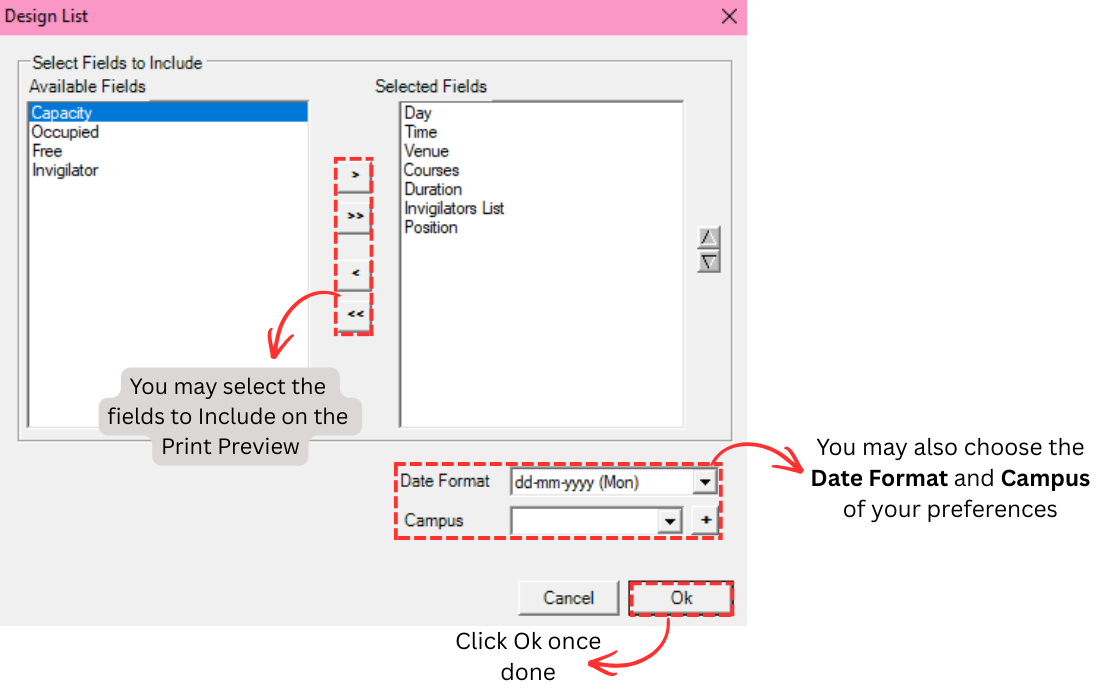
| > | Move ONE Field to the right |
| >> | Move All Fields to the right |
| < | Move ONE Field to the left |
| << | Move All Fields to the left |
Click the ![]() Print Preview button. Print Preview Option window will appear.
Print Preview button. Print Preview Option window will appear.
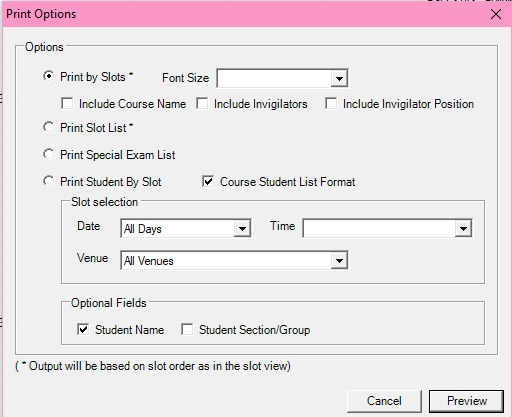
- You may choose to Print By Slot, Print Slot List, Print Special Exam List or Print Student by Slot.
- If you choose to Print By Slot, you may choose the Font Size and choose to Include Course Name, Invigilator or Invigilator Position.
- If you choose to Print Student By Slot, you may choose the Slot Selection and Optional Fields to include in the Print Preview.
Once done, click Preview. ![]()
Course List
You may analyze the Course List to know if the exam courses has been placed into the right slot.
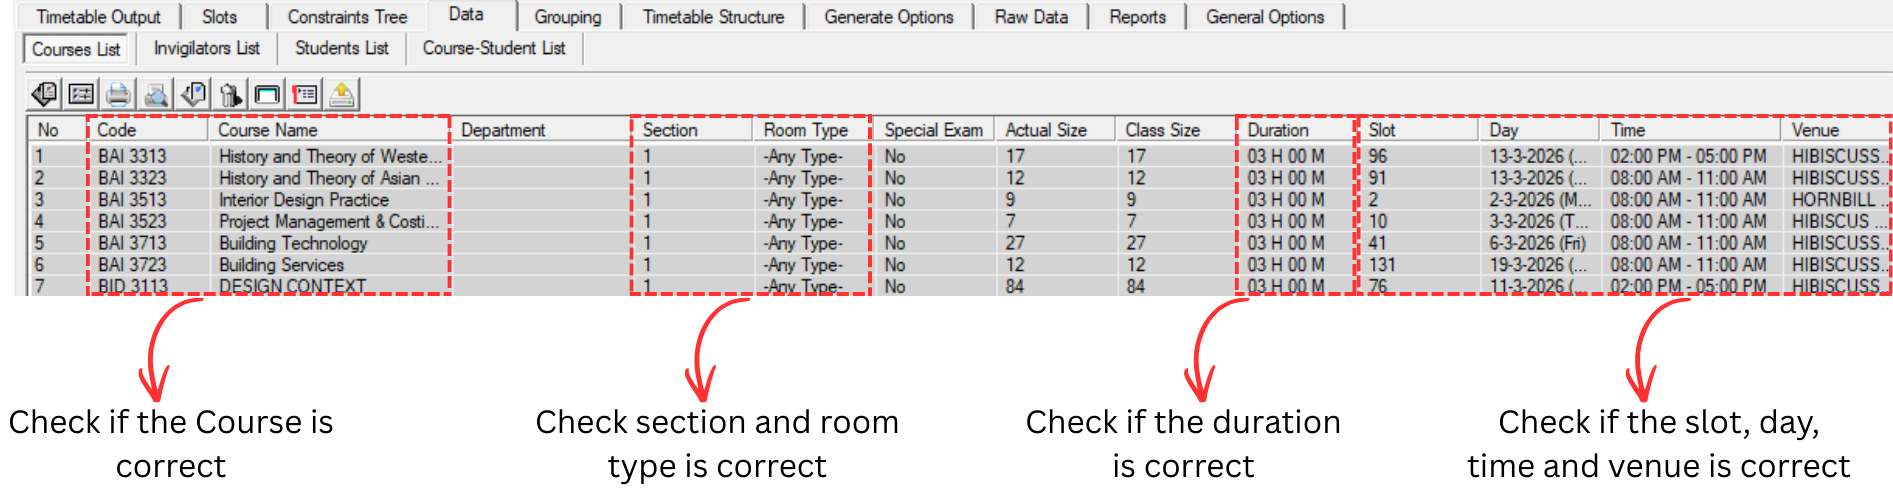
To edit, you may refer to the 7.4.2 Editing Courses.
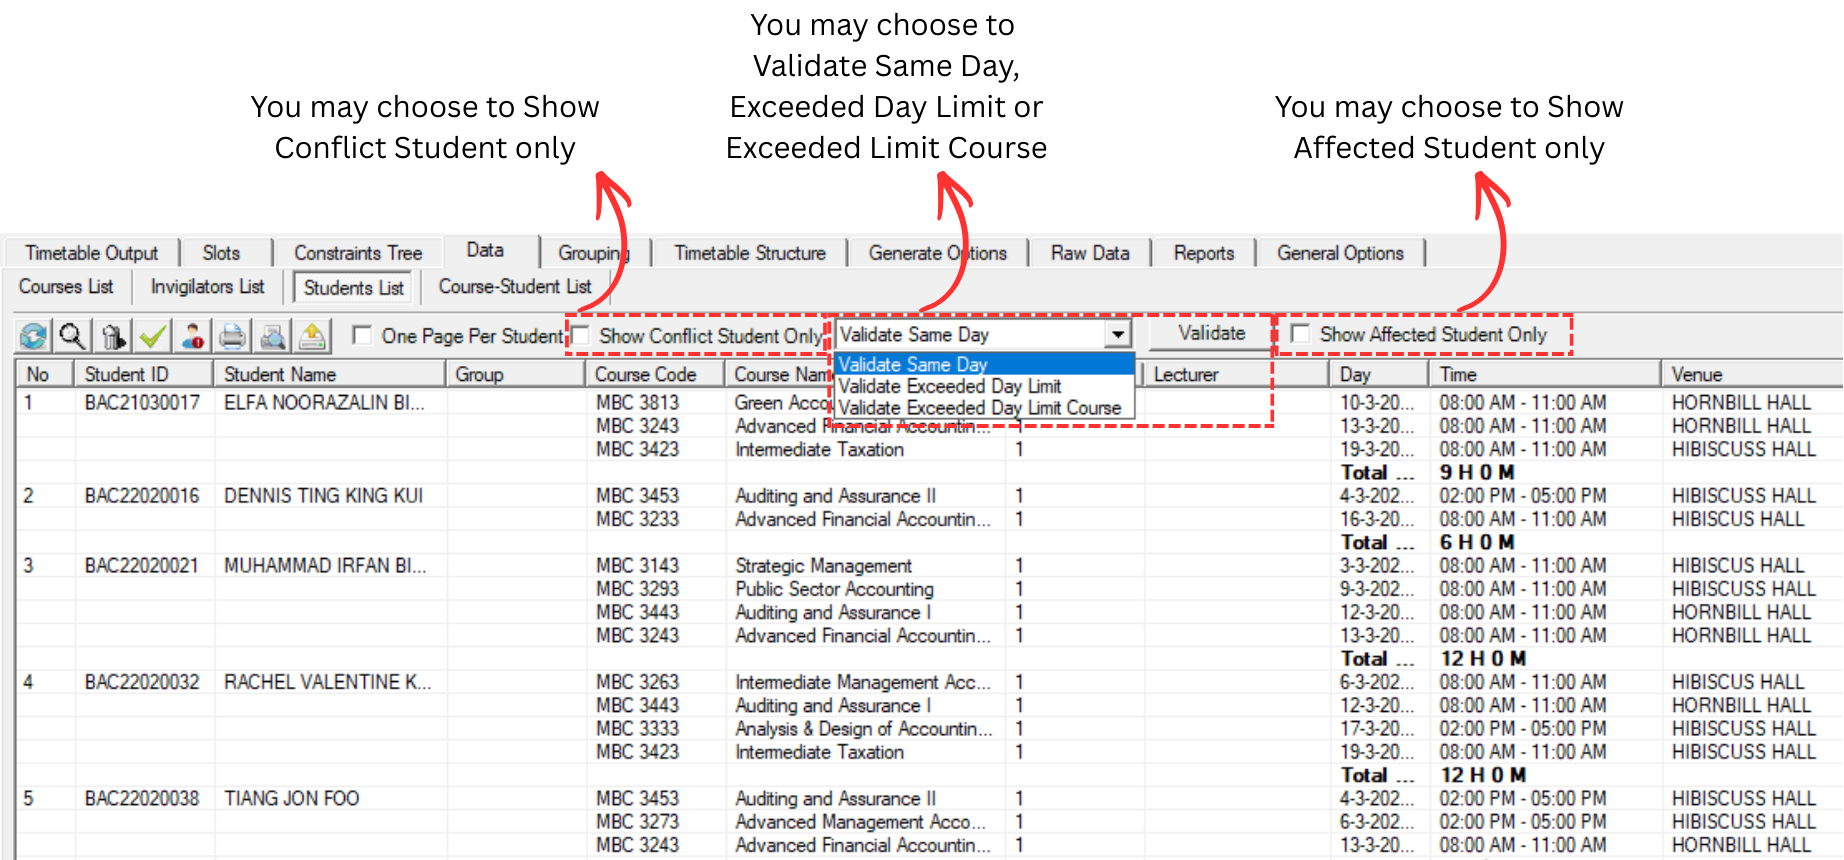
Student List
In Student List, you may analyze student based on your preference option. Refer to the diagram below.
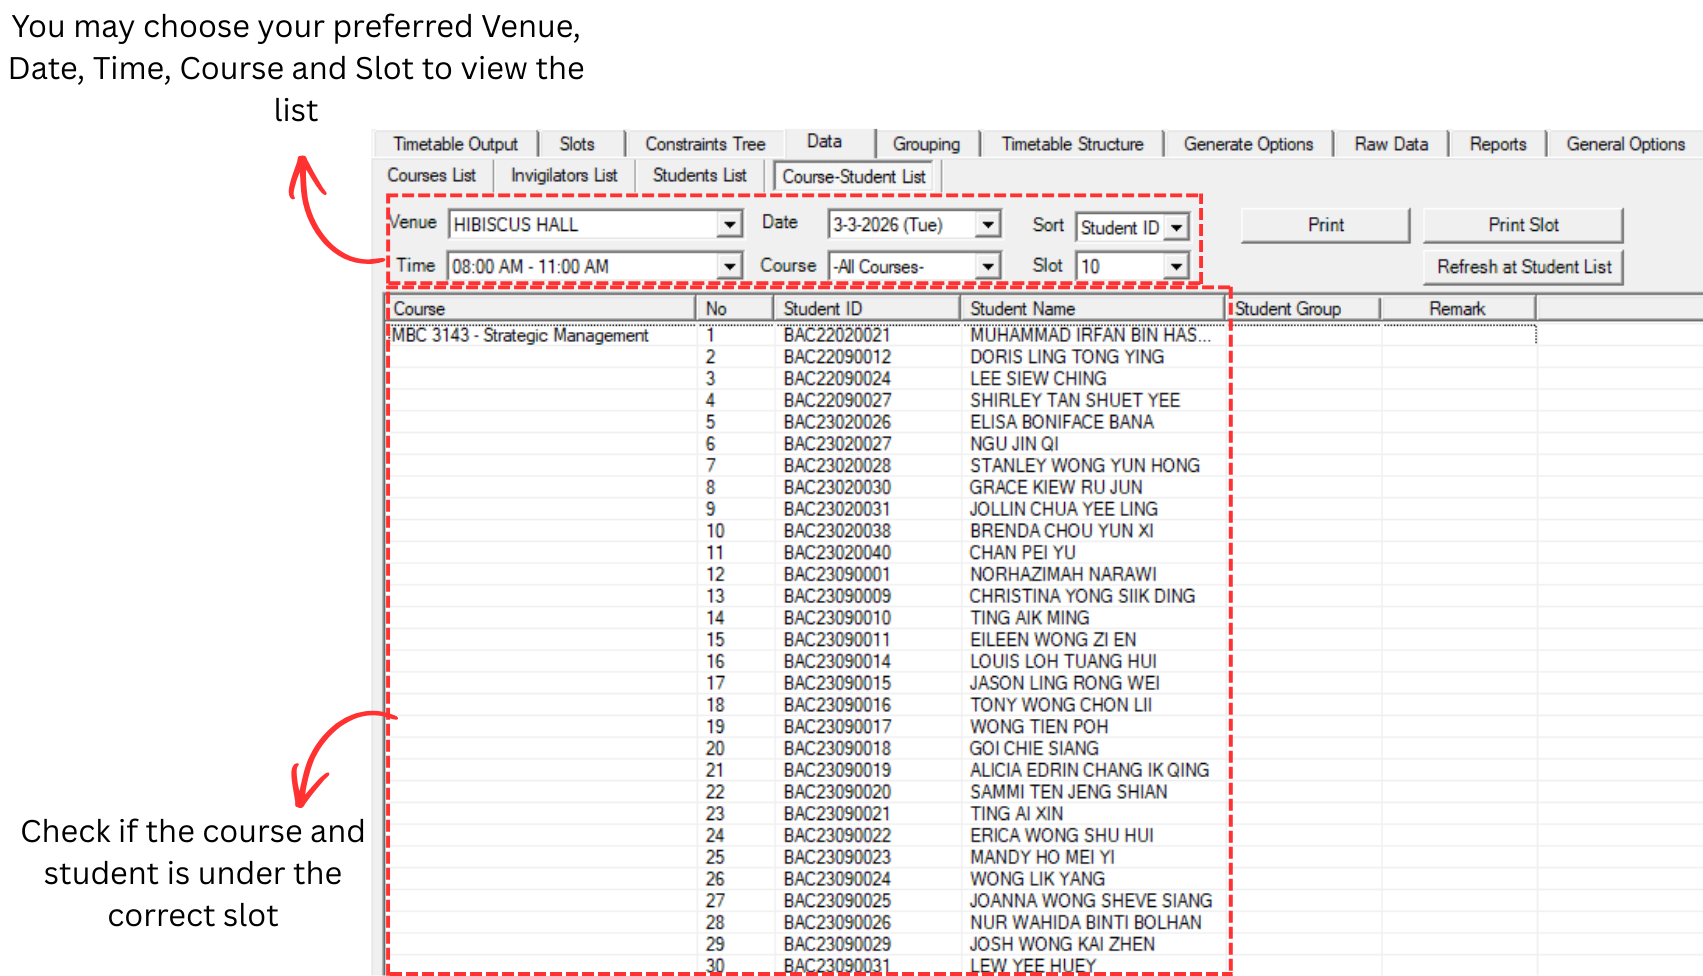
Course-Student List
In Course-Student List, you may analyze Course-Student List to know if the exam courses has been placed into the right slot.
To edit, you may refer to the 7.4.2 Editing Courses.
7.4.2 Editing Courses
Remove Course from Slot
Upon Analysis, unsatisfied slot assignment can be removed by using the Remove Section Slot Assignment function at the Right-Click Function. Here are a few locations to remove section in the slot which is:
- Timetable Output
- Tree Structure
- Course List
Note that, if the section is locked, please unlock first before remove in the slot.
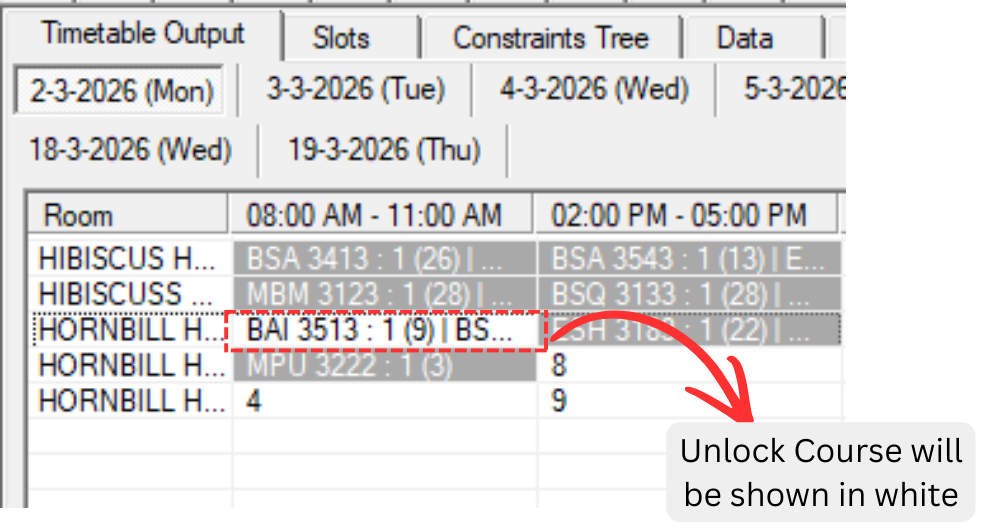
To unlock, right click on the slot you want to unlock and select Unlock Course → Unlock course in Slot.
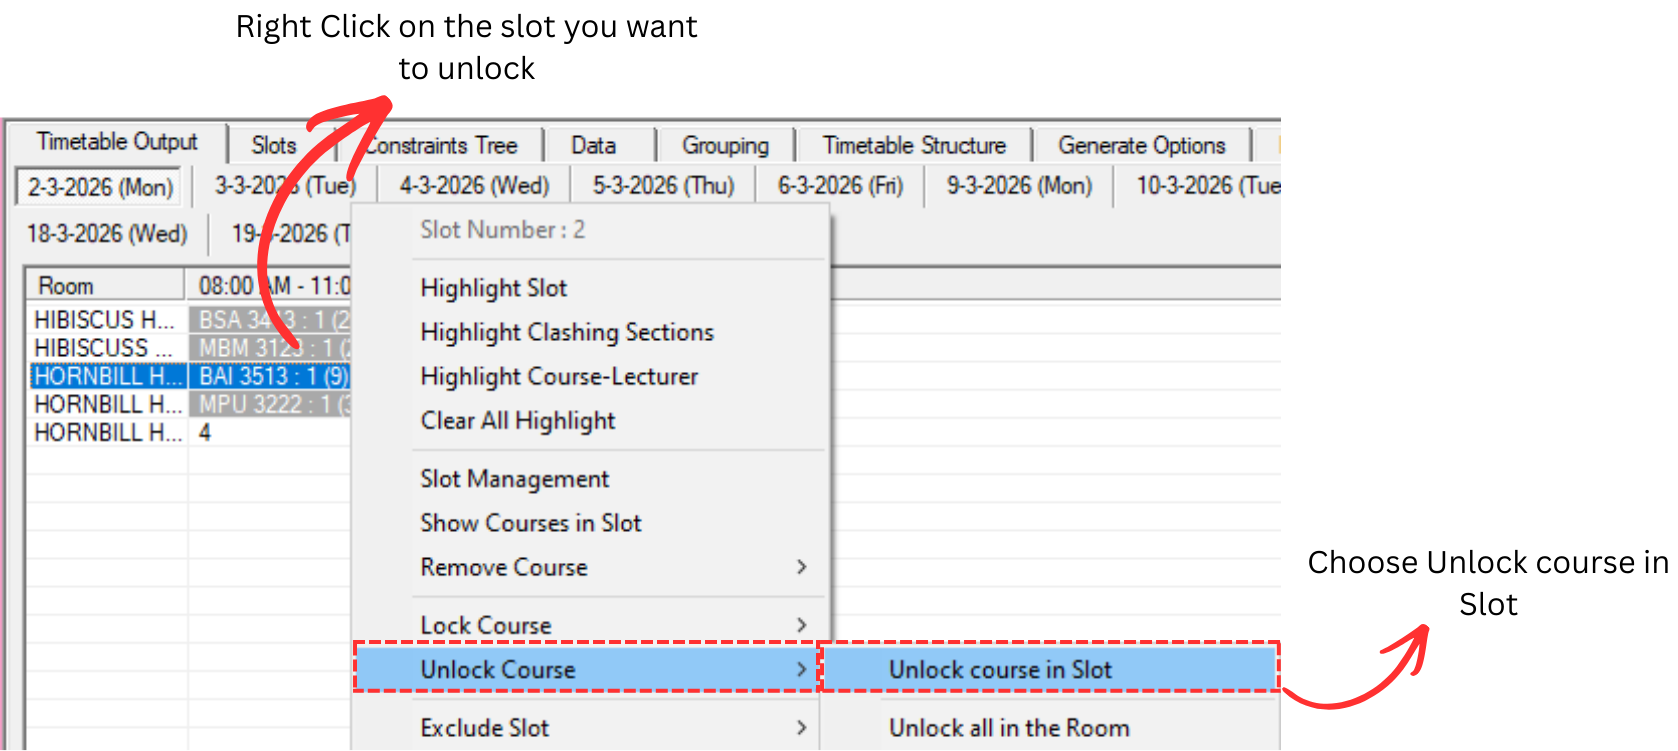
The unlocked course will be shown in white on the Timetable Output.
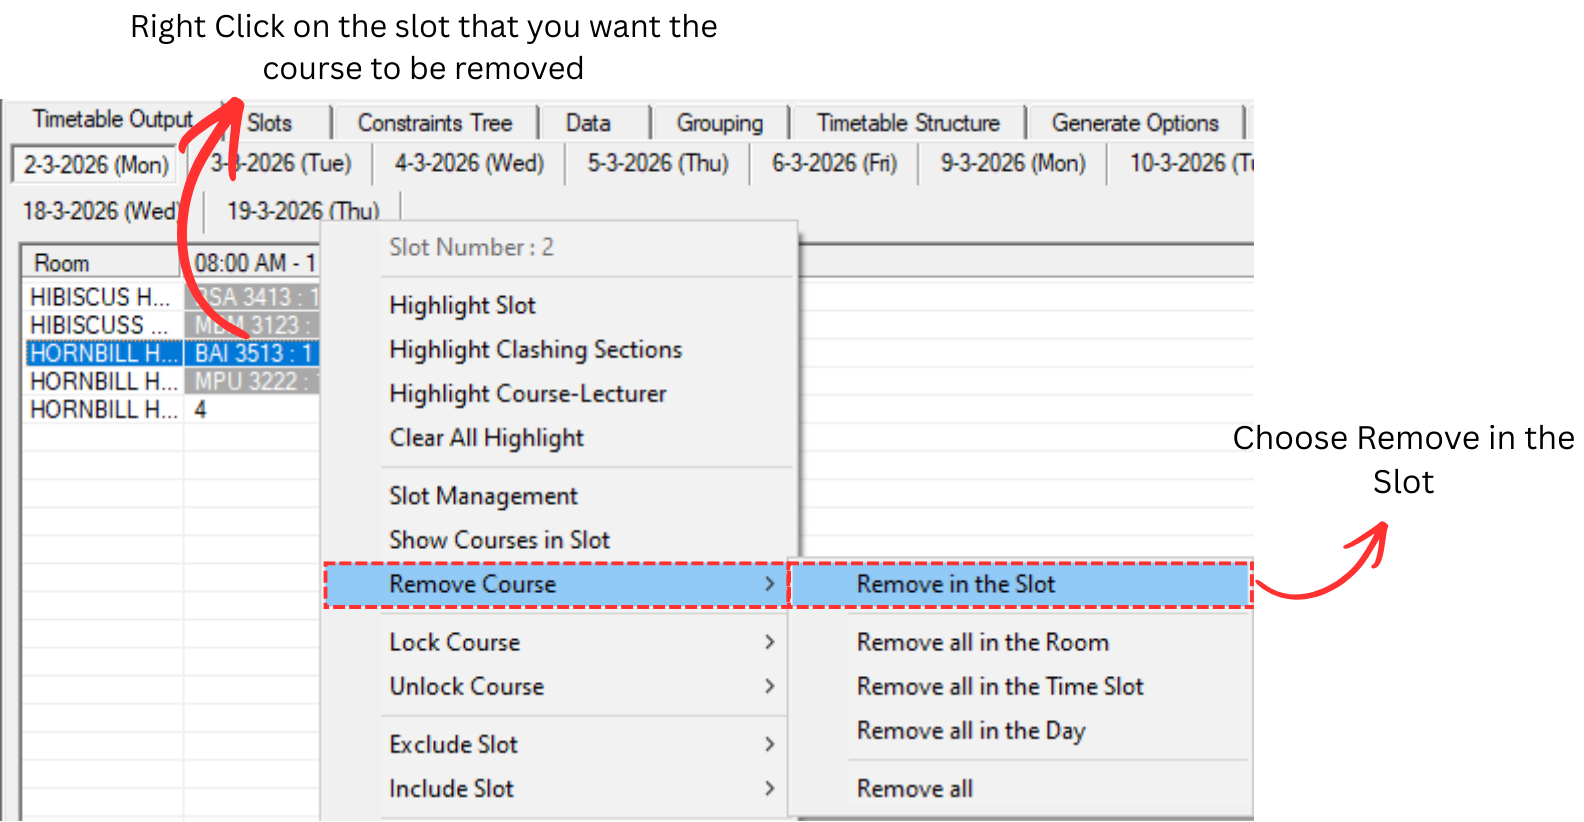
1. Remove from Timetable Output
Right click on the slot that you want the course to be removed and select Remove Course → Remove in the Slot.
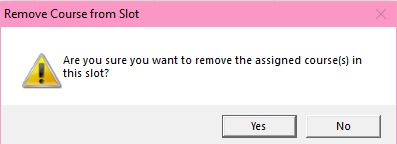
A confirmation popup message will appear. Click Yes to proceed with the removal.
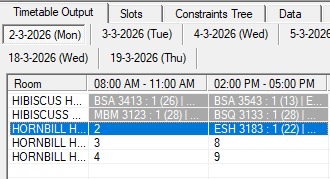
The course will be removed from the slot and the timetable will be updated accordingly.
2. Remove Course at Tree Structure
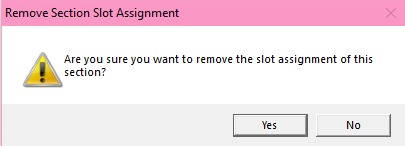
Right click on the section and select Remove Section Slot Assignment.
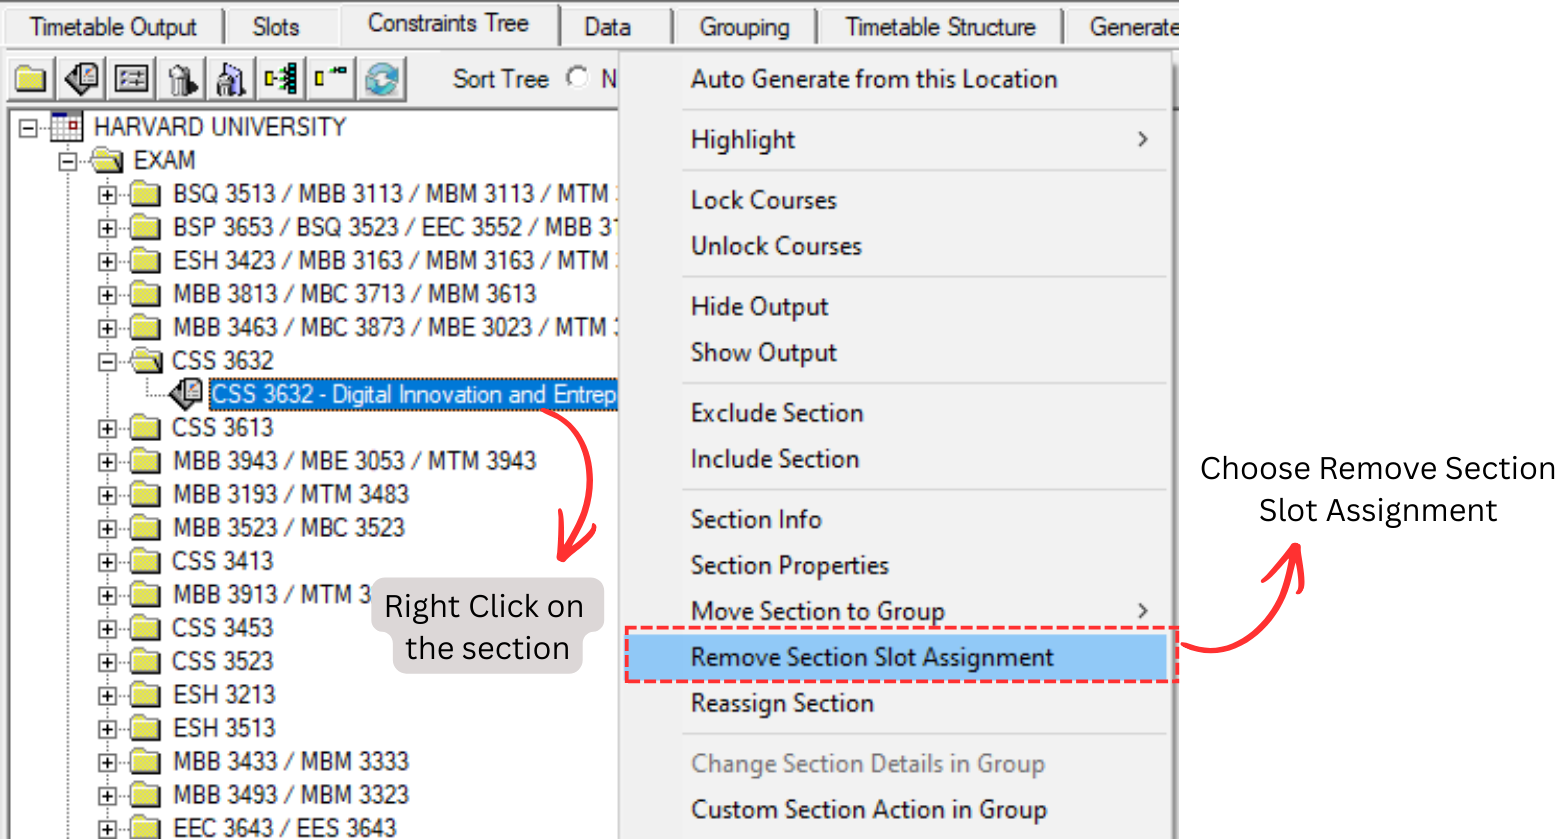
Note that, if you remove the section on the folder instead of the section itself, the entire sections under the folder will be removed from the slot as well.
A confirmation popup message will appear. Click Yes to confirm the removal.
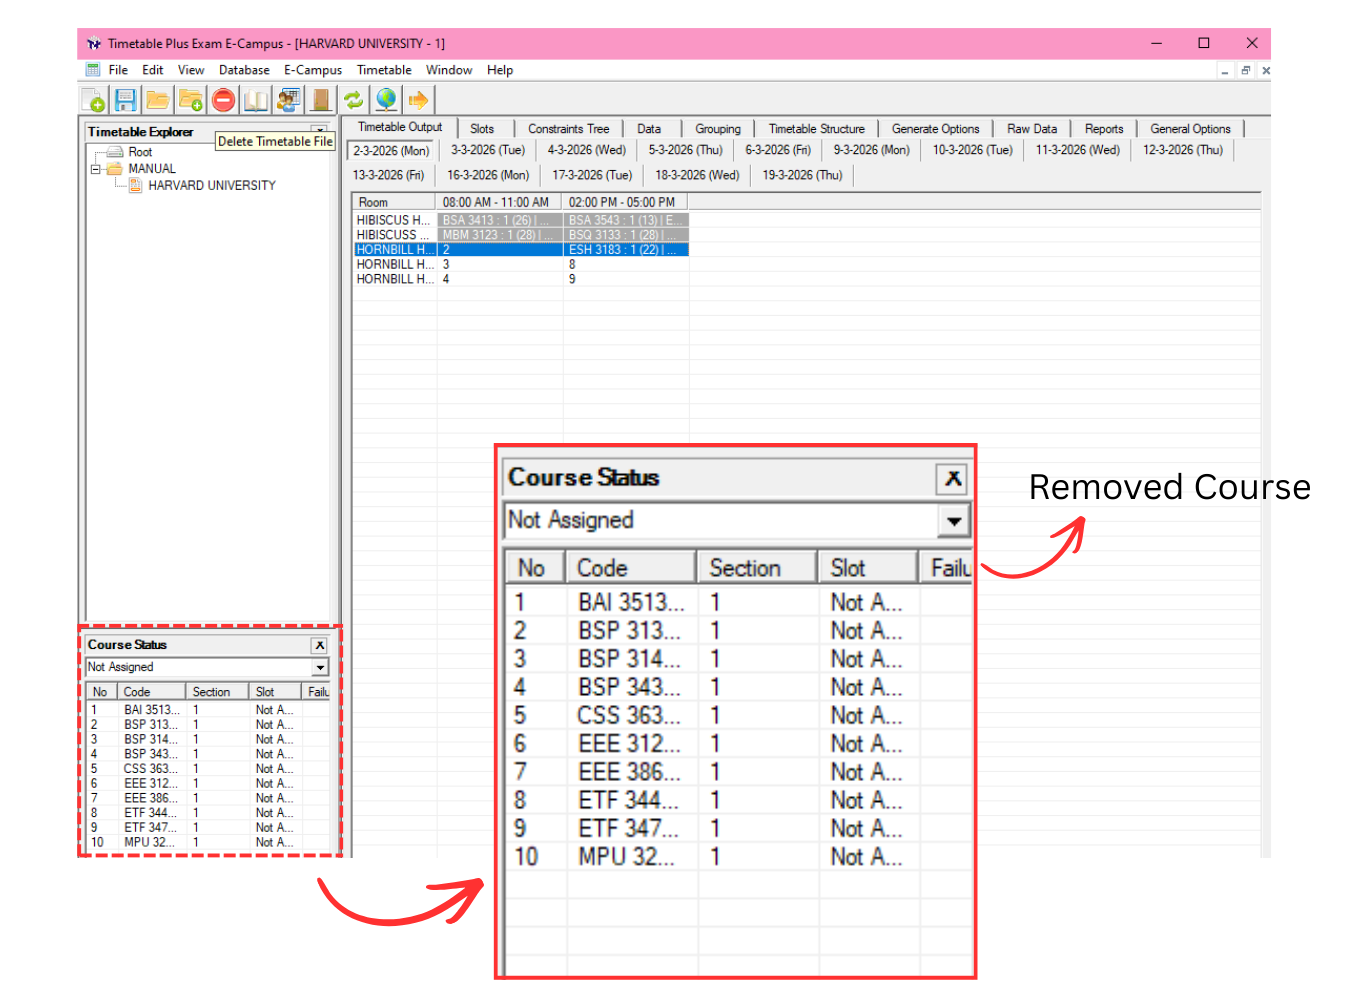
The removed courses will appear under the Course Status window with a Not Assigned status.
3. Remove Course at Course List
Right click on the section under the course and select Remove Slot Assignment → Selected Section.
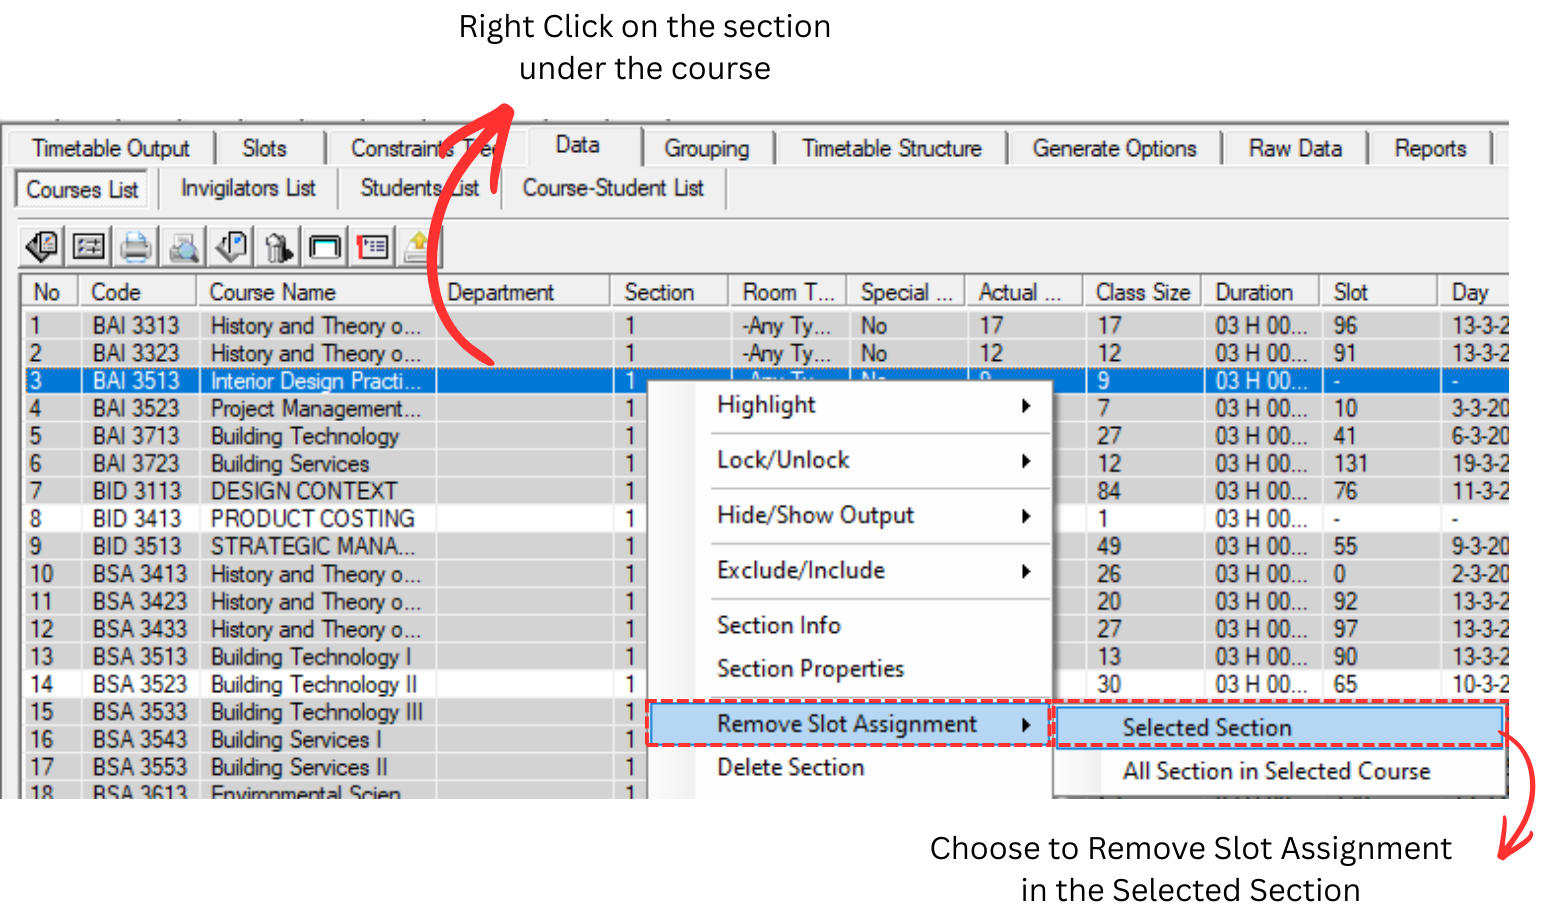
Note that, if you choose All Section in Selected Course, all sections under the course will be removed from the slot.
Locate & Highlight Course
Once you have removed the course from the slot, you may view them at the Course Status under Not Assigned.
Before we allocate the section into the slot, we need to locate the section at tree so that we will be able to highlight same time and clashing section.
To Locate, right click the section under Course Status and click Locate Section → At Tree.
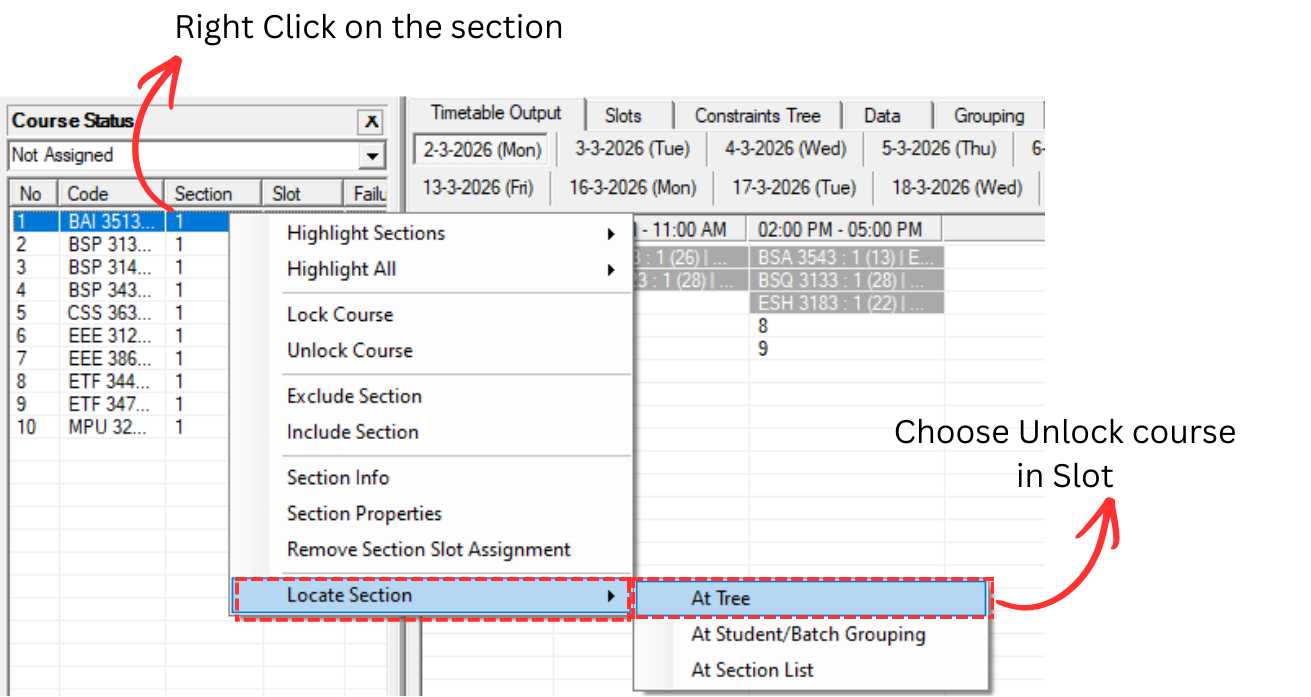
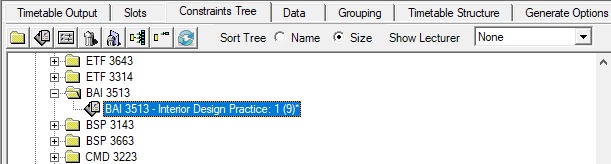
This will bring you to Constraints Tree.
Note that, it is recommended to highlight the folder at Constraints Tree so you will be able to know same time and clashing section.
To highlight, right click on the folder and select Highlight → Highlight Same time and Clashing Sections.
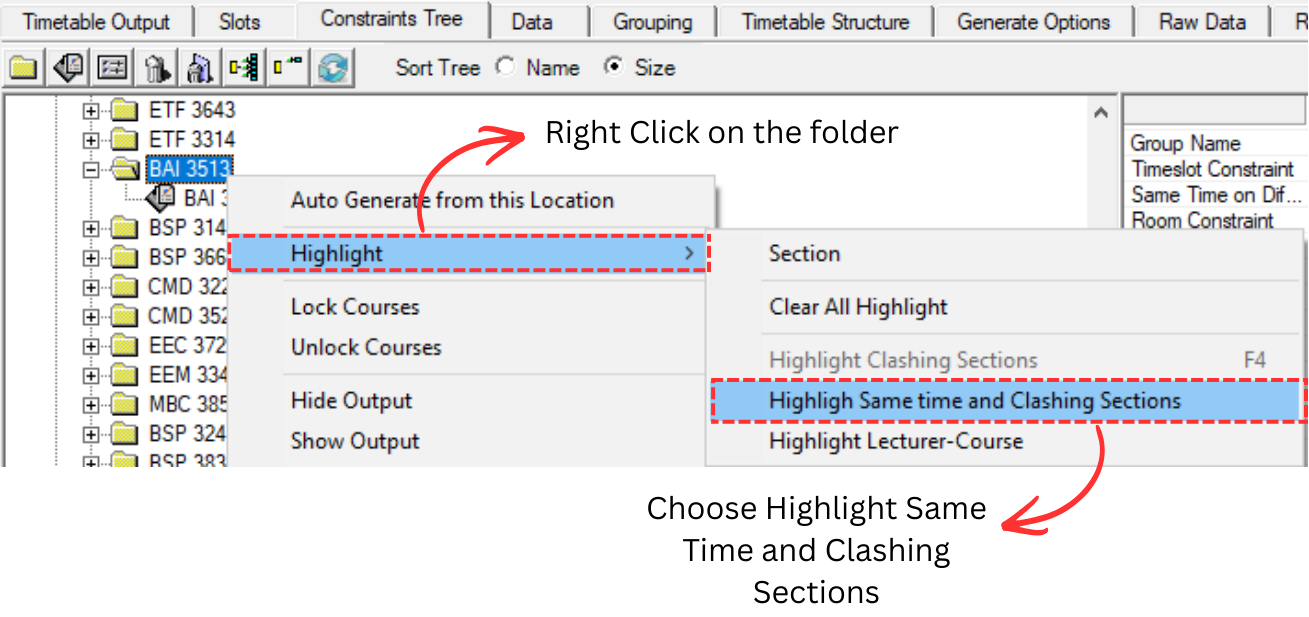
Once clicked, you will be able to see the highlight right away at the Constraints Tree and also Timetable Output.
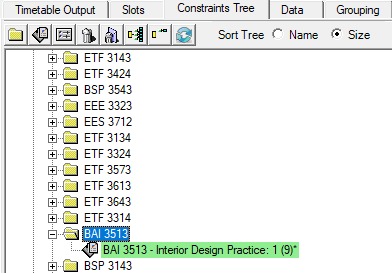
- Same Time Section — sections that are scheduled at the same time slot.
- Clashing Section — sections that have student conflicts with the selected course.
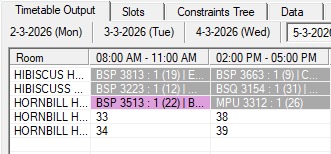
The purpose of highlighting is to identify free slots when you want to manually allocate a course. Slots with no color indicate that the slot is available and the course can be safely placed there without any time or student conflicts.
Manually Allocate Course into the Slot
To allocate course into the slot, you may want to select a slot with no clashing section.
When you found one, you can simply double click the slot and insert the course. Refer to the diagram below.
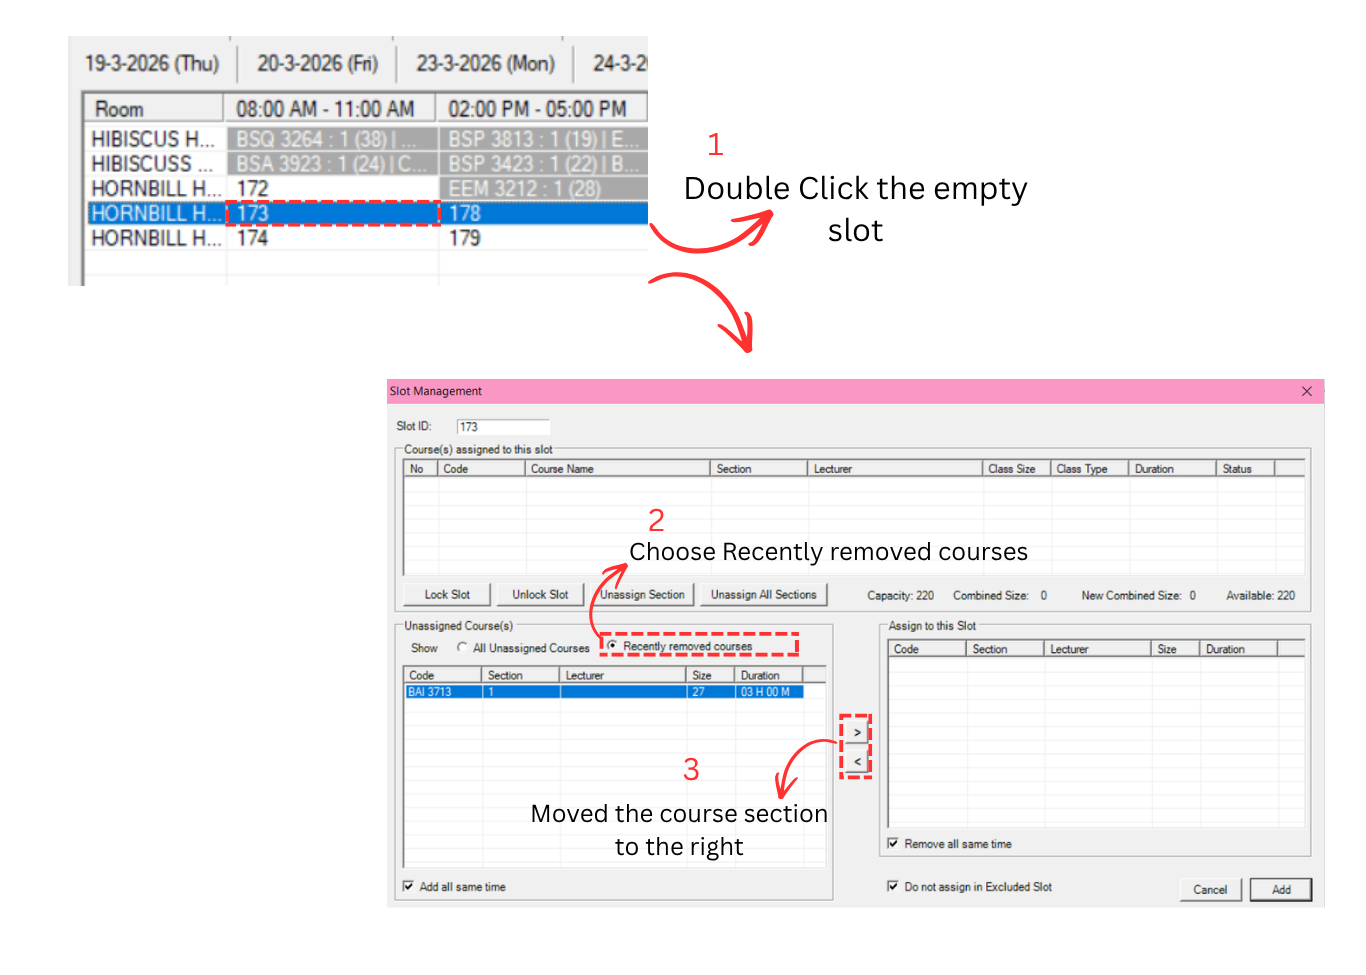
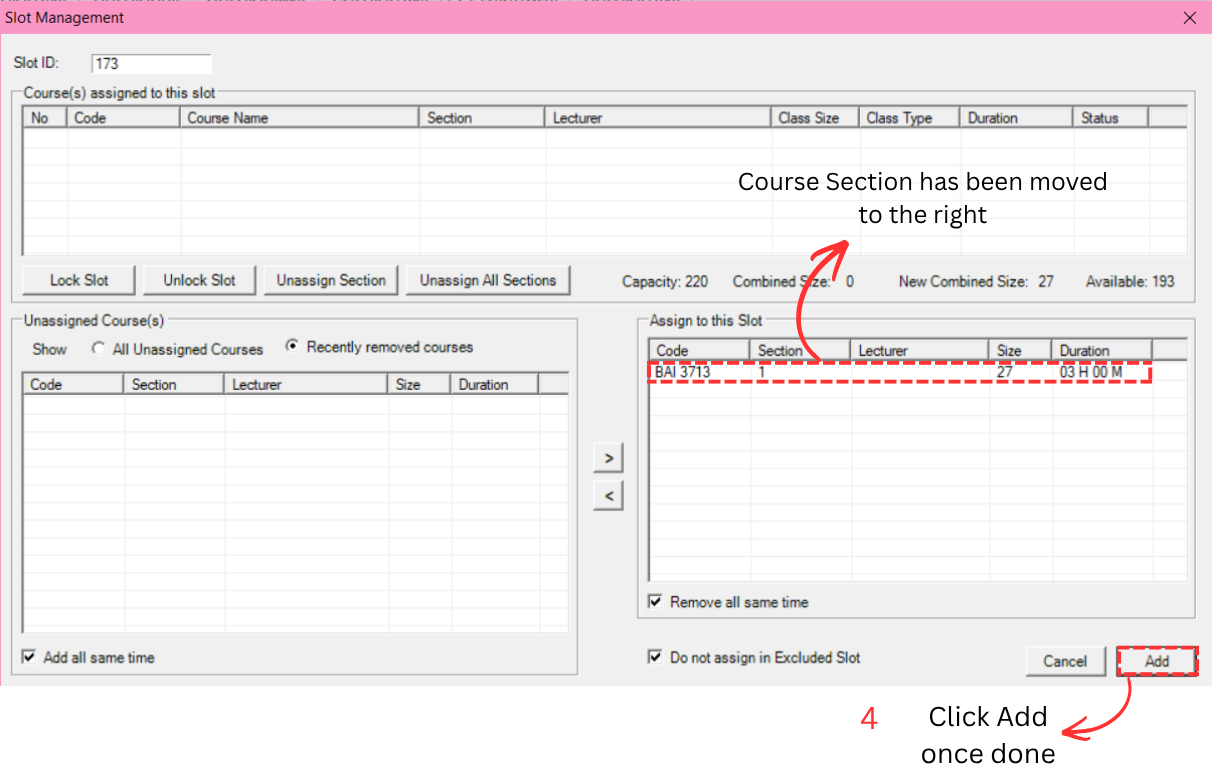
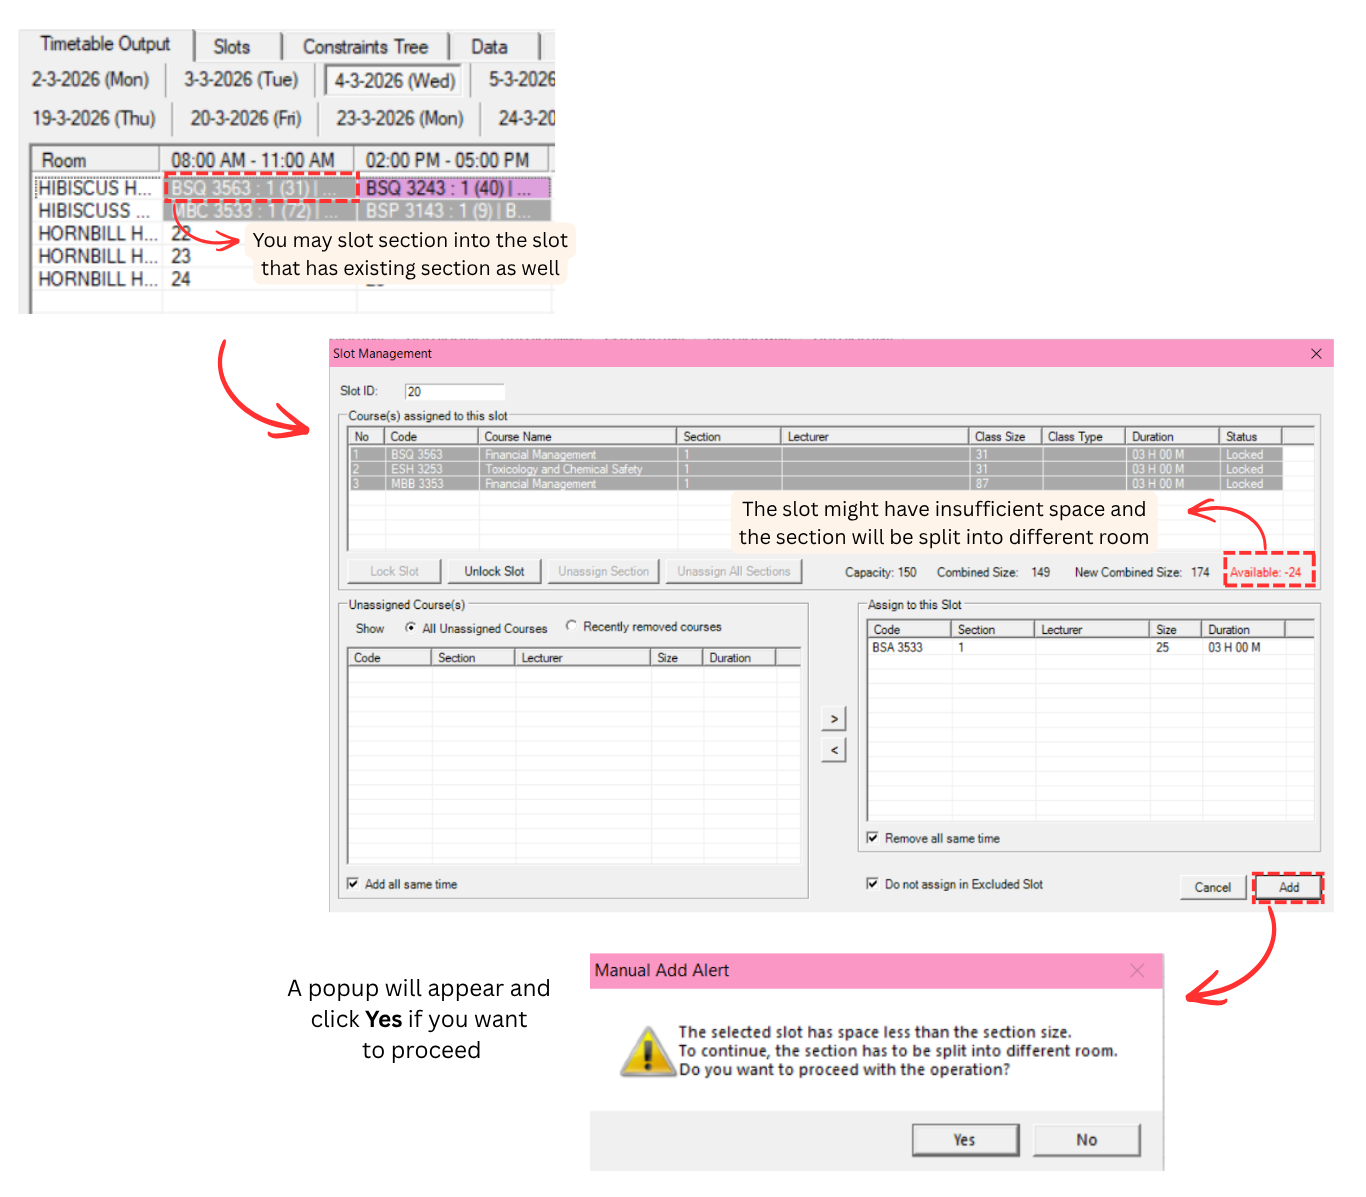
ADDITIONAL NOTE: You may also slot the section into the existing slot as long as there is no clashing section. This steps usually used to ensure all venues for examination are being filled perfectly.
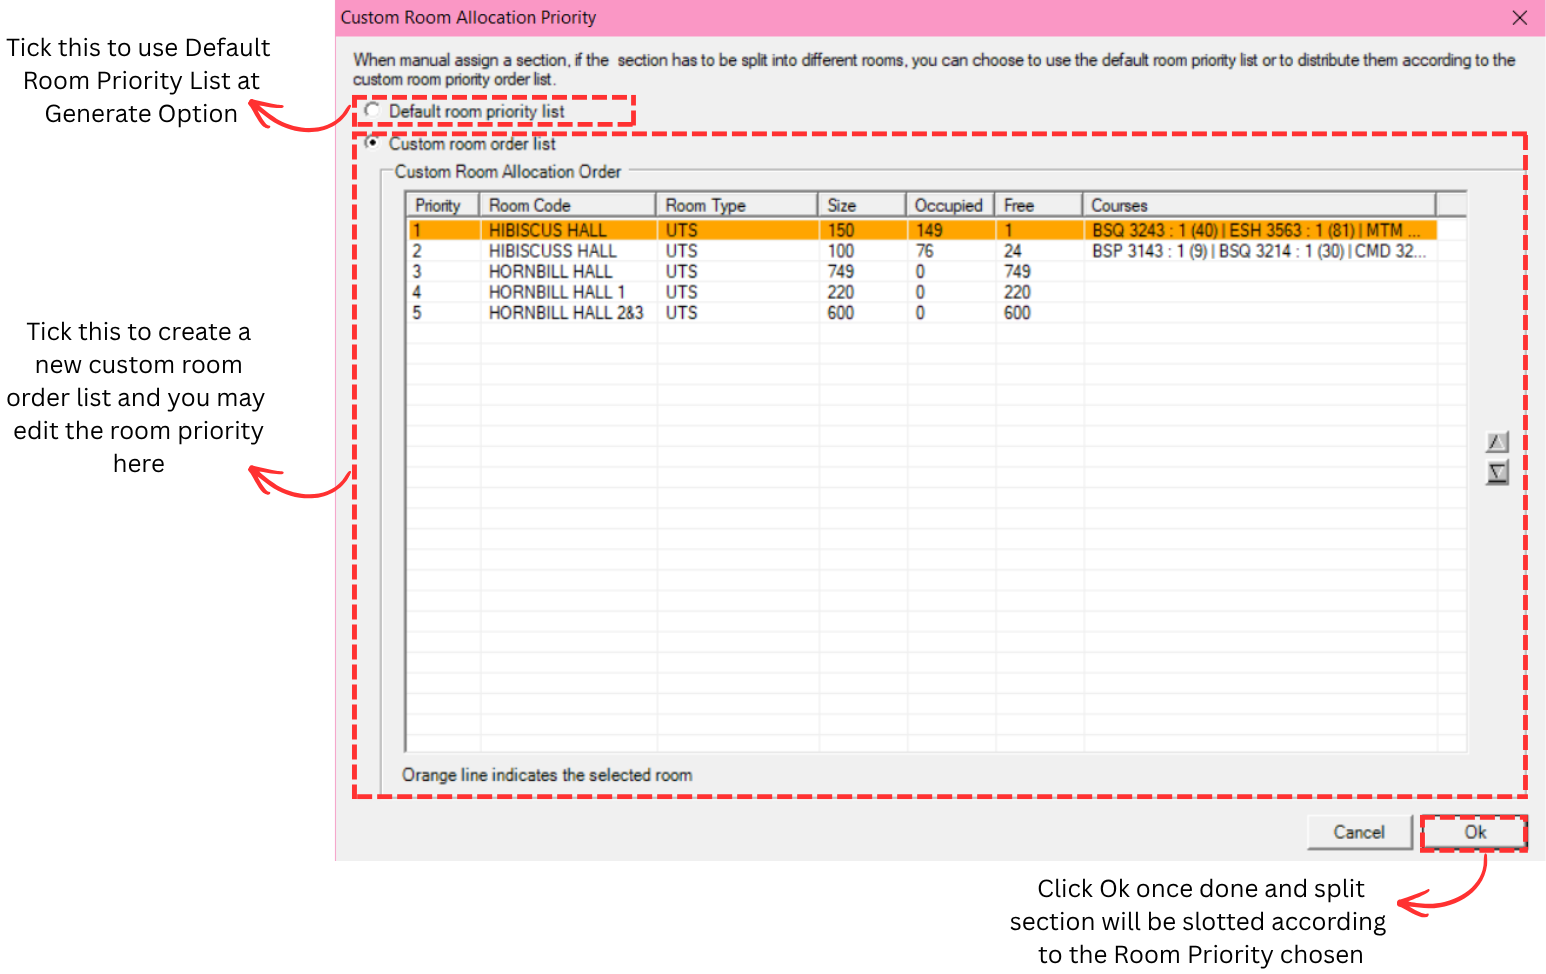
The slot might have insufficient space and the section will be split into different room. A popup will appear and click Yes if you want to proceed.
If you click Yes, another popup will appear asking for the split section to be slotted in room according to the previous Room Priority or a new one.